
PHP Proxy Server: How to Set Up Proxies in PHP
{ "@context": "https://schema.org", "@type": "HowTo", "name": "Setting Up a PHP Proxy Server for Web Scraping", "description": "Discover how to configure a PHP proxy server to enhance your web scraping efforts, ensuring anonymity, security, and the ability to bypass geoblocking and IP bans. This guide offers a step-by-step tutorial on setting up Apache as a proxy server, integrating proxy settings in PHP code, and utilizing the Bright Data proxy service for optimal web scraping performance.", "step": [ { "@type": "HowToStep", "name": "Understand the Role of Proxy Servers", "text": "Learn how proxy servers act as intermediaries to improve security, privacy, and performance by managing web requests and concealing the user's IP address." }, { "@type": "HowToStep", "name": "Set Up Apache as a Proxy Server", "text": "Enable Apache modules like mod_proxy, mod_proxy_http, and mod_proxy_connect to configure Apache to function as a proxy server. Adjust the Apache configuration file to forward requests and add custom headers." }, { "@type": "HowToStep", "name": "Integrate Proxy Configuration in PHP Code", "text": "Use PHP code examples to integrate proxy settings into your web scraping projects. Learn how to set proxies with cURL, file_get_contents, and Symfony BrowserKit for seamless web scraping." }, { "@type": "HowToStep", "name": "Overcome Traditional Proxy Integration Limitations", "text": "Address the challenges of traditional proxy integration methods in PHP, such as manual proxy switching and the complexity of setting up multiple proxies." }, { "@type": "HowToStep", "name": "Utilize Bright Data Proxy Service", "text": "Leverage Bright Data's extensive proxy network for efficient web scraping. Understand how to sign up, configure, and integrate Bright Data's proxies into your PHP applications." } ], "estimatedCost": { "@type": "MonetaryAmount", "currency": "USD", "value": "Varies" }, "supply": [ { "@type": "HowToSupply", "name": "PHP development environment", "requiredQuantity": 1 }, { "@type": "HowToSupply", "name": "Apache server for proxy setup", "requiredQuantity": 1 }, { "@type": "HowToSupply", "name": "Bright Data proxy service subscription", "requiredQuantity": 1 } ], "tool": [ { "@type": "HowToTool", "name": "PHP language and related libraries" }, { "@type": "HowToTool", "name": "Apache server configuration file" }, { "@type": "HowToTool", "name": "Bright Data Proxy Manager" } ] }
When connecting to a network, an IP address serves as a unique identifier, facilitating communication and identification within that network and across the internet. A proxy server acts as an intermediary between a user’s device and the internet, improving security, privacy, and performance by managing requests and concealing the user’s IP address.
Proxy servers ensure anonymity and help filter out threats by masking your IP and controlling website access. When it comes to web scraping specifically, proxy servers play a crucial role, helping users circumvent IP bans and avoid geoblocking measures.
In this tutorial, you’ll learn more about proxies and how to set up a proxy server for web scraping in PHP.
Using a Proxy Server in PHP
If you want to set up a proxy server, there are various ways to do it. You can use server applications like Apache or Nginx as forward proxy servers, or you can opt for dedicated proxy tools like Squid. In this tutorial, you’ll use Apache as the proxy server.
To set up a proxy server for web scraping in PHP , you need to make sure PHP is installed on your system. If you haven’t installed it yet, follow the official documentation to do so. This article uses Ubuntu as the operating system.
Set Up a Proxy Server with Apache
In Apache, the
mod_proxy
,
mod_proxy_http
, and
mod_proxy_connect
modules can be used to make Apache act as a proxy server.
To set up the proxy server, you need to start by enabling the modules:
sudo a2enmod proxy
sudo a2enmod proxy_http
sudo a2enmod proxy_connect
Then you need to create a new
VirtualHost
file where you’ll define the proxy server:
cd /etc/apache2/sites-available/
sudo cp 000-default.conf proxy.conf
In the
proxy.conf
file, paste the following code:
<VirtualHost *:80>
    ServerName localhost
    ServerAdmin admin@localhost
    <IfModule mod_ssl.c>
            SSLEngine off
    </IfModule>

    ErrorLog ${APACHE_LOG_DIR}/error.log
    CustomLog ${APACHE_LOG_DIR}/access.log combined

    ProxyRequests On
    ProxyVia On
    <Proxy *>
        Order deny,allow
        Allow from all
    </Proxy>
</VirtualHost>
In this code,
ProxyRequests On
enables Apache to be a forward proxy server.
ProxyVia On
adds a
Via
header that helps inspect the request path in a chain of proxies. Additionally, the
<Proxy>
control block declares who is allowed to access the proxy. Any host is allowed to access the proxy server.
For more detailed information, check out the official docs .
To finish setting up the proxy server, enable the
VirtualHost
:
sudo a2ensite proxy.conf
service apache2 reload
Using the Proxy Server
In the following section, you’ll learn how to use the proxy server in PHP code. Typically, any web request or automation framework provides a mechanism to set proxies. In this article, you’ll learn about three methods: curl,
file_get_contents
, and Symfony BrowserKit.
Set Proxies in curl
The first method you’ll learn about shows you how to integrate proxies into your PHP script using the
cURL
library
, a powerful tool for making HTTP requests.
Create a file named
curl.php
with the following code:
<?php

$proxyUrl = 'http://localhost:80';
$targetUrl = 'https://httpbin.org/get';

$ch = curl_init();

curl_setopt($ch, CURLOPT_URL, $targetUrl);
curl_setopt($ch, CURLOPT_PROXY, $proxyUrl);
curl_setopt($ch, CURLOPT_RETURNTRANSFER, true);

curl_setopt($ch, CURLOPT_SSL_VERIFYPEER, false);
curl_setopt($ch, CURLOPT_SSL_VERIFYHOST, false);

$response = curl_exec($ch);

if (curl_errno($ch)) {
    echo 'cURL Error: ' . curl_error($ch);
} else {
    echo $response;
}

curl_close($ch);
This script initiates a curl session, sets the target URL and proxy URL using
curl_setopt
, and executes the session to retrieve the response. The
CURLOPT_PROXY
option sets the proxy. The proxy URL is set to
localhost:80
, which leverages the proxy you created in the previous step.
For simplicity, the script also includes options to disable SSL verification. However, make sure you exercise caution in a production environment. Any curl errors encountered during the execution are displayed for debugging purposes.
Run the script with the command
php curl.php
.
After executing the script, you can inspect the Apache access log file to track the request made to the proxy. The access log file is typically located at
/var/log/httpd/access.log
.
In this log file, you’ll find an entry using the
CONNECT
protocol corresponding to the executed script, indicating that the request was successfully processed with an HTTP status code of 200:
127.0.0.1 - - [21/Dec/2023:12:34:56 +0530] "CONNECT httpbin.org:443 HTTP/1.1" 200 -
Set Proxies in file_get_contents
You can also use
file_get_contents
to set up proxies in PHP and then leverage the Apache proxy to fetch content.
To do so, create a
file_get_contents.php
file and add the following code:
<?php

$options = [
    'http' => [
        'proxy' => 'tcp://127.0.0.1:80',
        'request_fulluri' => true,
    ],
];
$context = stream_context_create($options);

$response = file_get_contents('https://httpbin.org/get', false, $context);

if ($response === false) {
    echo "Failed to retrieve data from $url";
} else {
    echo $response;
}
This PHP code initiates an HTTP request to retrieve the data from
http://wikipedia.org
using a specified proxy server. The proxy server details are configured in the
$options
array, where the ‘proxy’ key defines the server address (‘tcp://127.0.0.1:80’) and
request_fulluri
is set to true, treating the request URI as a full URI.
A stream context adding these options is created using
stream_context_create
. The actual HTTP request is made with
file_get_contents
, adding the created context and resulting in the retrieval of content from
HttpBin
.
Set Proxies in Symfony BrowserKit
If you’re a Symfony user, integrating proxies is easy with BrowserKit .
If you want to follow along and don’t already have Symfony installed, make sure you install it now .
Once Symfony is set up, you can easily use proxies in your PHP code:
<?php

require './vendor/autoload.php';

use SymfonyComponentBrowserKitHttpBrowser;
use SymfonyComponentHttpClientHttpClient;

$proxyServer = 'http://127.0.0.1';
$proxyPort = '80';

$client = new HttpBrowser(HttpClient::create(['proxy' => sprintf('%s:%s', $proxyServer, $proxyPort)]));

$client->request('GET', 'https://httpbin.org/get');

$content = $client->getResponse()->getContent();

echo $content;
This code block uses Symfony BrowserKit and
HttpClient
to make a
GET
request to
HttpBin
through the Apache proxy configured at
$proxyUrl
. Then the response content is retrieved and displayed. The
HttpBrowser
instance is set up with the specified proxy settings, making it easy to integrate proxies into Symfony applications.
Limitations of Traditional Proxy Integration Methods
Although configuring proxies in PHP might seem straightforward, the various methods come with certain limitations. For instance, while it’s possible to switch between different proxies manually, this is an inefficient approach when scraping large amounts of data.
Additionally, if the proxy becomes unavailable or the IP becomes restricted or encounters issues, these methods don’t inherently provide a mechanism to switch to an alternative proxy automatically. This results in service interruptions or data retrieval failures requiring manual intervention. Although you could write code to switch proxies automatically, it’s a complicated process, and you’ll have to set up or rent multiple proxy servers across different geographic regions for maximum security.
The good news is Bright Data can help.
The Bright Data Proxy Server
Bright Data is a web data extraction platform that offers tools for web scraping and data collection at scale. For instance, Bright Data’s robust collection of worldwide proxy servers gives you access to diverse IP addresses that can help you overcome geoblocking and IP bans.
Additionally, the Bright Data on-demand proxies can help you dynamically acquire the resources you need, when they’re needed. This is helpful in web scraping scenarios where your requirements are fluctuating, ensuring optimal performance and responsiveness. Bright Data offers different types of proxies ( ie residential proxies, data center proxies, ISP proxies, and mobile proxies) that ensure you have the proxy that best suits your use case.
One of the main advantages of the Bright Data solution is the automated proxy rotation , which contributes to enhanced anonymity and mitigates detection risks during web scraping activities. This feature, coupled with access to an advanced data center proxy network boasting over 770,000 IPs worldwide, makes Bright Data a superior choice for web scraping.
Using the Bright Data Proxy with PHP
Using Bright Data is easy. All you have to do is sign up for a free account.
After creating an account, click on Proxies and Scraping Infra in the sidebar and then select Get Started under Residential Proxies :
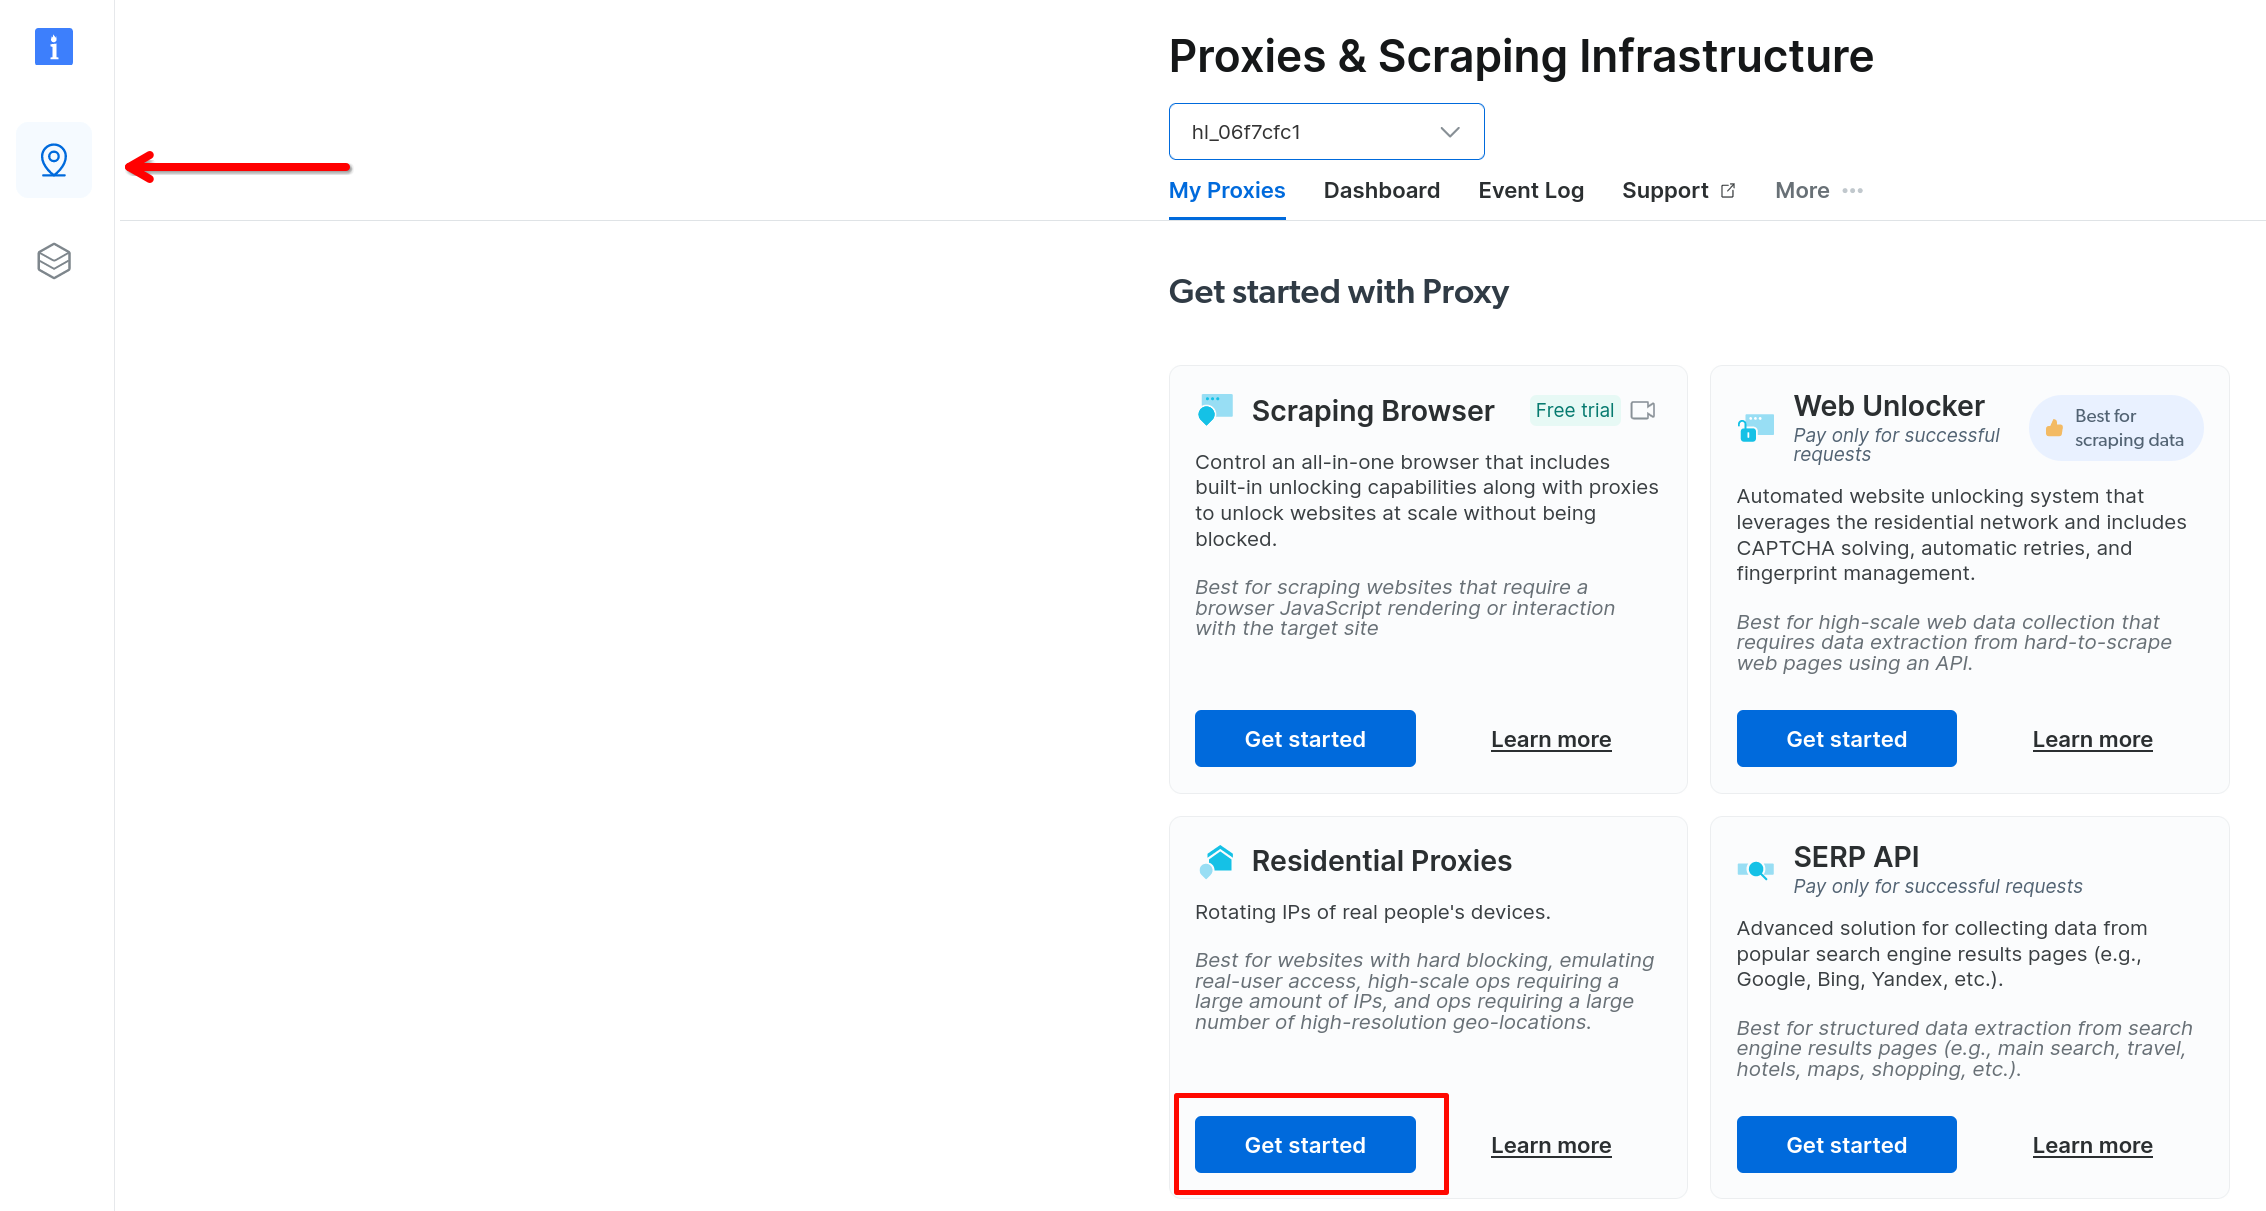
Bright Data residential proxy configuration
Here, you can configure the proxy, such as choosing between Dedicated and Shared proxies:
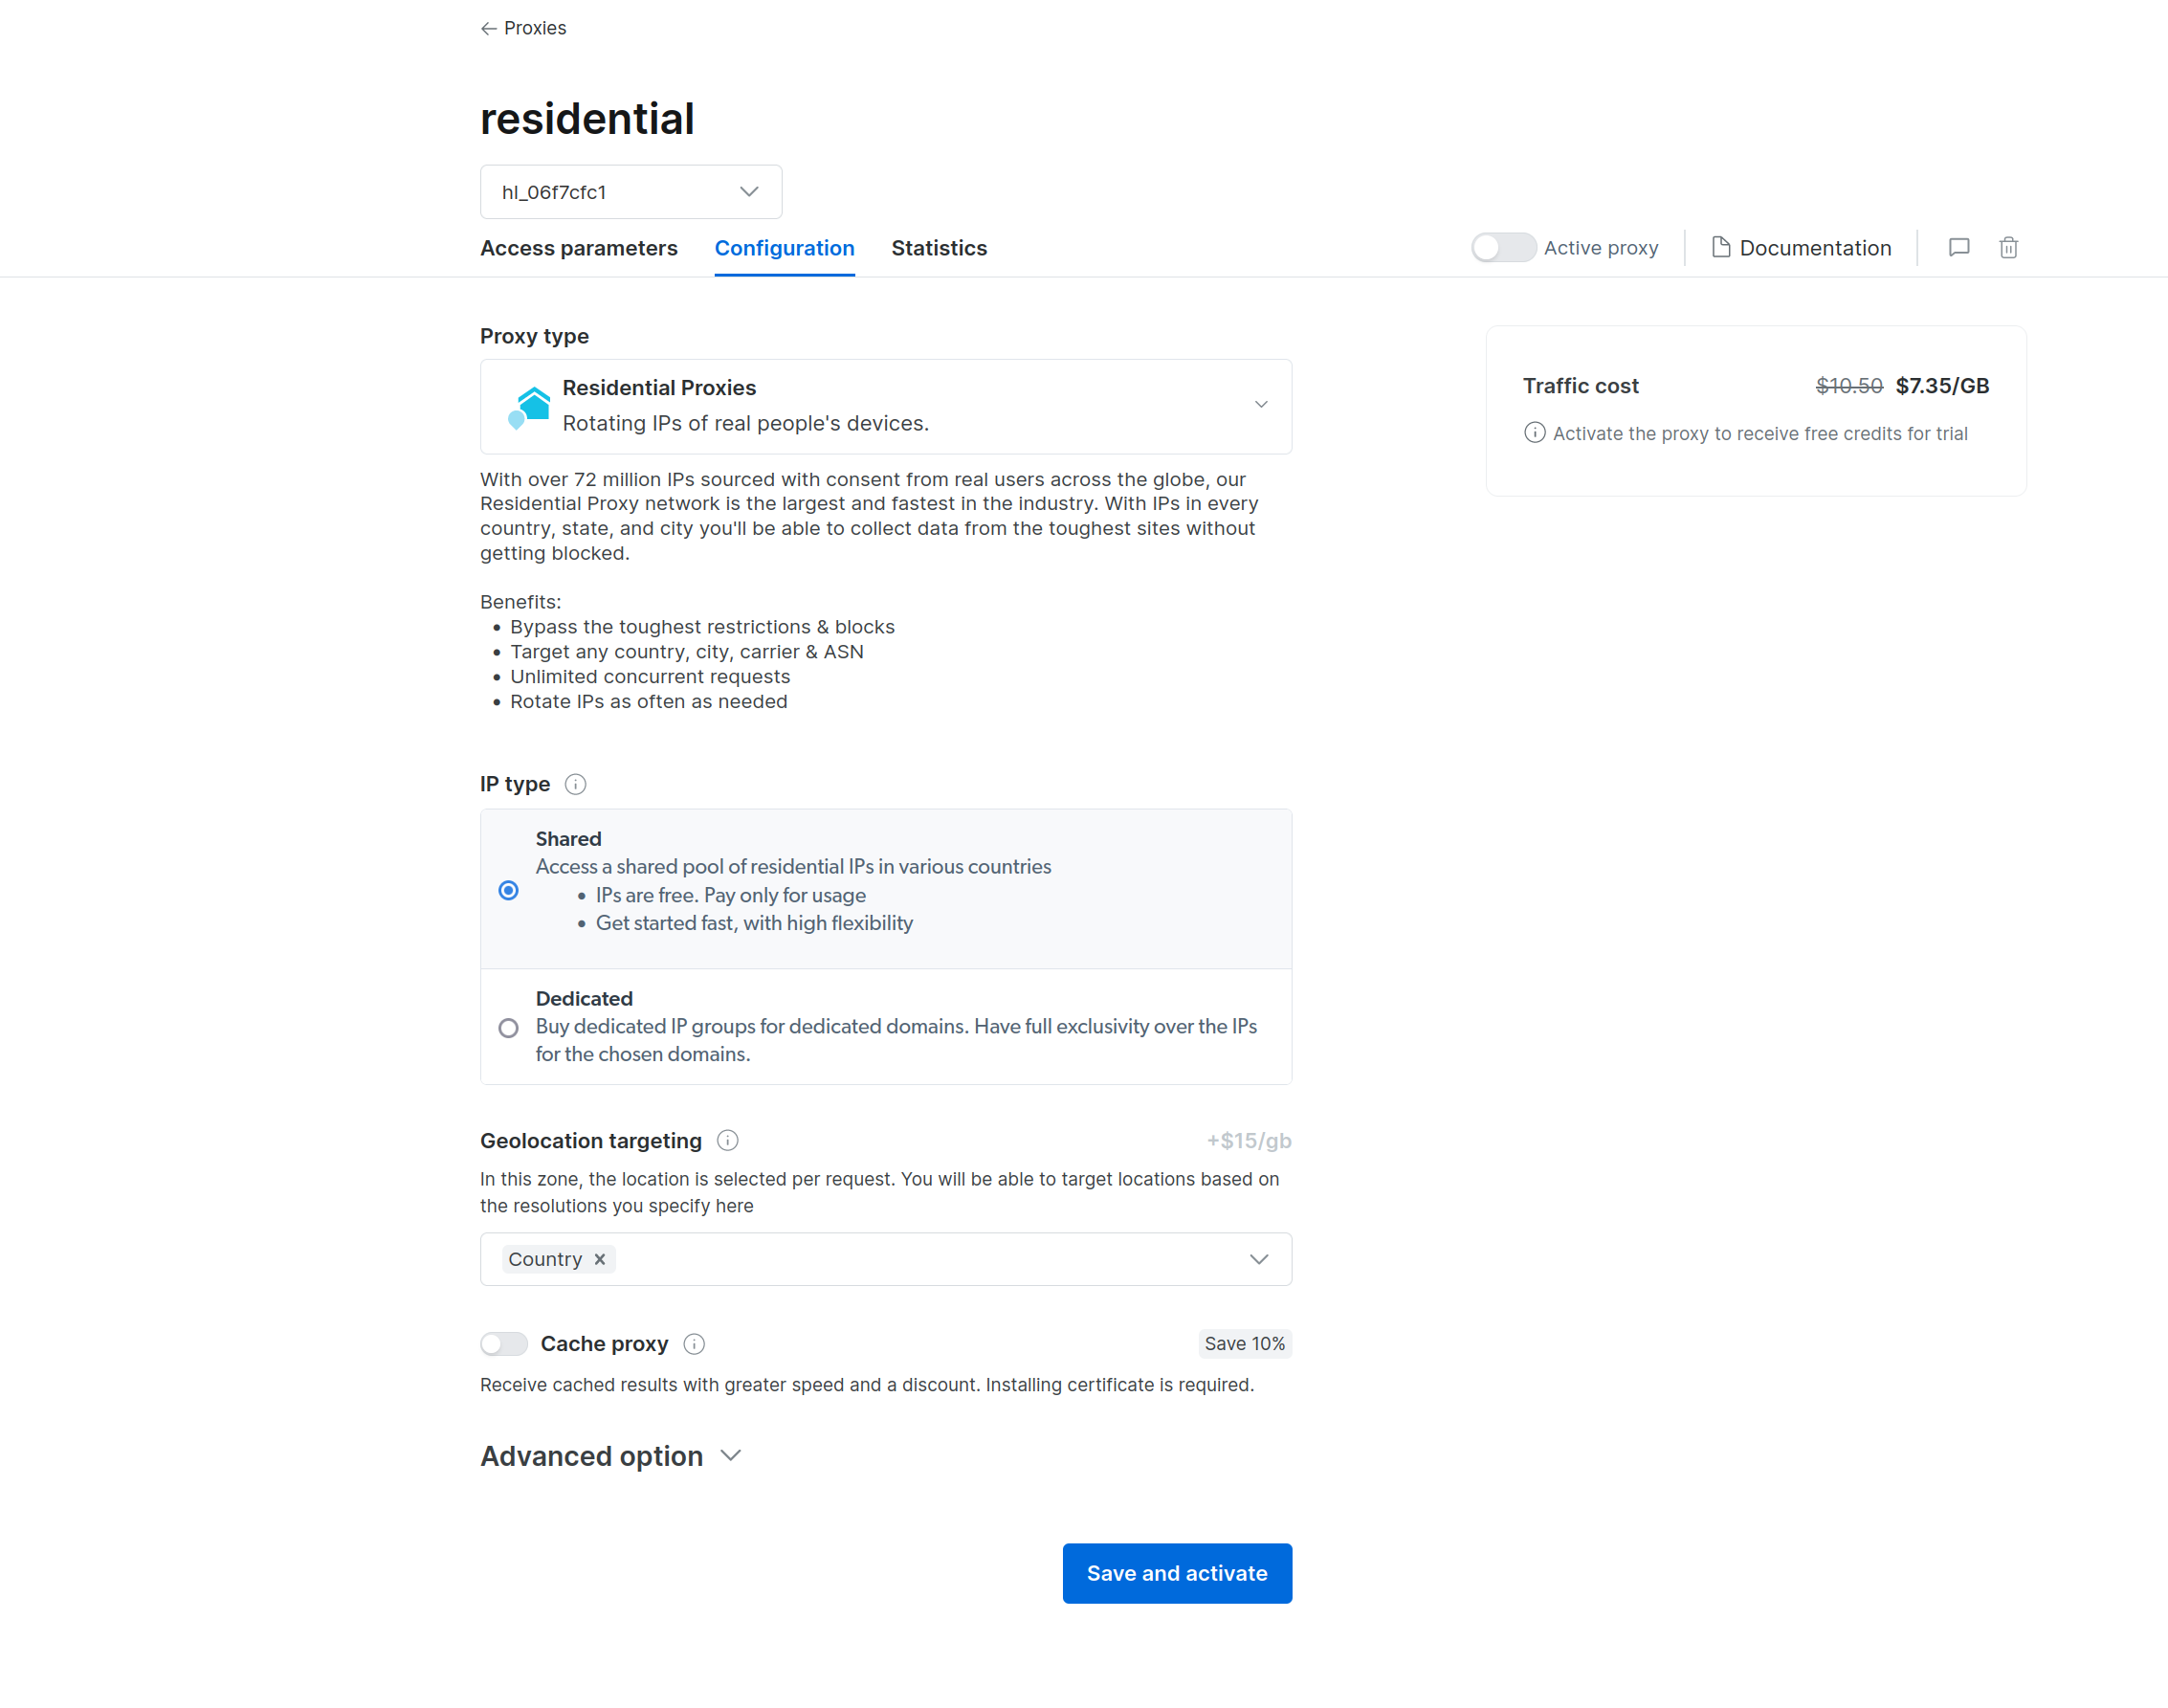
Choosing the proxy configuration
Once you’ve chosen your proxy configuration, activate the proxy service by clicking Save . Bright Data provides you with unique login credentials:
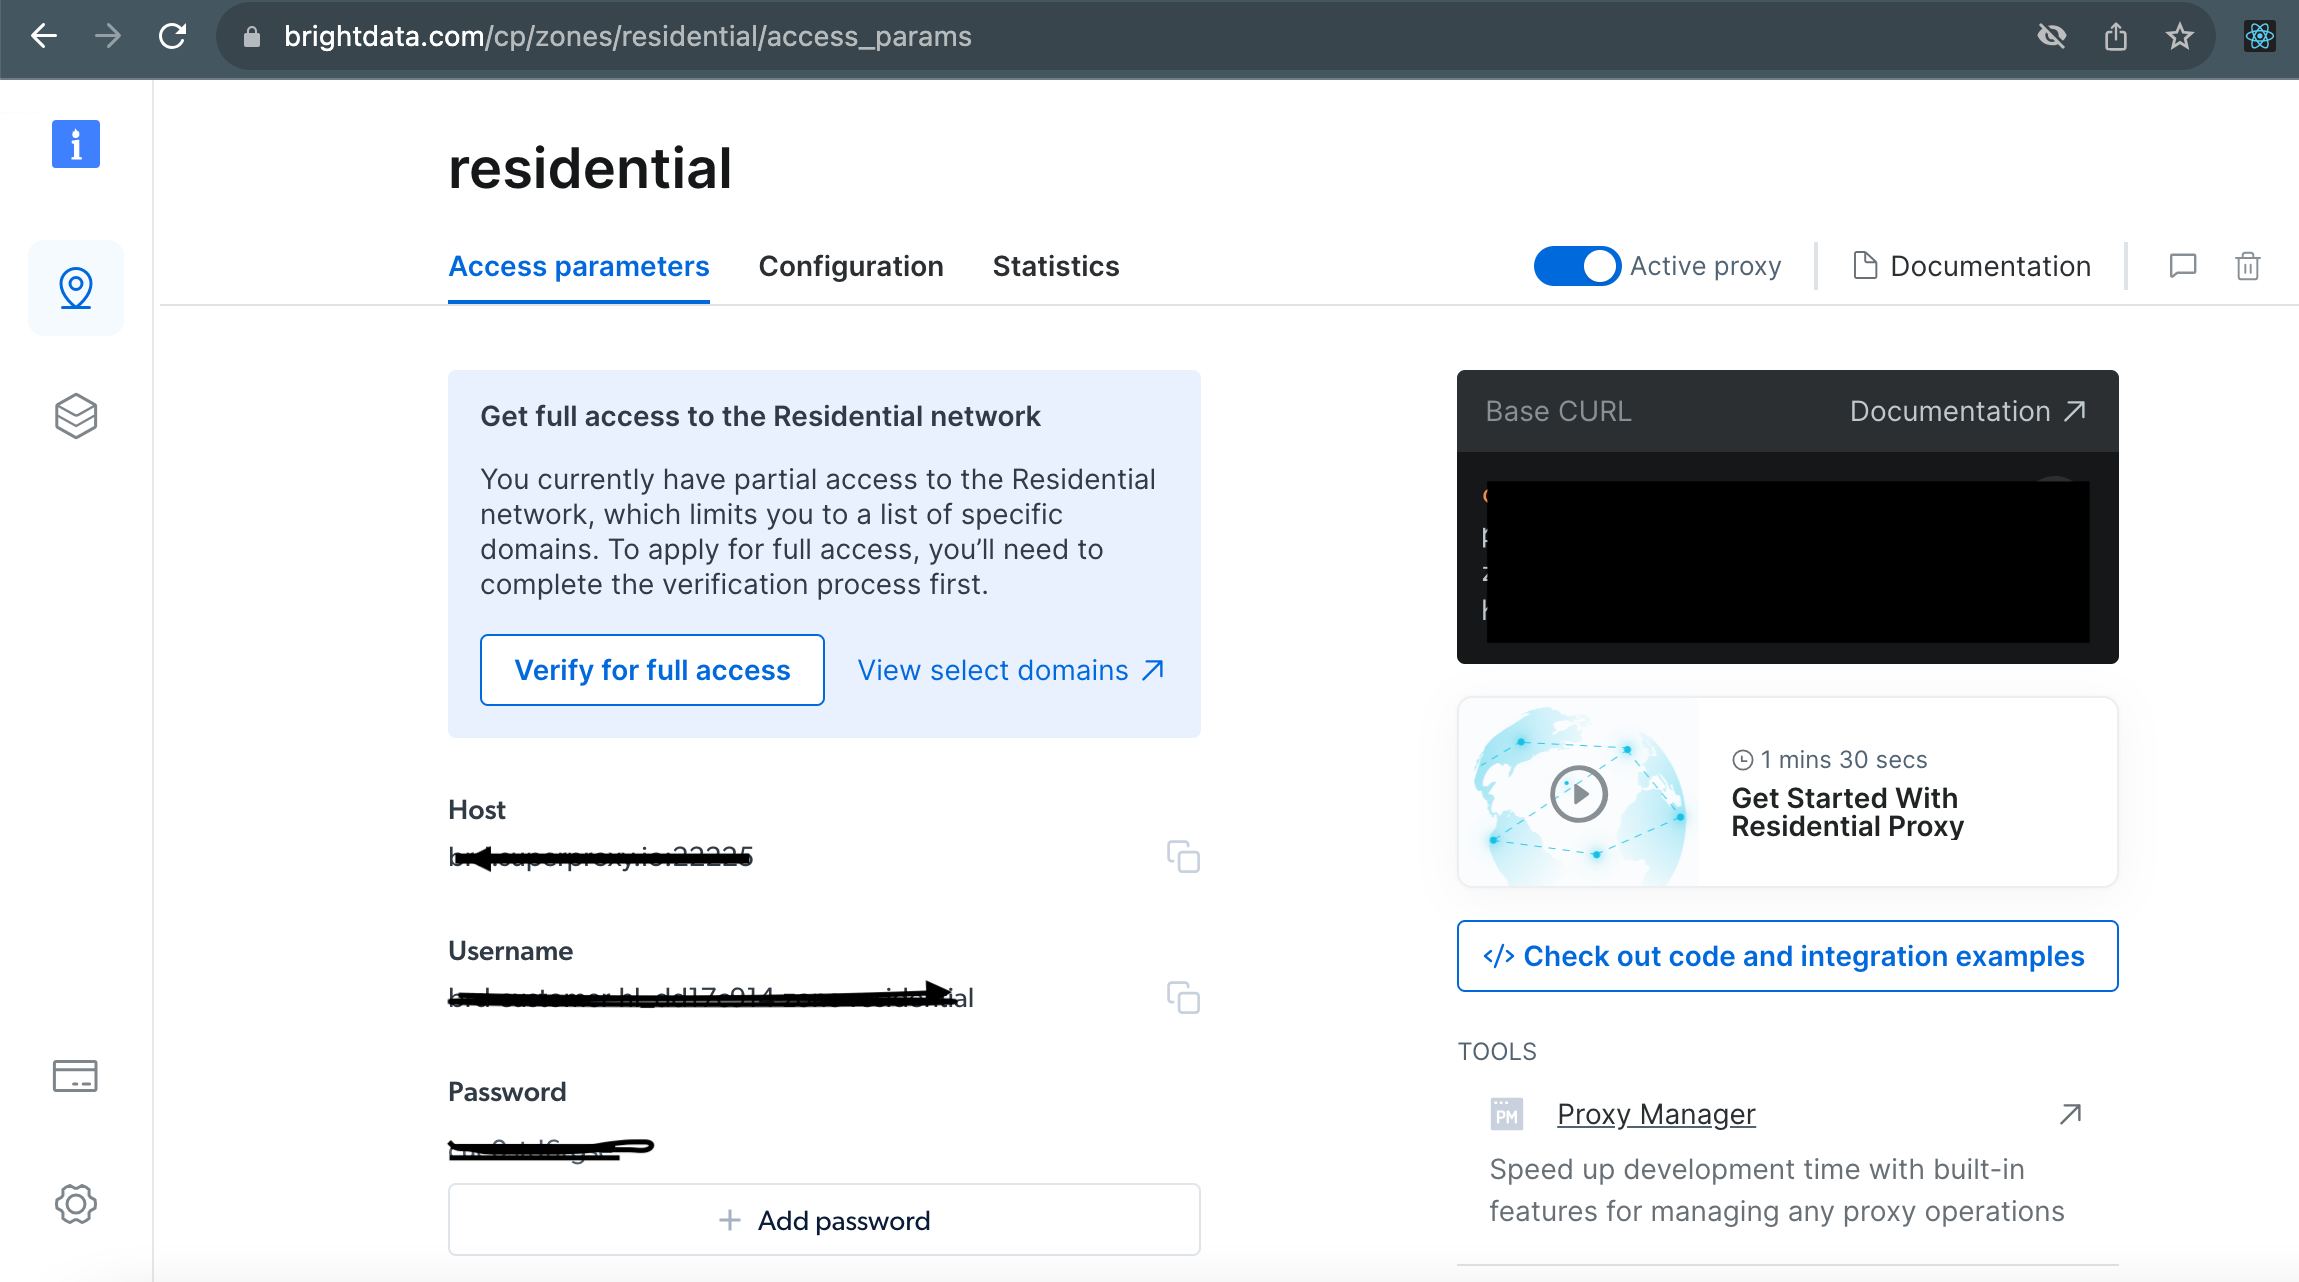
Bright Data login credentials
With your Bright Data proxy details, you can use the Bright Data proxy to scrape Wikipedia. Start by creating a
scrape.php
file and adding the following code:
<?php

// BrightData proxy details
$proxyUrl = 'Your-proxy-url-from-the access-paramaters';
$proxyUser = 'Your-username:Your-password';

$targetUrl = 'https://en.wikipedia.org/wiki/Proxy_server';

$ch = curl_init();

curl_setopt($ch, CURLOPT_URL, $targetUrl);
curl_setopt($ch, CURLOPT_PROXY, $proxyUrl);
curl_setopt($ch, CURLOPT_PROXYUSERPWD, $proxyUser);
curl_setopt($ch, CURLOPT_RETURNTRANSFER, true);
curl_setopt($ch, CURLOPT_SSL_VERIFYPEER, false);

$response = curl_exec($ch);

if (curl_errno($ch)) {
    echo 'cURL Error: ' . curl_error($ch);
} else {
    $dom = new DOMDocument();
    @$dom->loadHTML($response);

    $content = $dom->getElementById('mw-content-text')->textContent;

    $headings = [];
    $headingsNodeList = $dom->getElementsByTagName('h2');
    foreach ($headingsNodeList as $heading) {
        $headings[] = $heading->textContent;
    }

    $headingsNodeList = $dom->getElementsByTagName('h3');
    foreach ($headingsNodeList as $heading) {
        $headings[] = $heading->textContent;
    }

    echo "Content:n";
    echo $content . "nn";

    echo "Headings:n";
    foreach ($headings as $index => $heading) {
        echo ($index + 1) . ". $headingn";
    }
}

curl_close($ch);
Make sure you replace
Your-proxy-url-from-the access-paramaters
,
Your-username
, and
Your-password
with your specific credentials.
Make sure you replace
Your-proxy-url-from-the access-paramaters
,
Your-username
, and
Your-password
with your specific credentials.
In this code, the proxy details are integrated into the curl request to ensure that the web scraping is done through the Bright Data proxy network.
Next, run
php scrape.php
in your terminal. Here are the scraped results:
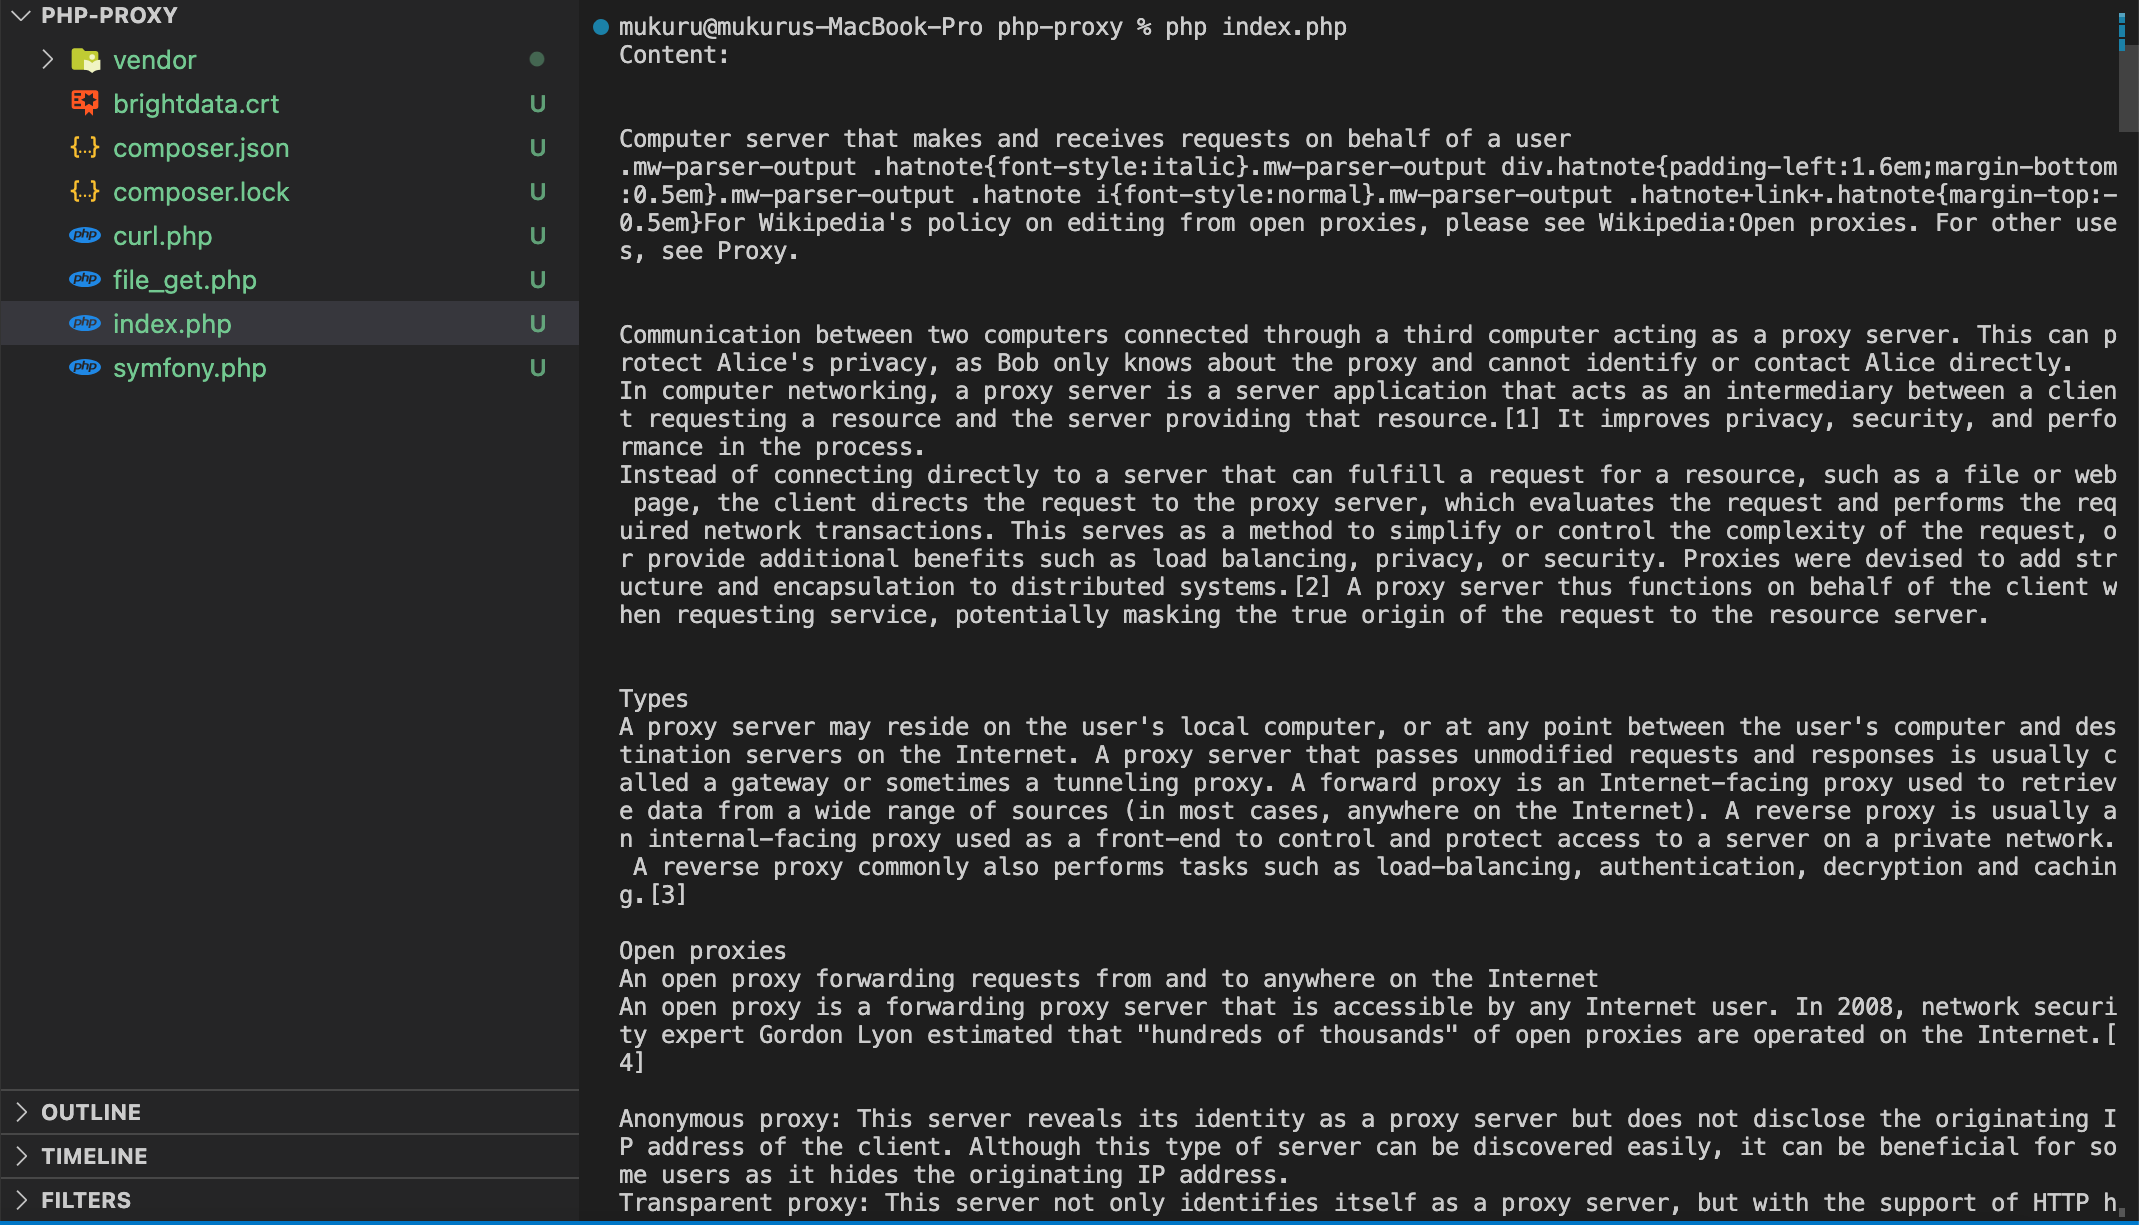
Results of scraped data from Wikipedia using Bright Data
To confirm that your requests are now getting routed through the Bright Data proxy, you can try sending a GET request to http://lumtest.com/myip.json . If you open this in your browser, it will respond with a JSON object containing the details of your local ISP.
To try it out with a Bright Data proxy, save the following code in a new PHP file and run it:
<?php

// BrightData proxy details
$proxyUrl = 'brd.superproxy.io:22225';
$proxyUser = 'brd-customer-hl_0c2320f1-zone-residential_proxy1:j30hm0h2pqde';

$targetUrl = 'http://lumtest.com/myip.json';

$ch = curl_init();

curl_setopt($ch, CURLOPT_URL, $targetUrl);
curl_setopt($ch, CURLOPT_PROXY, $proxyUrl);
curl_setopt($ch, CURLOPT_PROXYUSERPWD, $proxyUser);
curl_setopt($ch, CURLOPT_RETURNTRANSFER, true);
curl_setopt($ch, CURLOPT_SSL_VERIFYPEER, false);

$response = curl_exec($ch);

if (curl_errno($ch)) {
    echo 'cURL Error: ' . curl_error($ch);
} else {
    echo $response;
}

curl_close($ch);
The output should show the location and other details of the proxy being used:
{"ip":"91.66.16.153","country":"DE","asn":{"asnum":3209,"org_name":"Vodafone GmbH"},"geo":{"city":"Berlin","region":"BE","region_name":"Land Berlin","postal_code":"12205","latitude":52.428,"longitude":13.3095,"tz":"Europe/Berlin","lum_city":"berlin","lum_region":"be"}}
This confirms that the request is indeed being routed through the Bright Data proxy servers.
Conclusion
In this tutorial, you explored various methods for setting up a proxy server in PHP. While local proxy servers with Apache are an option, leveraging the Bright Data proxy servers introduces a new level of efficiency and versatility.
The Bright Data proxy servers provide you with a comprehensive global proxy network, ensuring access to a diverse range of IPs, including residential , ISP , datacenter , and mobile proxies . Additionally, the Bright Data proxy rotation contributes to enhanced anonymity and the mitigation of detection risks during web scraping activities.
Whether you’re a novice seeking simplicity or an experienced developer requiring advanced capabilities, the Bright Data proxy servers provide a robust foundation for successful and efficient web scraping endeavors.