
NodeJS Proxy Server - How to Guide
{ "@context": "https://schema.org", "@type": "HowTo", "name": "Using Proxy Servers in Node.js", "description": "This guide teaches you how to utilize proxy servers in Node.js to improve privacy, bypass IP bans and geoblocking, and enhance web scraping projects. You'll learn the setup and usage of proxies with various tools such as Axios, Playwright, and Puppeteer, as well as integrating the advanced Bright Data proxy server.", "step": [ { "@type": "HowToStep", "name": "Prepare Your Environment", "text": "Ensure Node.js is installed on your system and choose a text editor like Visual Studio Code. Initialize a Node.js project in a new directory, and install required packages including Axios, Playwright, Puppeteer, and http-proxy-agent." }, { "@type": "HowToStep", "name": "Set Up a Local Proxy Server", "text": "Install mitmproxy, an open-source tool, and launch it. Verify the proxy setup by fetching data from an external service, such as a weather report for Paris, via the curl command." }, { "@type": "HowToStep", "name": "Scrape a Website Using Fetch", "text": "Create a script using fetch method in Node.js to route requests through the proxy server. The script fetches and logs data from a target URL, like https://toscrape.com." }, { "@type": "HowToStep", "name": "Scrape a Website Using Playwright", "text": "Write a Node.js script using Playwright to launch a browser, navigate to a URL, and scrape content through the proxy. The browser instance should be configured with the proxy server details." }, { "@type": "HowToStep", "name": "Scrape a Website Using Puppeteer", "text": "Utilize Puppeteer in Node.js to control a headless browser for web scraping. Configure the Puppeteer browser to use the proxy server for its requests." }, { "@type": "HowToStep", "name": "Integrate Bright Data Proxy Server", "text": "Sign up for Bright Data, and configure a residential proxy. Use your proxy credentials in a Node.js script to scrape data via Bright Data's proxy servers, enabling advanced scraping features like IP rotation." } ], "supply": [ { "@type": "HowToSupply", "name": "Node.js installation" }, { "@type": "HowToSupply", "name": "Text editor" }, { "@type": "HowToSupply", "name": "Mitmproxy tool" }, { "@type": "HowToSupply", "name": "Bright Data account" } ], "tool": [ { "@type": "HowToTool", "name": "Axios" }, { "@type": "HowToTool", "name": "Playwright" }, { "@type": "HowToTool", "name": "Puppeteer" }, { "@type": "HowToTool", "name": "http-proxy-agent" } ], "estimatedCost": { "@type": "MonetaryAmount", "currency": "USD", "value": "Varies" } }
Web scraping, a data collection technique, is often hindered by various obstacles, including IP bans, geoblocking, and privacy concerns. Thankfully, proxy servers can help you navigate these challenges. They serve as intermediaries between your computer and the internet, handling requests with their own IP addresses. This functionality not only aids in evading IP-related restrictions and bans but also facilitates access to geographically restricted content. Additionally, proxy servers are instrumental in maintaining anonymity during web scraping, protecting your privacy.
Utilizing proxy servers can also improve the performance and reliability of your web scraping efforts. By distributing requests across multiple servers, they ensure that no single server bears an excessive load, optimizing the process.
In this tutorial, you’ll learn how to use a proxy server in Node.js for your web scraping projects.
Prerequisites
Before you begin this tutorial, it’s recommended that you have some familiarity with JavaScript and Node.js. If Node.js isn’t already installed on your computer, you need to install it now .
You also need a suitable text editor. There are several options available, such as Sublime Text. This tutorial uses Visual Studio Code (VS Code). It’s user-friendly and packed with features that make coding easier.
To get started, create a new directory named
web-scraping-proxy
, and then initialize your Node.js project. Open your terminal or shell and navigate to your new directory using the following commands:
cd web-scraping-proxy
npm init -y
Next, you need to install some Node.js packages to handle HTTP requests and parse HTML.
Ensure you’re in your project directory, and then run the following:
npm install axios node-fetch playwright puppeteer http-proxy-agent
npx playwright install
Axios is used to make HTTP requests to retrieve web content. Playwright and Puppeteer automate browser interactions, which is essential for scraping dynamic websites. Playwright supports various browsers, and Puppeteer is focused on Chrome or Chromium. The
http-proxy-agent
library will be used to create a proxy agent for the HTTP requests.
The
npx playwright install
is required to install the necessary drivers that the
playwright
library will be using.
Once you’ve completed these steps, you’re ready to dive into the world of web scraping with Node.js.
Set Up a Local Proxy for Web Scraping
A crucial first step in web scraping is establishing a proxy server, and for this tutorial, you’ll use the open source tool mitmproxy.
To get started, head over to the mitmproxy download page and download version 10.1.6 that is tailored for your operating system. If you need guidance during installation, the mitmproxy installation guide is a helpful resource.
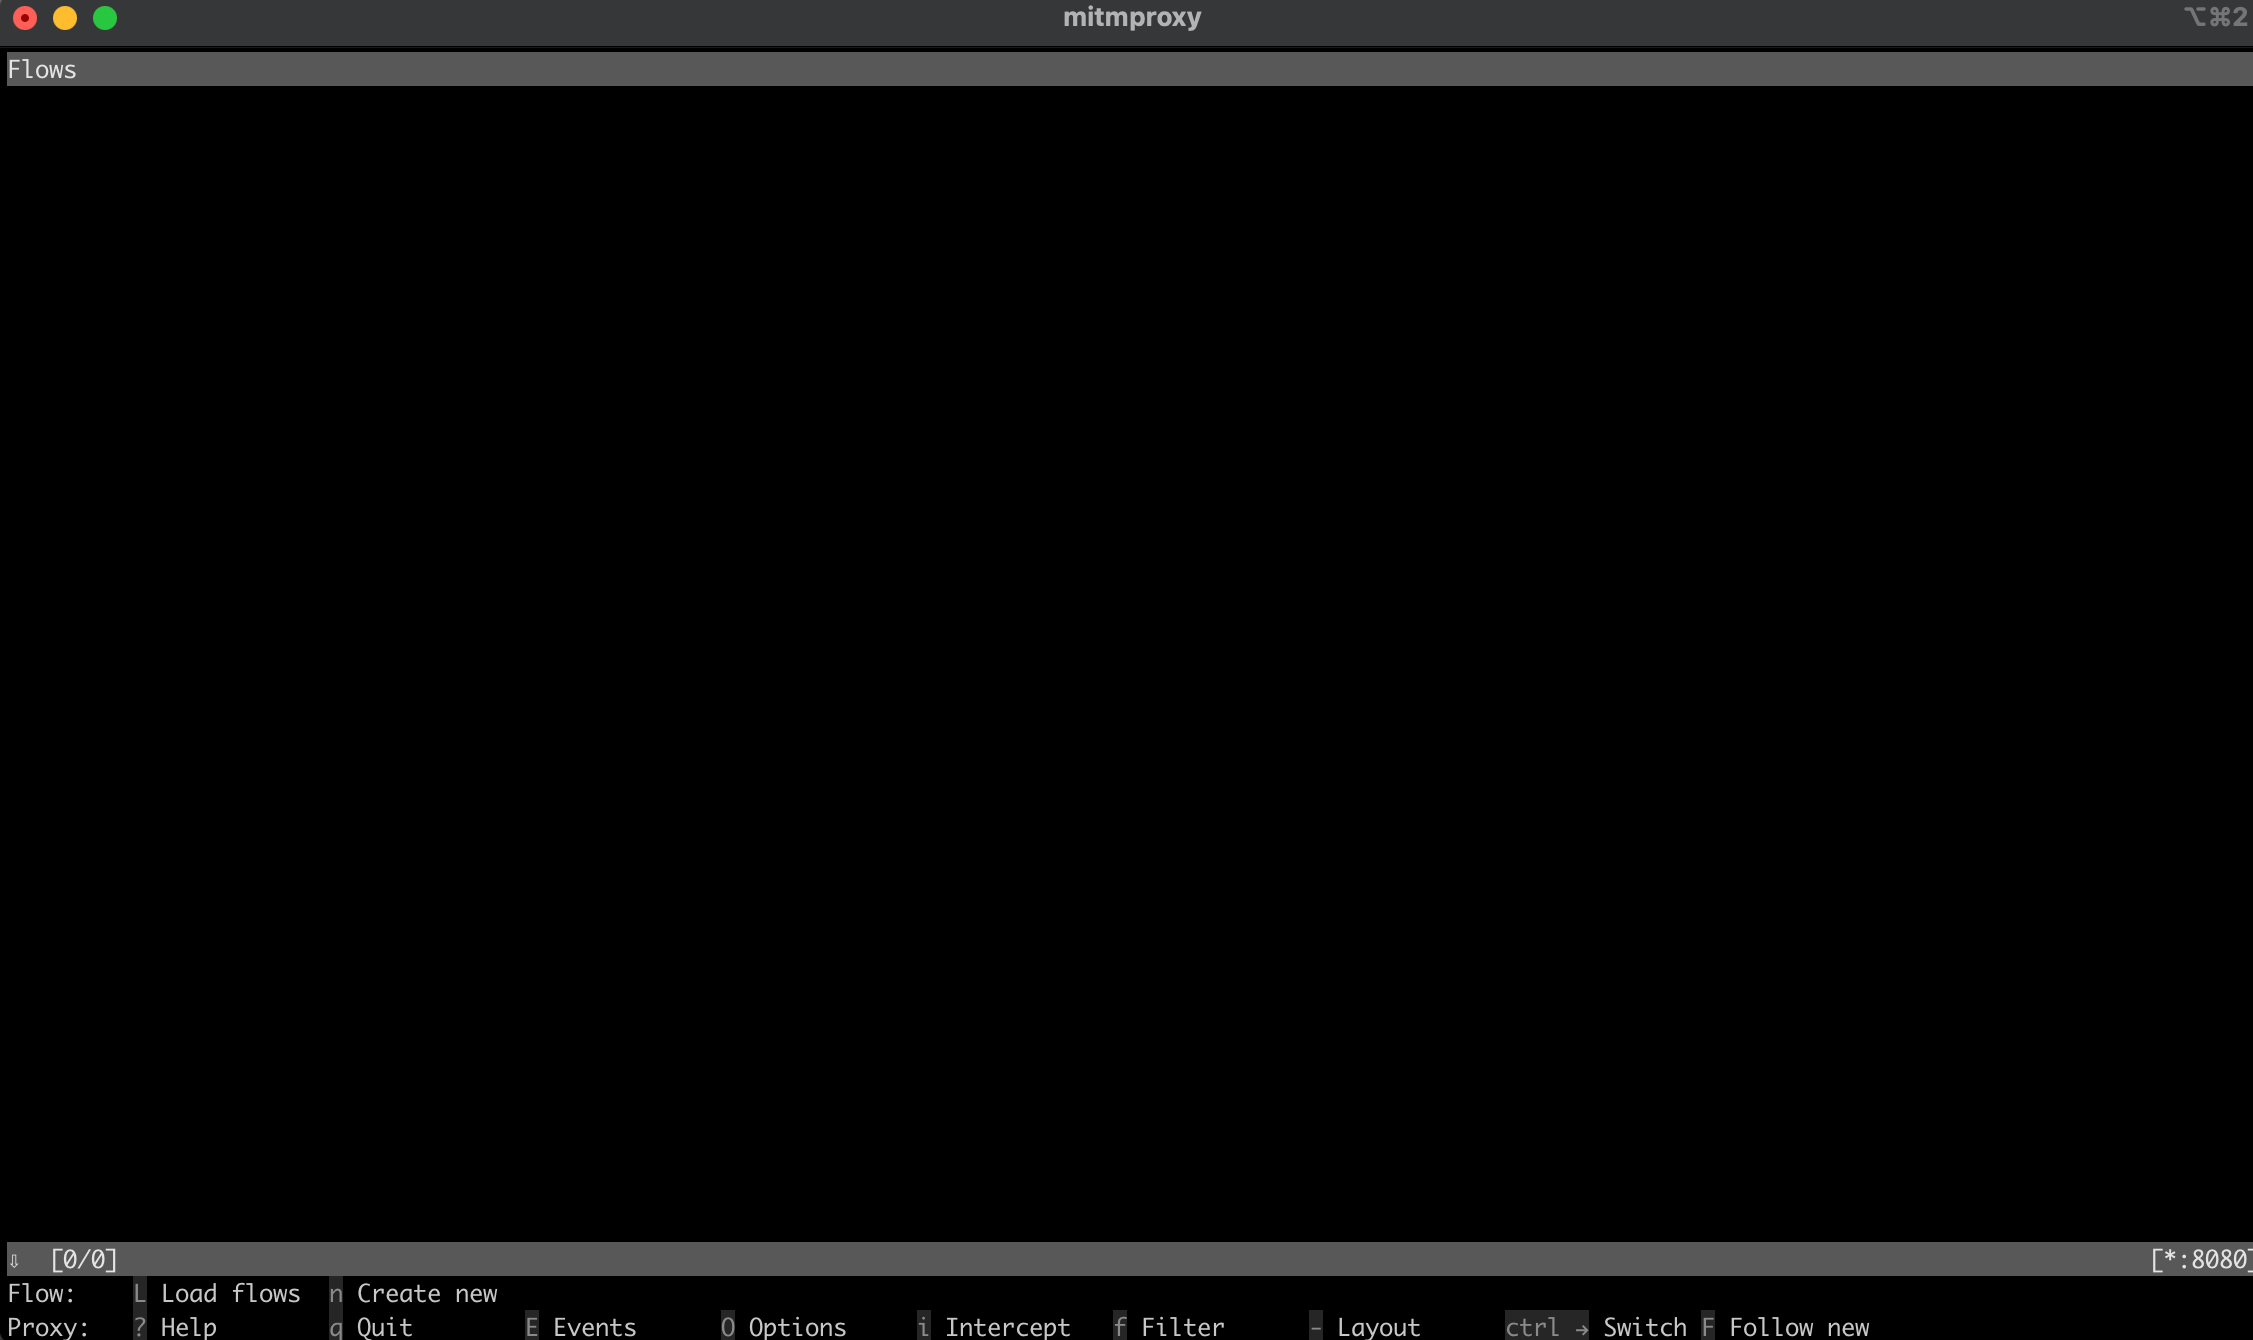
Once you have mitmproxy installed, launch it by entering the following command in your terminal:
mitmproxy
This command opens a window in your terminal that serves as the interface for mitmproxy:
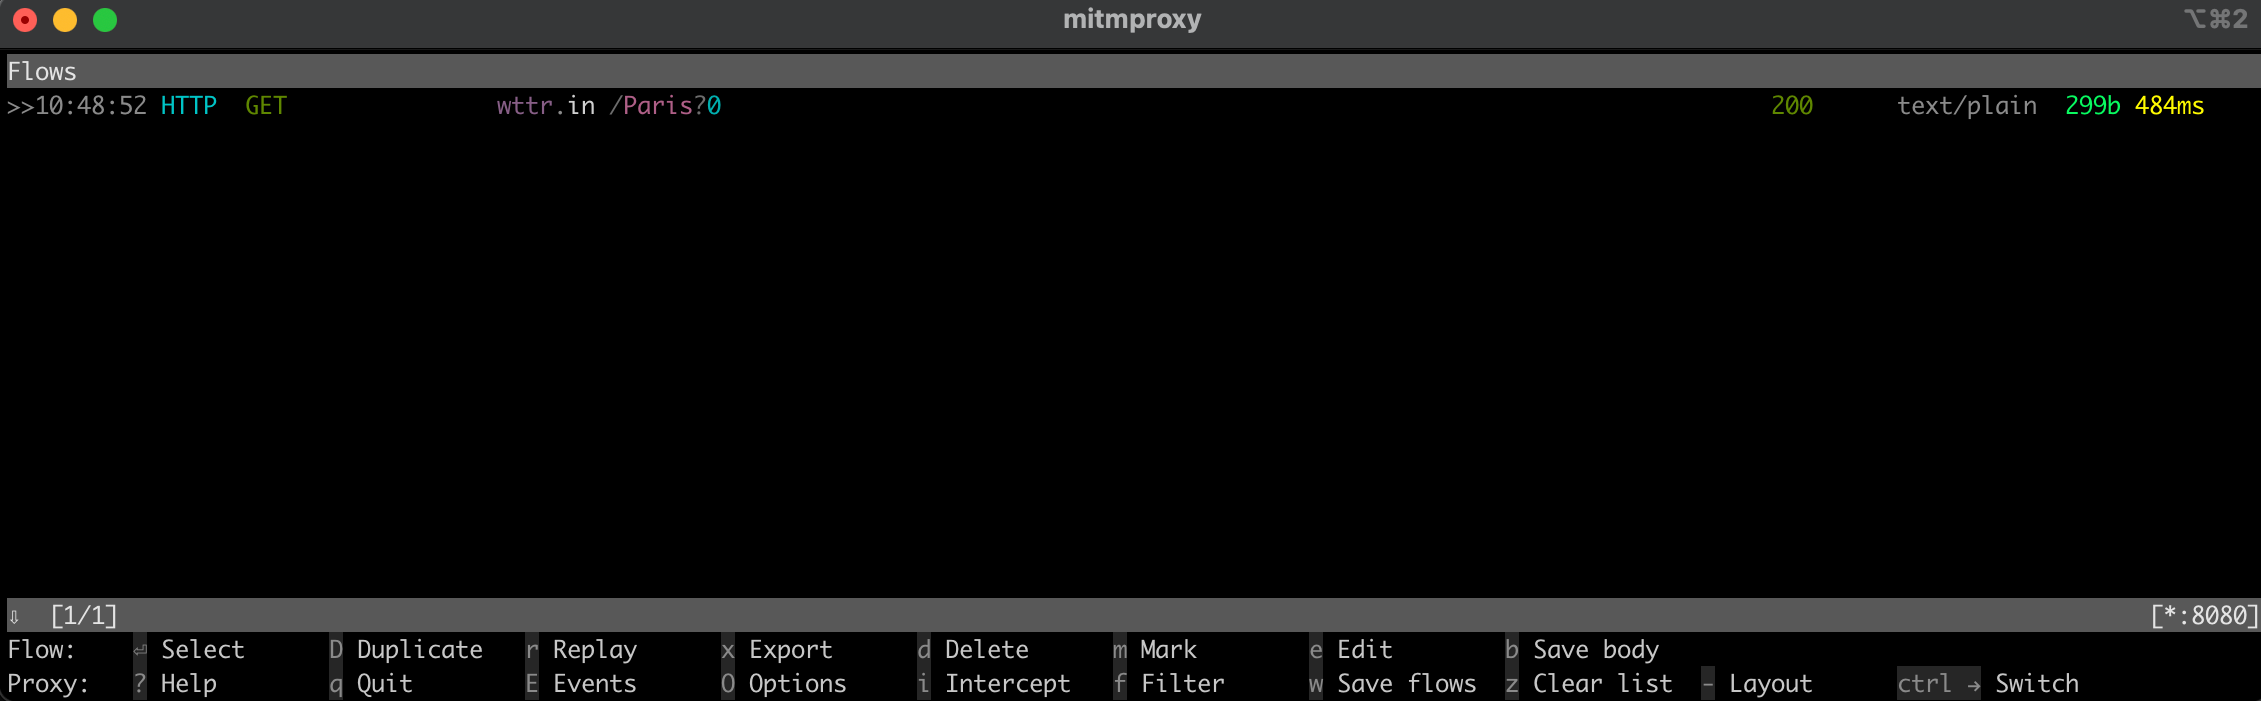
To ensure that your proxy is set up correctly, try running a test. Open a new terminal window and execute the following command:
curl --proxy http://localhost:8080 "http://wttr.in/Paris?0"
This command fetches the weather report for Paris. Your output should look like this:
Weather report: Paris

                Overcast
       .--.     -2(-6) °C
    .-(    ).   ↙ 11 km/h
   (___.__)__)  10 km
                0.0 mm
Back in the mitmproxy window, you’ll notice that it captured the request, indicating that your local proxy is functioning correctly:
Implement a Proxy in Node.js for Web Scraping
Now, it’s time to move on to the practical aspects of web scraping with Node.js. In this section, you’ll write a script that scrapes a website by sending requests via the local proxy server.
Scrape a Website Using the Fetch Method
Create a new file named
fetchScraping.js
in the root directory of your project. This file will contain the code to scrape content from a website, which in this case is
https://toscrape.com/
.
In your
fetchScraping.js
, input the following JavaScript code. This script uses the
fetch
method to send requests through your proxy server:
const fetch = require("node-fetch");
const HttpProxyAgent = require("http-proxy-agent");

async function fetchData(url) {
  try {
    const proxyAgent = new HttpProxyAgent.HttpProxyAgent(
      "http://localhost:8080"
    );
    const response = await fetch(url, { agent: proxyAgent });
    const data = await response.text();
    console.log(data); // Outputs the fetched data
  } catch (error) {
    console.error("Error fetching data:", error);
  }
}

fetchData("http://toscrape.com/");
This code snippet defines an asynchronous function
fetchData
that takes a URL and sends a request to that URL using
fetch
while routing it through the local proxy. Then it prints out the response data.
To execute your web scraping script, open your terminal or shell and navigate to the root directory of your project, where your
fetchScraping.js
file is located. Run the script using this command:
node fetchScraping.js
You should see the following output in your terminal:
…output omitted…
<div class="row">
<div class="col-md-1"></div>
<div class="col-md-10">
<h2>Books</h2>
<p>A <a href="http://books.toscrape.com">fictional bookstore</a> that desperately wants to be scraped. It's a safe place for beginners learning web scraping and for developers validating their scraping technologies as well. Available at: <a href="http://books.toscrape.com">books.toscrape.com</a></p>
<div class="col-md-6">
<a href="http://books.toscrape.com"><img src="./img/books.png" class="img-thumbnail"></a>
</div>
<div class="col-md-6">
<table class="table table-hover">
<tr><th colspan="2">Details</th></tr>
<tr><td>Amount of items </td><td>1000</td></tr>
<tr><td>Pagination </td><td>✔</td></tr>
<tr><td>Items per page </td><td>max 20</td></tr>
<tr><td>Requires JavaScript </td><td>✘</td></tr>
</table>
</div>
</div>
</div>
…output omitted…
This output is the HTML content of the
http://toscrape.com
web page. The successful display of this data indicates that your web scraping script, routed through the local proxy, is functioning correctly.
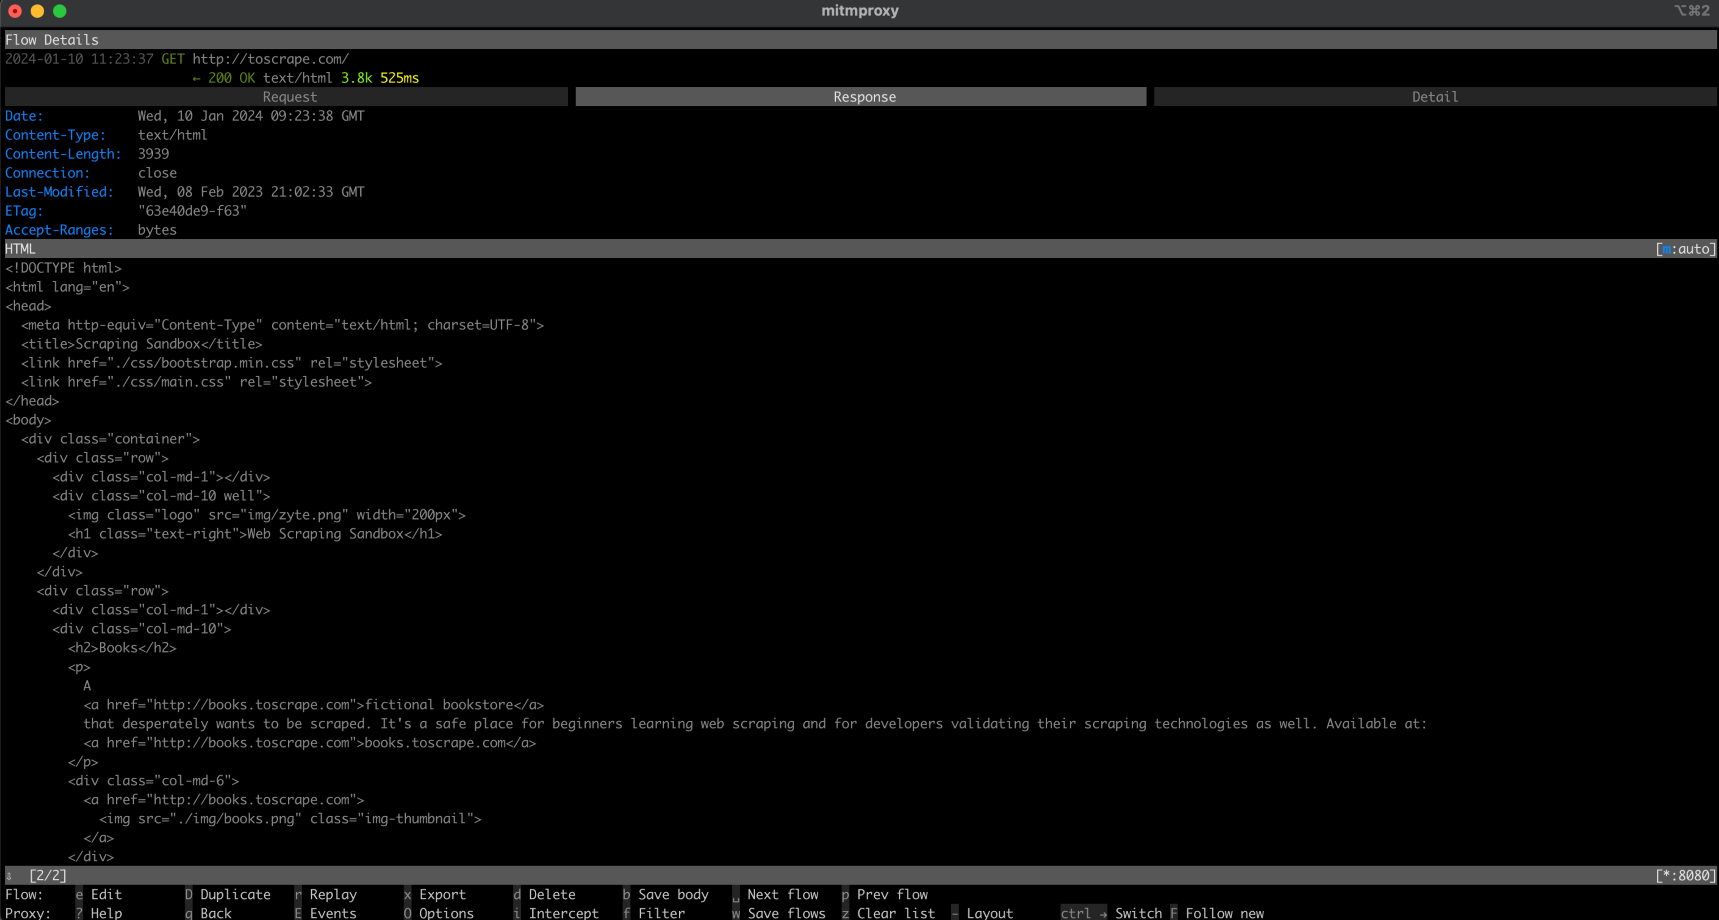
Now, navigate back to your
mitmproxy
window, and you should see the request being logged, which means that your request went through your local proxy:
Scrape a Website Using Playwright
Compared to
Fetch
, Playwright is an advanced tool that allows for more dynamic interactions with web pages. To use it, you need to create a new file called
playwrightScraping.js
in your project. In this file, input the following JavaScript code:
const { chromium } = require("playwright");

(async () => {
  const browser = await chromium.launch({
    proxy: {
      server: "http://localhost:8080",
    },
  });
  const page = await browser.newPage();
  await page.goto("http://toscrape.com/");

  // Extract and log the entire HTML content
  const content = await page.content();
  console.log(content);

  await browser.close();
})();
This code uses Playwright to launch a Chromium browser instance configured to use your local proxy server. It then opens a new page in the browser, navigates to
http://toscrape.com
, and waits for the page to load. After scraping the necessary data, the browser is closed.
To run this script, make sure you’re in the directory containing
playwrightScraping.js
. Open your terminal or shell and execute the script using the following:
node playwrightScraping.js
When you run the script, Playwright will start a Chromium browser, navigate to the specified URL, and execute any additional scraping commands you’ve added. This process uses the local proxy server, helping you avoid exposing your IP address and circumvent potential restrictions.
The expected output should be similar to the previous one:
…output omitted…
<div class="row">
<div class="col-md-1"></div>
<div class="col-md-10">
<h2>Books</h2>
<p>A <a href="http://books.toscrape.com">fictional bookstore</a> that desperately wants to be scraped. It's a safe place for beginners learning web scraping and for developers validating their scraping technologies as well. Available at: <a href="http://books.toscrape.com">books.toscrape.com</a></p>
<div class="col-md-6">
<a href="http://books.toscrape.com"><img src="./img/books.png" class="img-thumbnail"></a>
</div>
<div class="col-md-6">
<table class="table table-hover">
<tr><th colspan="2">Details</th></tr>
<tr><td>Amount of items </td><td>1000</td></tr>
<tr><td>Pagination </td><td>✔</td></tr>
<tr><td>Items per page </td><td>max 20</td></tr>
<tr><td>Requires JavaScript </td><td>✘</td></tr>
</table>
</div>
</div>
</div>
…output omitted…
As before, you should see your request being logged on the
mitmproxy
window.
Scrape a Website Using Puppeteer
Now, scrape a website using Puppeteer. Puppeteer is a powerful tool that provides a high level of control over a headless Chrome or Chromium browser. This method is particularly useful for scraping dynamic websites that require JavaScript rendering.
To begin, create a new file in your project named
puppeteerScraping.js
. This file will contain the Puppeteer code to scrape a website using the proxy server for requests.
Open your newly created
puppeteerScraping.js
file and insert the following JavaScript code:
    const puppeteer = require('puppeteer');

    (async () => {
        const browser = await puppeteer.launch({
            args: ['--proxy-server=http://localhost:8080']
        });
        const page = await browser.newPage();
        await page.goto('http://toscrape.com/');
        const content = await page.content();
        console.log(content); // Outputs the page HTML
        await browser.close();
    })();
In this code, you’re initializing Puppeteer to launch a headless browser, specifying that it should use your local proxy server. The browser opens a new page, navigates to
http://toscrape.com
, and then retrieves the HTML content of the page. Once the content is logged into the console, the browser session is closed.
To execute your script, navigate to the folder containing
puppeteerScraping.js
in your terminal or shell. Run the script using the following command:
node puppeteerScraping.js
After running the script, Puppeteer opens the
http://toscrape.com/
URL using the proxy server. You should see the HTML content of the page printed in your terminal. This indicates that your Puppeteer script is scraping the web page through the local proxy correctly.
The expected output should be similar to the previous ones, and you should see your request being logged on the
mitmproxy
window:
…output omitted…
<div class="row">
<div class="col-md-1"></div>
<div class="col-md-10">
<h2>Books</h2>
<p>A <a href="http://books.toscrape.com">fictional bookstore</a> that desperately wants to be scraped. It's a safe place for beginners learning web scraping and for developers validating their scraping technologies as well. Available at: <a href="http://books.toscrape.com">books.toscrape.com</a></p>
<div class="col-md-6">
<a href="http://books.toscrape.com"><img src="./img/books.png" class="img-thumbnail"></a>
</div>
<div class="col-md-6">
<table class="table table-hover">
<tr><th colspan="2">Details</th></tr>
<tr><td>Amount of items </td><td>1000</td></tr>
<tr><td>Pagination </td><td>✔</td></tr>
<tr><td>Items per page </td><td>max 20</td></tr>
<tr><td>Requires JavaScript </td><td>✘</td></tr>
</table>
</div>
</div>
</div>
…output omitted…
A Better Alternative: The Bright Data Proxy Server
If you’re looking to improve your web scraping capabilities, consider using Bright Data. The Bright Data proxy server offers an advanced solution for managing your web requests.
Bright Data offers various proxy servers, such as residential , ISP , datacenter , and mobile proxies , that enable you to access any website from different geographic locations. This allows you to emulate different user agents and maintain anonymity.
Bright Data also offers IP rotation which enhances the efficiency and the anonymity of your web scraping activities by automatically switching between different proxies, to prevent your IP from being banned.
Additionally, you can use Bright Data’s Scraping Browser which is an automated browser that has built-in unblocking capabilities for things such as CAPTCHA, cookies, and browser fingerprinting. You can also leverage Bright Data’s Web Unlocker , which comes with machine learning algorithms to bypass any blockage from the targeted websites and enables you to collect data without being blocked.
Implement Bright Data Proxy in a Node.js Project
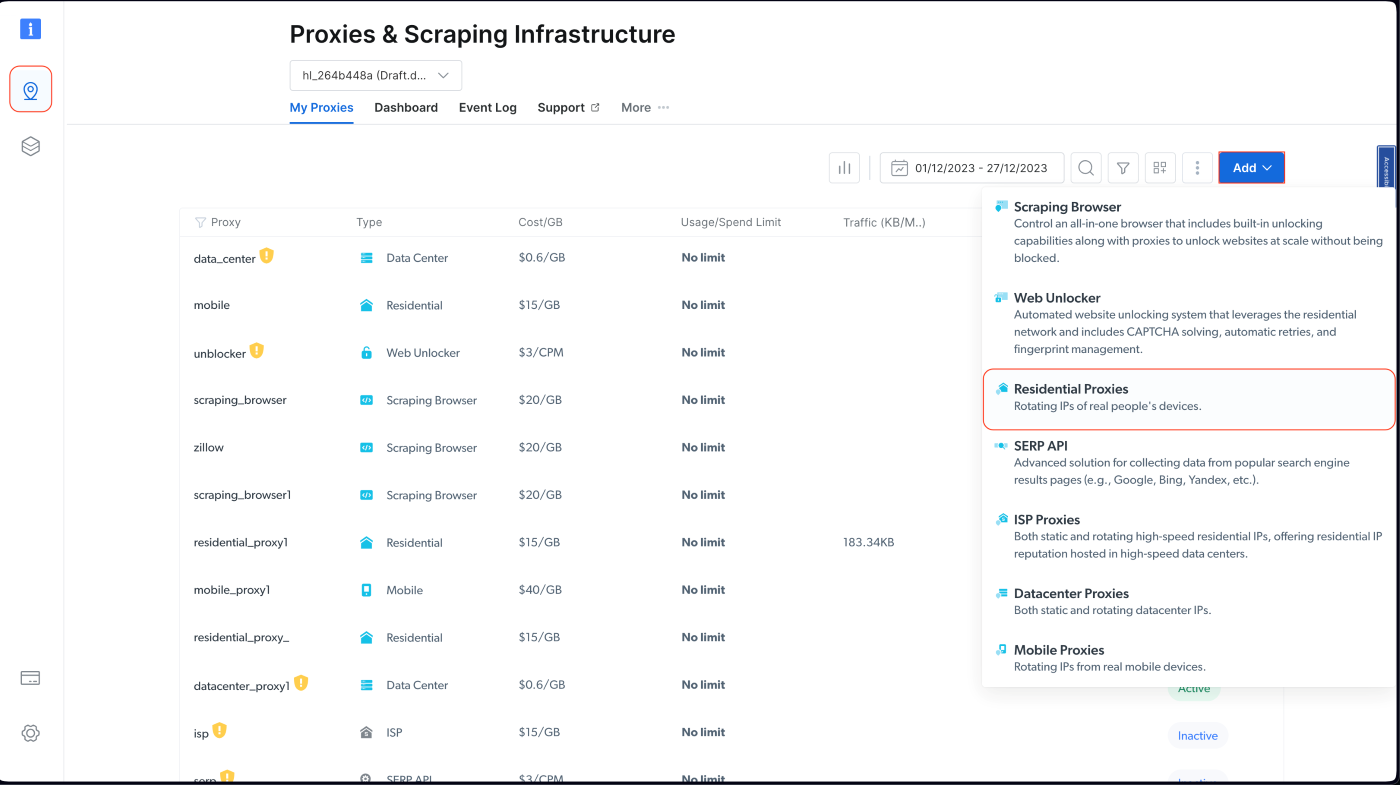
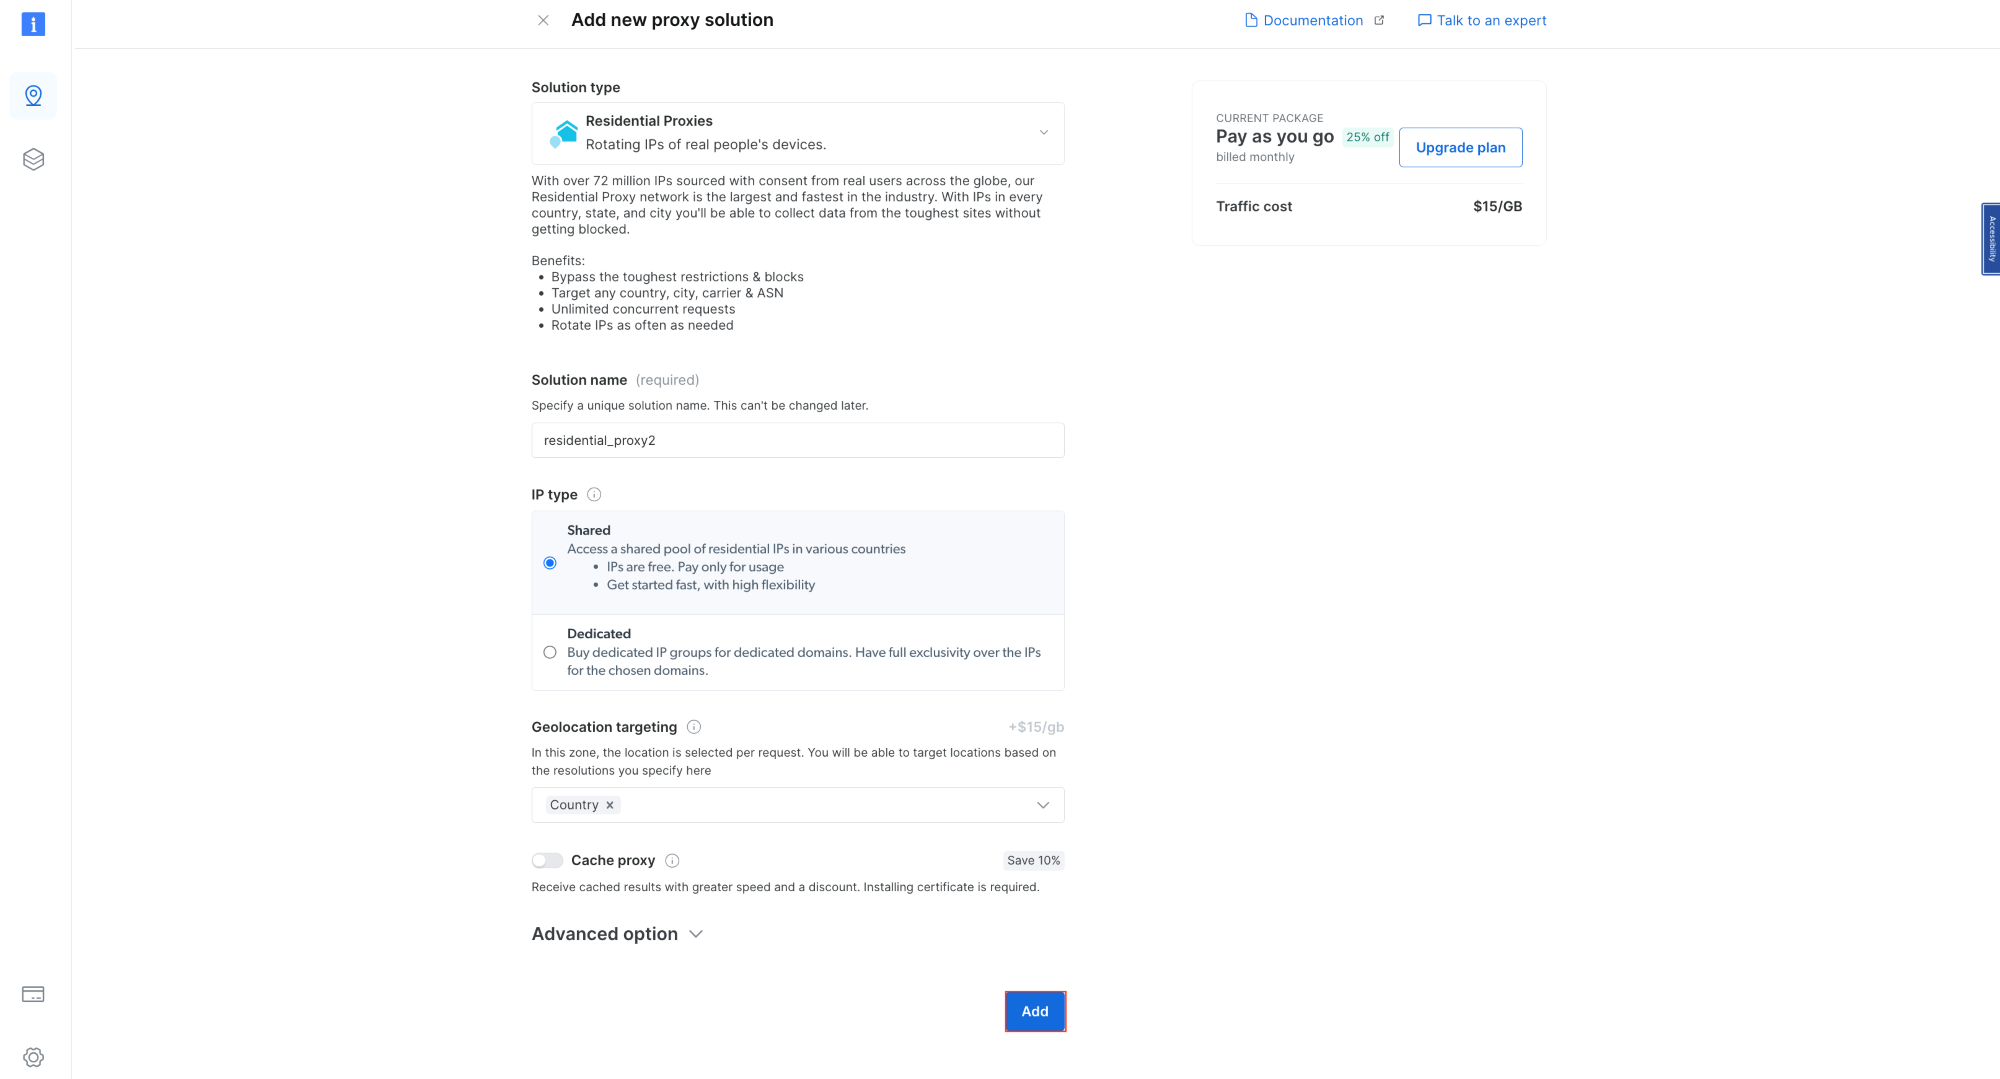
To integrate a Bright Data proxy into your Node.js project, you need to sign up for a free trial. Once your account is active, sign in, navigate to Proxies & Scraping Infrastructure , and add a new proxy by selecting Residential Proxies :
Retain the default settings and finalize the creation of your residential proxy:
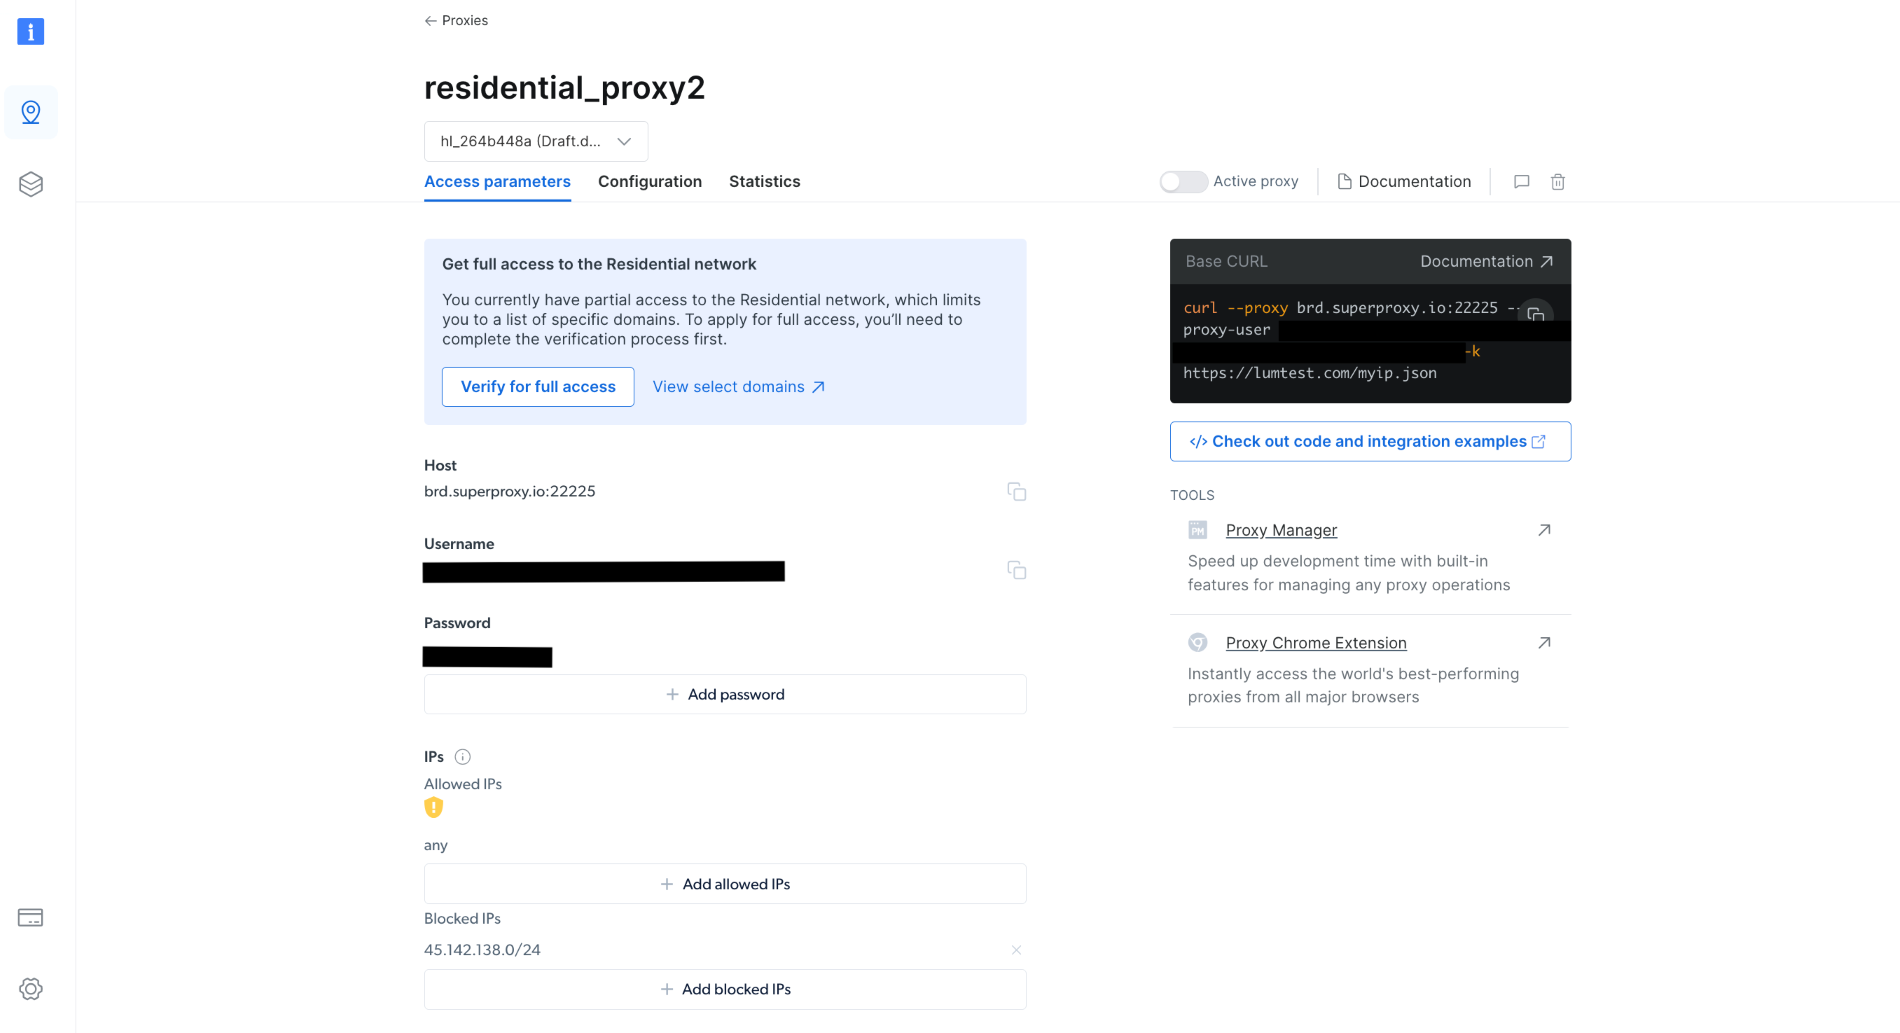
Once created, take note of the proxy credentials, including the host, port, username, and password. You need these in the next step:
In your project, create a
scrapingWithBrightData.js
file and add the following snippet, ensuring you replace the placeholder text with your Bright Data proxy credentials:
    const axios = require('axios');

    async function fetchDataWithBrightData(url) {
        const proxyOptions = {
            proxy: {
                host: 'YOUR_BRIGHTDATA_PROXY_HOST',
                port: YOUR_BRIGHTDATA_PROXY_PORT,
                auth: {
                    username: 'YOUR_BRIGHTDATA_USERNAME',
                    password: 'YOUR_BRIGHTDATA_PASSWORD'
                }
            }
        };
        try {
            const response = await axios.get(url, proxyOptions);
            console.log(response.data); // Outputs the fetched data
        } catch (error) {
            console.error('Error:', error);
        }
    }

    fetchDataWithBrightData('http://lumtest.com/myip.json');
This script configures
axios
to route HTTP requests through your Bright Data proxy. It fetches data from a specified URL using this proxy configuration. In this example, you’ll target
http://lumtest.com/myip.json
so that you can see the different proxy server sources based on your Bright Data configuration.
To execute your script, navigate to the folder containing
scrapingWithBrightData.js
in your terminal or shell. Then run the script using the following command:
node scrapingWithBrightData.js
Once you run the command, you should get the location of your IP address outputted to your console, which is mainly related to the proxy server of Bright Data.
The expected output is similar to the following:
{
  ip: '108.53.191.230',
  country: 'US',
  asn: { asnum: 701, org_name: 'UUNET' },
  geo: {
    city: 'Jersey City',
    region: 'NJ',
    region_name: 'New Jersey',
    postal_code: '07302',
    latitude: 40.7182,
    longitude: -74.0476,
    tz: 'America/New_York',
    lum_city: 'jerseycity',
    lum_region: 'nj'
  }
}
Now, if you run the script again with node
scrapingWithBrightData.js
, you’ll notice a different IP address location is being used by the Bright Data proxy server. This confirms that Bright Data uses different locations and IPs each time you run your scraping script, which lets you bypass any blockage or IP bans from the targeted websites.
Your output would look like this:
{
  ip: '93.85.111.202',
  country: 'BY',
  asn: {
    asnum: 6697,
    org_name: 'Republican Unitary Telecommunication Enterprise Beltelecom'
  },
  geo: {
    city: 'Orsha',
    region: 'VI',
    region_name: 'Vitebsk',
    postal_code: '211030',
    latitude: 54.5081,
    longitude: 30.4172,
    tz: 'Europe/Minsk',
    lum_city: 'orsha',
    lum_region: 'vi'
  }
}
The straightforward interface and settings of Bright Data make it easy for anyone, even beginners, to effectively use its powerful proxy management features.
Conclusion
In this article, you learned how to use proxies with Node.js. Without proper proxy management solutions like Bright Data, you may encounter challenges such as IP bans and limited access to target websites, which can hinder your scraping efforts. You also learned how easy it is to use the Bright Data proxies to enhance your web scraping endeavors. These servers not only contribute robustness and efficiency to your data collection process but also provide the versatility required for various scraping scenarios.
As you put these skills into practice, remember the importance of operating within the bounds of website terms and data privacy laws. It’s essential to scrape responsibly, respecting the rules set forth by websites. With the knowledge you have gained, particularly the capabilities offered by the Bright Data proxies, you are well-prepared for successful and ethical web scraping. Happy scraping!
Start free trial
Start free trial
All the code for this tutorial is available in this GitHub repository .