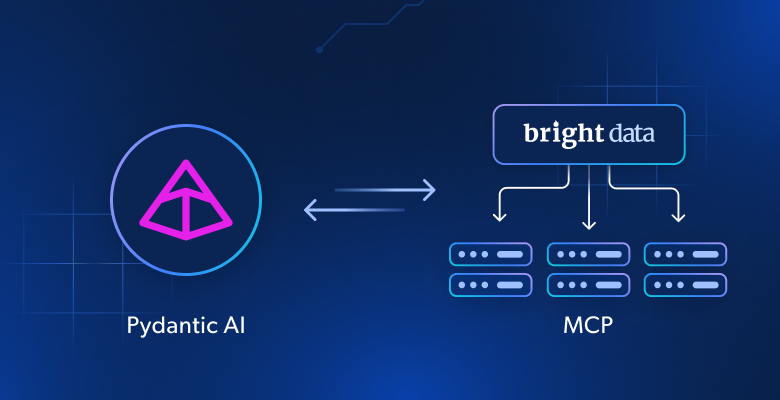
Integrate Pydantic AI with Bright Data's Web MCP
In this guide, you will learn:
What Pydantic AI is and what makes it unique as a framework for building AI agents.
Why Pydantic AI pairs well with Bright Data’s Web MCP server to build agents that can access the web.
How to integrate Pydantic with Bright Data’s Web MCP to create an AI agent backed by real data.
Let’s dive in!
What Is Pydantic AI?
Pydantic AI is a Python agent framework developed by the creators of Pydantic , the most widely used data validation library for Python.
Compared to other AI agent frameworks , Pydantic AI emphasizes type safety, structured outputs, and integration with real-world data and tools. In detail, some of its main characteristics are:
Support for OpenAI, Anthropic, Gemini, Cohere, Mistral, Groq, HuggingFace, Deepseek, Ollama, and other LLM providers.
Structured output validation via Pydantic models.
Debugging and monitoring via Pydantic Logfire .
Optional dependency injection for tools, prompts, and validators.
Streamed LLM responses with on-the-fly data validation.
Multi-agent and graph support for complex workflows.
Tool integration via MCP and including HTTP calls.
Familiar Pythonic flow to build AI agents like standard Python apps.
Built-in support for unit testing and iterative dev.
The library is open source and has already reached over 11k stars on GitHub .
Why Combine Pydantic AI with an MCP Server for Web Data Retrieval
AI agents built with Pydantic AI inherit the limitations of the underlying LLM. These include a lack of access to real-time information, which can lead to inaccurate responses. Fortunately, that issue can easily be addressed by equipping the agent with up-to-date data and the ability to perform live web exploration.
This is where the Bright Data’s Web MCP comes in. Built on Node.js, this MCP server integrates with Bright Data’s suite of AI-ready data retrieval tools. These tools empower your agent to access web content, query structured datasets, search the web, and interact with web pages on the fly.
As of now, the MCP tools in the server include:
| Tool | Description |
|---|---|
| scrape_as_markdown | Scrape content from a single webpage URL with advanced extraction options, returning results as Markdown. Can bypass bot detection and CAPTCHA. |
| search_engine | Extract search results from Google, Bing, or Yandex, returning SERP data in markdown format (URL, title, snippet). |
| scrape_as_html | Retrieve webpage content from a URL with advanced extraction options, returning the full HTML. Can bypass bot detection and CAPTCHA. |
| session_stats | Provide statistics on tool usage during the current session. |
| scraping_browser_go_back | Navigate back to the previous page in the scraping browser session. |
| scraping_browser_go_forward | Navigate forward to the next page in the scraping browser session. |
| scraping_browser_click | Perform a click action on a specific element by selector. |
| scraping_browser_links | Retrieve all links, including text and selectors, on the current page. |
| scraping_browser_type | Input text into a specified element within the scraping browser. |
| scraping_browser_wait_for | Wait until a particular element becomes visible on the page before proceeding. |
| scraping_browser_screenshot | Capture a screenshot of the current browser page. |
| scraping_browser_get_html | Retrieve the HTML content of the current page in the browser. |
| scraping_browser_get_text | Extract the visible text content from the current page. |
Then, there are over 40 specialized tools to collect structured data from a wide range of websites (e.g., Amazon, Yahoo Finance, TikTok, LinkedIn, and more) using
Web Scraper APIs
. For example, the
web_data_amazon_product
tool gathers detailed, structured product information from Amazon by accepting a valid product URL as input.
Now, take a look at how you can use these MCP tools in Pydantic AI!
How to Integrate Pydantic AI with the Bright MCP Server in Python
In this section, you will learn how to use Pydantic AI to build an AI agent. The agent will be equipped with live data scraping, retrieval, and interaction capabilities from the Web MCP server.
As an example, we will demonstrate how the agent can retrieve product data from Amazon on the fly. Keep in mind that this is just one of many possible use cases . The AI agent can tap into any of the 50+ tools available through the MCP server to perform a wide range of tasks.
Follow this guided walkthrough to build your Gemini + Bright Data MCP-powered AI agent using Pydantic AI!
Prerequisites
To replicate the code example, make sure you have the following installed locally:
Python 3.10 or higher .
Node.js (we recommend the latest LTS version).
You will also need:
A Bright Data account.
A Gemini API key (or an API key for another supported LLM provider, such as OpenAI, Anthropic, Deepseek, Ollama, Groq, Cohere, and Mistral).
Do not worry about setting up the API keys just yet. The steps below will guide you through configuring both the Bright Data and Gemini credentials when the time comes.
While not strictly required, this background knowledge will help you follow the tutorial:
A general understanding of how MCP works.
Basic familiarity with how AI agents operate .
Some knowledge of the Web MCP server and its available tools.
Basic knowledge with asynchronous programming in Python .
Step #1: Create Your Python Project
Open your terminal and create a new folder for your project:
mkdir pydantic-ai-mcp-agent
The
pydantic-ai-mcp-agent
folder will hold all the code for your Python AI agent.
Navigate into the newly created folder and set up a virtual environment inside it:
cd pydantic-ai-mcp-agent
python -m venv venv
Now, open the project folder in your preferred Python IDE. We recommend Visual Studio Code with the Python extension or PyCharm Community Edition .
Create a file named
agent.py
in the root of your project. At this point, your folder structure should look like this:
pydantic-ai-mcp-agent/
├── venv/
└── agent.py
The
agent.py
file is currently empty, but it will soon contain the logic to integrate Pydantic AI with the Bright Data MCP server.
Activate the virtual environment using the terminal in your IDE. In Linux or macOS, execute this command:
source venv/bin/activateEquivalently, on Windows, launch:
venv/Scripts/activateYou are all set! You now have a Python environment ready to build an AI agent with web data access.
Step #2: Install Pydantic AI
In your activated virtual environment, install all the required Pydantic AI packages with:
pip install "pydantic-ai-slim[google,mcp]"
This installs
pydantic-ai-slim
, a lightweight version of the full
pydantic-ai
package that avoids pulling in unnecessary dependencies.
In this case, since you plan to integrate your agent with the Bright Data MCP server, you will require the
mcp
extension. And because we will integrate Gemini as the LLM provider, you also need the
google
extension.
Note : For other models or providers, refer to the model documentation to see which optional dependencies are required.
Next, add these imports in your
agent.py
file:
from pydantic_ai import Agent
from pydantic_ai.mcp import MCPServerStdio
from pydantic_ai.models.google import GoogleModel
from pydantic_ai.providers.google import GoogleProvider
Cool! You can now use Pydantic AI for agent building.
Step #3: Set Up Environment Variables Reading
Your AI agent will interact with third-party services like Bright Data and Gemini via API. Do not hardcode your API keys into your Python code. Instead, load them from environment variables for better security and maintainability.
To simplify the process, take advantage of the
python-dotenv
library. With your virtual environment activated, install it by running:
pip install python-dotenv
Then, in your
agent.py
file, import the library and load the environment variables with
load_dotenv()
:
from dotenv import load_dotenv

load_dotenv()
This enables the script to read environment variables from a local
.env
file. So go ahead and create a
.env
file inside your project folder:
pydantic-ai-mcp-agent/
├── venv/
├── agent.py
└── .env     # <---------------
You can now access environment variables like this:
env_value = os.getenv("<ENV_NAME>")
Do not forget to import the
os
module from the Python standard library:
import os
Here we go! You are now set up to securely load Api keys from the
.env
file.
Step #4: Get Started with the Bright Data MCP Server
If you have not already, create a Bright Data account . If you already have one, simply log in.
Then, follow the official instructions to set up your Bright Data API key. For simplicity, we assume you are using a token with Admin permissions in this section.
Install the
Bright Data’s Web MCP
globally via
npm
:
npm install -g @brightdata/mcpThen, test that everything works with the Bash command below:
API_TOKEN="<YOUR_BRIGHT_DATA_API>" npx -y @brightdata/mcpOr, on Windows, the equivalent PowerShell command is:
$env:API_TOKEN="<YOUR_BRIGHT_DATA_API>"; npx -y @brightdata/mcp
In the above command, replace the
<YOUR_BRIGHT_DATA_API>
placeholder with the actual Bright Data API you retrieved earlier. Both commands set the required
API_TOKEN
environment variable and startsthe MCP server through the
@brightdata/mcp
npm package.
If everything is working correctly, your terminal will display logs similar to this:

The Bright Data MCP server startup logs
The first time you launch the MCP server, it will automatically create two default zones in your Bright Data account:
mcp_unlocker
: A zone for
Web Unlocker
.
mcp_browser
: A zone for
Browser API
.
These two zones enable the MCP server to run all the tools it exposes.
To verify that, log into your Bright Data dashboard and navigate to the “ Proxies & Scraping Infrastructure ” page. You will see the following zones automatically created:
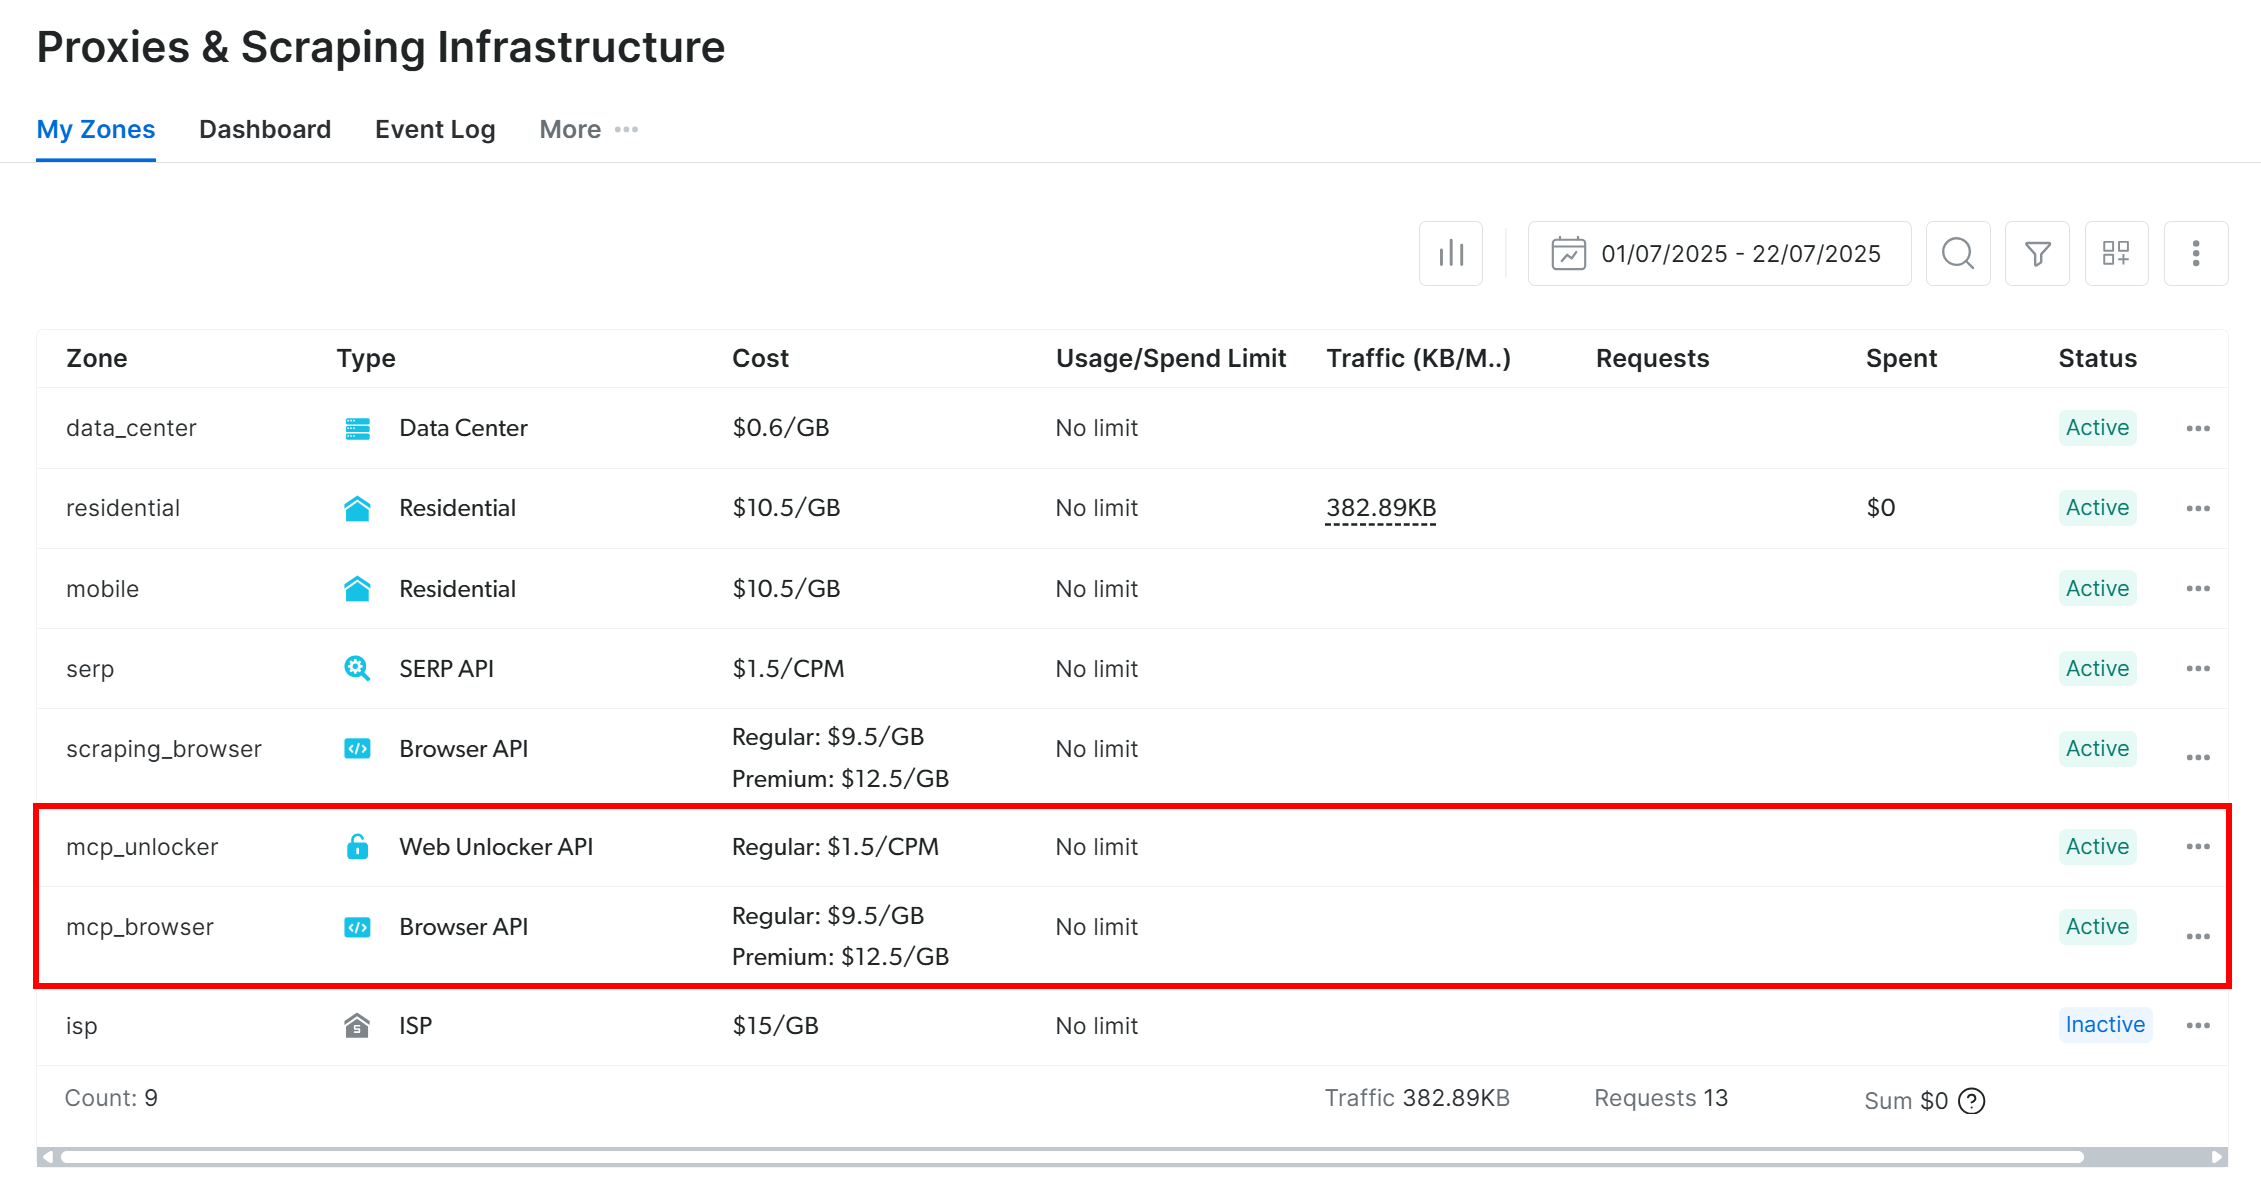
The mcp_unlocker and mcp_browser zones created by the MCP server at startup
Note : If you are not using an API token with Admin permissions, you will have to create the zones manually. Anyway, you can always specify the zone names in the envs as explained in the official documentation .
By default, the Web MCP only exposes the
search_engine
and
scrape_as_markdown
tools. To unlock advanced capabilities like browser automation and structured data extraction, you have to enable Pro Mode by setting the
PRO_MODE=true
environment variable.
Terrific! The Web MCP works like a charm.
Step #5: Connect to the Web MCP
Now that you confirmed your machine can run the Web MCP, connect to it!
Start by adding your Bright Data API key to the
.env
file:
BRIGHT_DATA_API_KEY="<YOUR_BRIGHT_DATA_API_KEY>"
Replace the
<YOUR_BRIGHT_DATA_API_KEY>
placeholder with the actual Bright Data API key you got earlier.
Then, read it in the
agent.py
file with:
BRIGHT_DATA_API_KEY = os.getenv("BRIGHT_DATA_API_KEY")Keep in mind that Pydantic AI supports three methods of connecting to an MCP server :
Using the Streamable HTTP transport.
Using the HTTP SSE transport.
Running the server as a subprocess and connecting via
stdio
.
If you are not familiar with the first two methods, read our guide on SSE vs Streamable HTTP for a deeper explanation.
In this case, you want to run the server as a subprocess (third method). To do that, initialize an
MCPServerStdio
instance as shown below:
server = MCPServerStdio(
    "npx",
    args=[
        "-y",
        "@brightdata/mcp",
    ],
    env={
        "API_TOKEN": BRIGHT_DATA_API_KEY,
        "PRO_MODE": "true" # Enable the Pro Mode to access all Bright Data tools
    },
)
What these lines of code do is essentially launch the Web MCP using the same
npx
command you ran earlier. It sets the
API_TOKEN
environment variable using your Bright Data API key for authentication. Plus, it enables
PRO_MODE
so you have access to all available tools, including advanced ones.
Great! You have now successfully configured the connection to your local Web MCP in code.
Step #6: Configure the LLM
Note : This section refers to Gemini, the chosen LLM for the tutorial. However, you can easily adapt it to OpenAI or any other supported LLM by following the official documentation .
Start by
retrieving your Gemini API key
and add it to your
.env
file like this:
GOOGLE_API_KEY="<YOUR_GOOGLE_API_KEY>"
Replace the
<YOUR_GOOGLE_API_KEY>
placeholder with your actual API key.
Next, import the necessary Pydantic AI libraries for Gemini integration:
from pydantic_ai.models.google import GoogleModel
from pydantic_ai.providers.google import GoogleProvider
These imports enable you to connect to the Google APIs and configure a Gemini model. Notice how you do not need to manually read the
GOOGLE_API_KEY
from the
.env
file. The reason is that
GoogleProvider
uses
google-genai
under the hood, which automatically reads the API key from the
GOOGLE_API_KEY
env.
Now, initialize the provider and model instances:
provider = GoogleProvider()
model = GoogleModel("gemini-2.5-flash", provider=provider)
Amazing! This will allow the Pydantic AI agent to connect to the
gemini-2.5-flash
model via the Google API, which is free to use.
Step #7: Define the Pydantic AI Agent
Define a Pydantic AI Agent that uses the previously configured LLM and connects to the Web MCP server:
agent = Agent(model, toolsets=[server])
Perfect! With just a single line of code, you just instantiated an
Agent
object. This represents an AI agent that can handle your tasks using the tools exposed by the Web MCP server.
Step #8: Launch Your Agent
To test your AI agent, you need to write a prompt that involves a web data extraction (on interaction) task. This helps you verify whether the agent uses the Bright Data tools as expected.
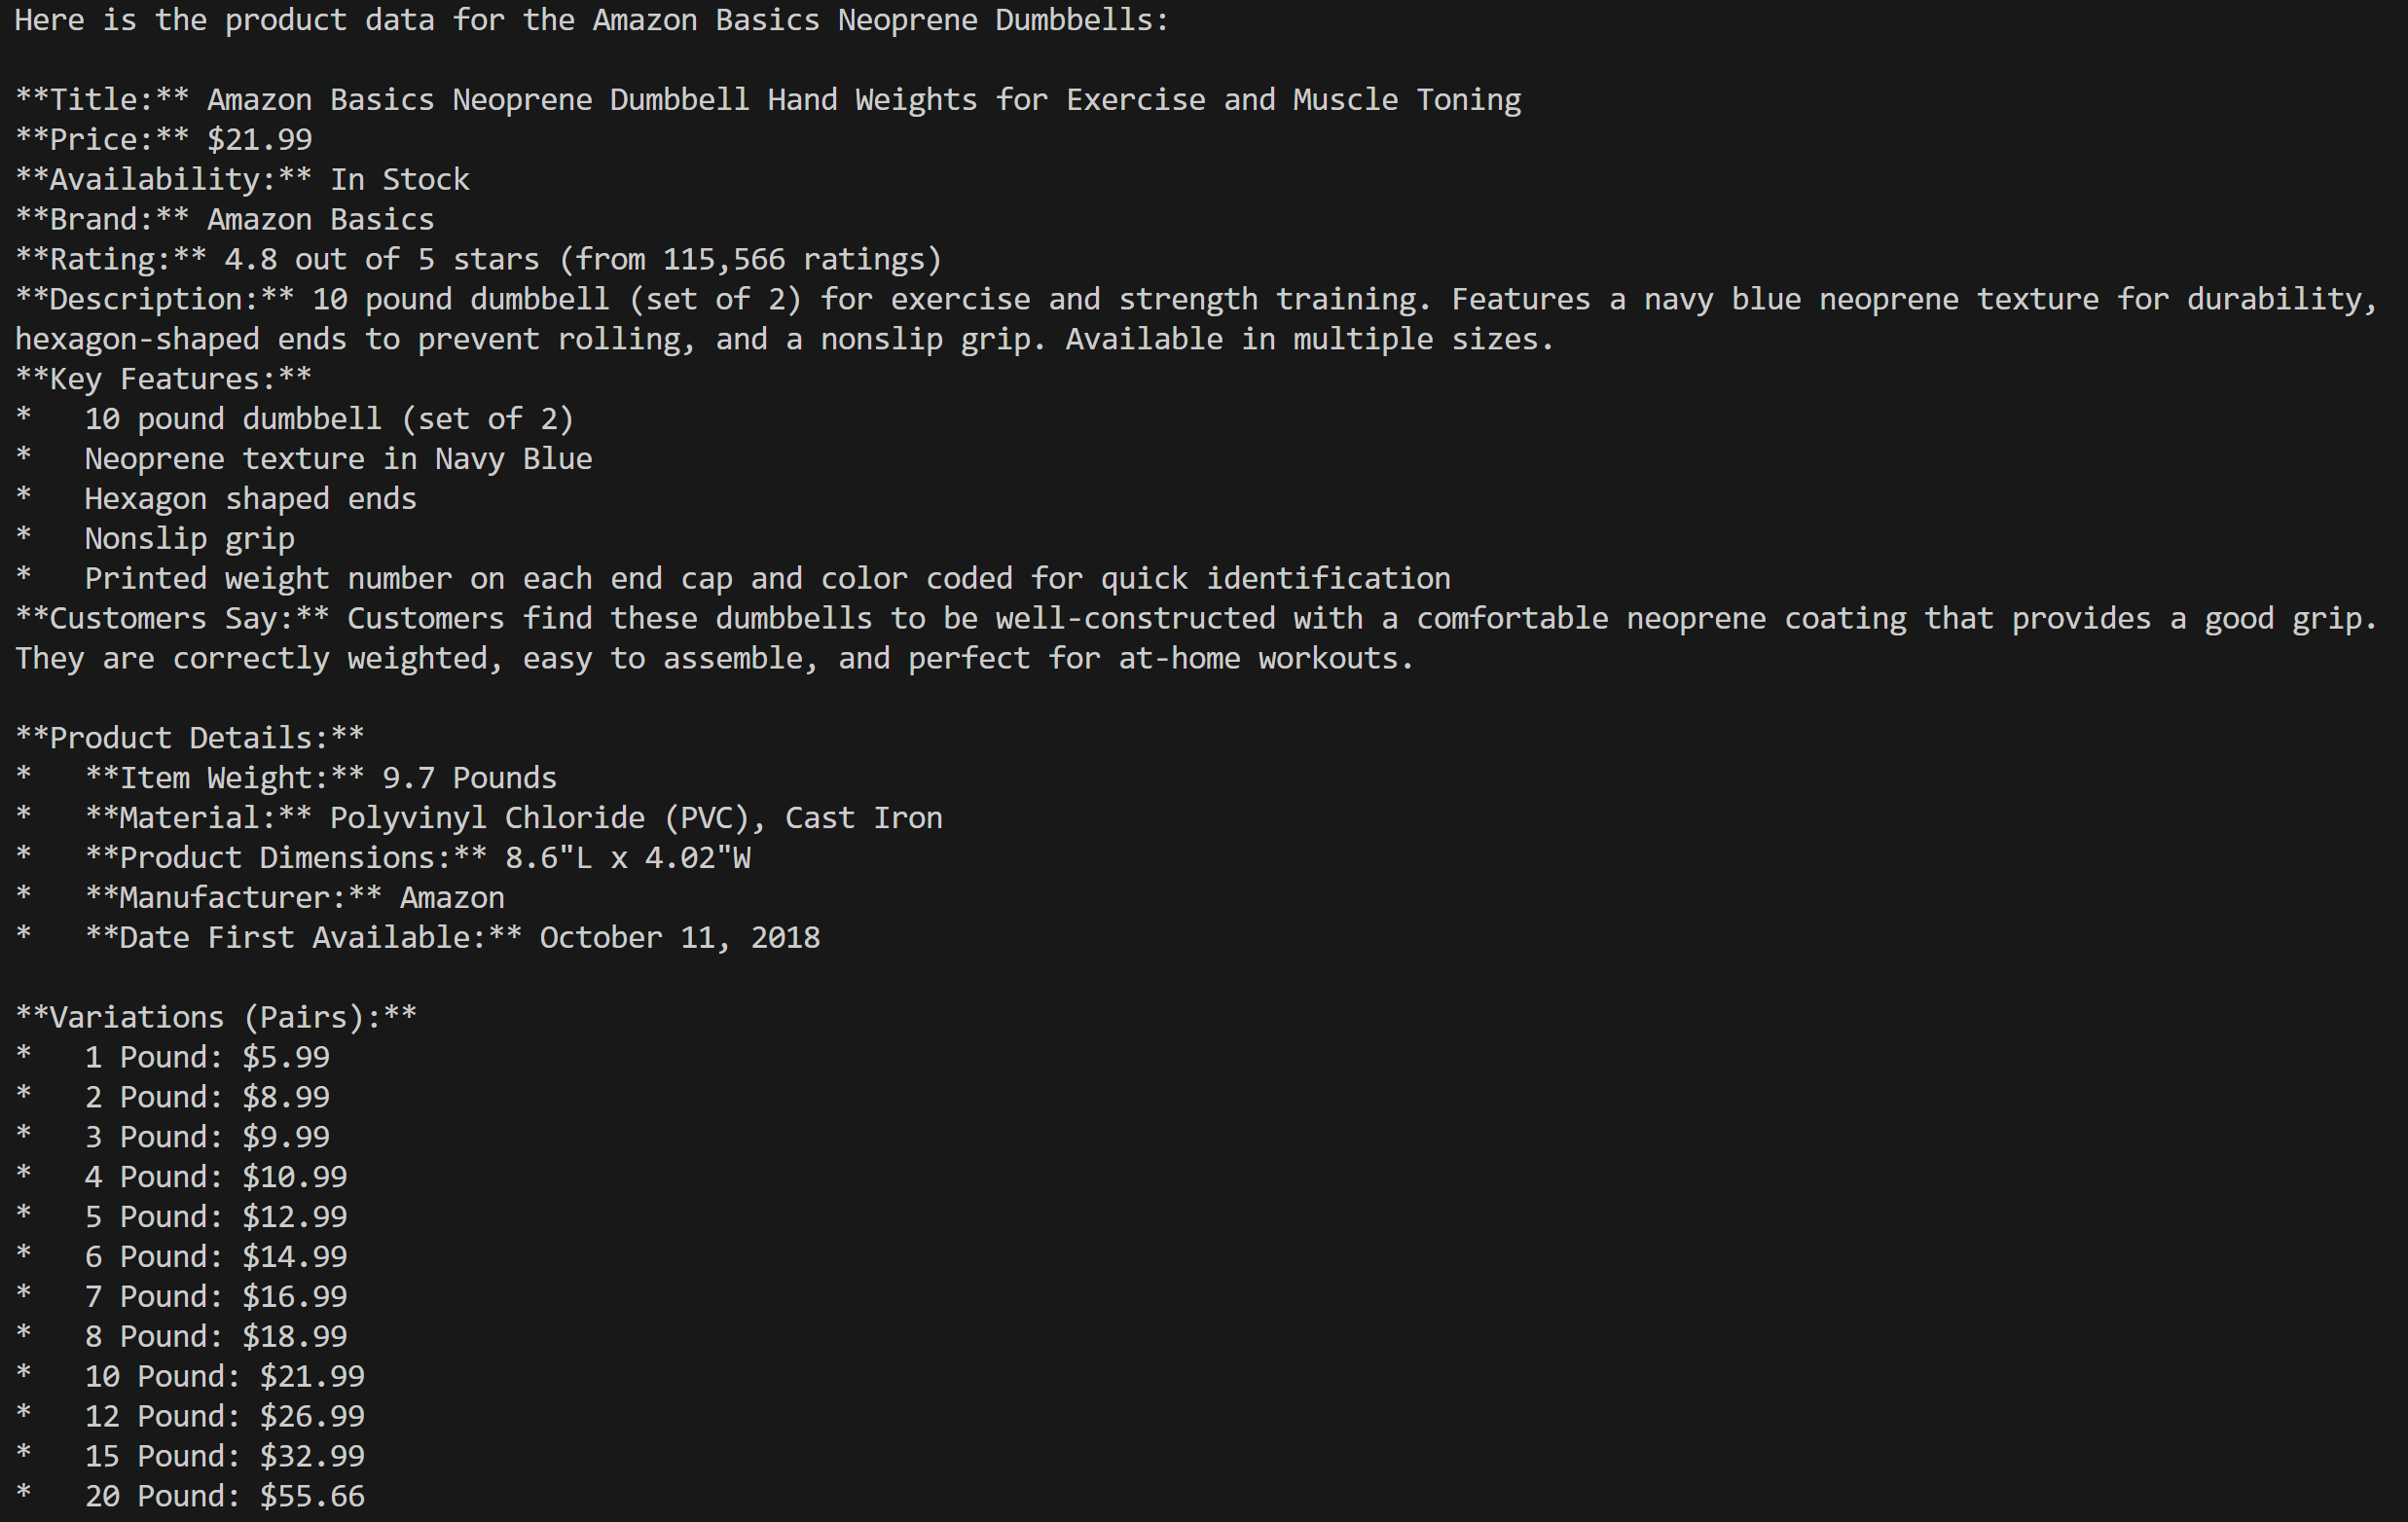
A good starting point is asking it to retrieve product data from an Amazon page, like this:
“Give me product data from https://www.amazon.com/AmazonBasics-Pound-Neoprene-Dumbbells-Weights/dp/B01LR5S6HK/”
“Give me product data from https://www.amazon.com/AmazonBasics-Pound-Neoprene-Dumbbells-Weights/dp/B01LR5S6HK/”
Normally, if you send a request like this directly to Gemini, one of two things would happen:
The request would fail due to Amazon’s anti-bot systems (e.g., the Amazon CAPTCHA ), which prevent Gemini from accessing the page content.
It would return hallucinated or made-up product information, since it can not access the live page.
Try the prompt directly in Gemini. You will likely get a message saying it could not access the Amazon page, followed by fabricated product details, as below:

The unsuccessful response produced by Gemini
Thanks to the integration with the Web MCP server, this should not happen in your setup. Instead of failing or guessing, your agent should use the
web_data_amazon_product
tool to retrieve real-time, structured product data from the Amazon page and then return it in a clean, readable format.
Since the method for interrogating the Pydantic AI agent is asynchronous, wrap the execution logic in an
async
function like so:
async def main():
    async with agent:
       result = await agent.run("Give me product data from https://www.amazon.com/AmazonBasics-Pound-Neoprene-Dumbbells-Weights/dp/B01LR5S6HK/")

    output = result.output
    print(output)

if __name__ == "__main__":
    asyncio.run(main())
Do not forget to import
asyncio
from the Python Standard Library:
import asyncioMission complete! All that is left is to run the full code and see if the agent lives up to expectations.
Step #9: Put It all Together
This is the final code in
agent.py
:
from pydantic_ai import Agent
from pydantic_ai.mcp import MCPServerStdio
from pydantic_ai.models.google import GoogleModel
from pydantic_ai.providers.google import GoogleProvider
from dotenv import load_dotenv
import os
import asyncio

# Load the environment variables from the .env file
load_dotenv()

# Read the API key from the envs for integration with the Bright Data Web MCP server
BRIGHT_DATA_API_KEY = os.getenv("BRIGHT_DATA_API_KEY")

# Connect to the Bright Data Web MCP server
server = MCPServerStdio(
    "npx",
    args=[
        "-y",
        "@brightdata/mcp",
    ],
    env={
        "API_TOKEN": BRIGHT_DATA_API_KEY,
        "PRO_MODE": "true" # Enable the Pro Mode to access all Bright Data tools
    },
)

# Configure the Google LLM model
provider = GoogleProvider()
model = GoogleModel("gemini-2.5-flash", provider=provider)

# Initialize the AI agent with Gemini and Bright Data's Web MCP server integration
agent = Agent(model, toolsets=[server])

async def main():
    async with agent:
       # Ask the AI Agent to perform a scraping task
       result = await agent.run("Give me product data from https://www.amazon.com/AmazonBasics-Pound-Neoprene-Dumbbells-Weights/dp/B01LR5S6HK/")
    # Get the result produced by the agent and print it
    output = result.output
    print(output)

if __name__ == "__main__":
    asyncio.run(main())
Wow! Thanks to Pydantic AI and Bright Data, in around 50 lines of code, you just built a powerful MCP-powered AI agent.
Execute the AI agent with:
python agent.pyIn the terminal, you should see an output as follows:
The output produced by the Pydantic AI agent
As you can see by checking the Amazon product page mentioned in the prompt , the information returned by the AI agent is accurate:

The Amazon product mentioned in the prompt
That is because the agent used the
web_data_amazon_product
tool provided by the Web MCP server to retrieve fresh, structured product data from Amazon in JSON format.
Et voilà! The expectations were met, and the Pydantic AI + MCP integration worked exactly as intended.
Next Steps
The AI agent built here is functional, but it serves only as a starting point. Consider taking it to the next level by:
Implementing a REPL loop to chat with the agent in the CLI or integrating it with GUI chat tools like Gradio .
Extending the Bright Data MCP tools by defining your own custom tools .
Adding debugging and monitoring using Pydantic Logfire .
Transforming your agent into a RAG autonomous agent within a multi-agent workflow.
Defining custom function validators for output data integrity.
Conclusion
In this article, you learned how to integrate Pydantic AI with the Bright Data’s Web MCP server to build an AI agent capable of accessing the web. This integration is made possible by Pydantic AI’s built-in support for MCP.
To build more sophisticated agents, explore the full range of services available in the Bright Data AI infrastructure . These solutions can power a wide variety of agentic scenarios .
Create a Bright Data account for free and start experimenting with our AI-ready web data tools!