
How To Set a Proxy in SuperAgent
This SuperAgent proxy guide will cover the following topics:
What SuperAgent is and why you need proxies.
What the superagent-proxy library is and why it is required.
How to set an HTTP, HTTPS, or SOCKS proxy in SuperAgent.
How to deal with proxy authentication and IP rotation.
What Is SuperAgent and Why Do You Need a Proxy?
{ "@context": "https://schema.org", "@type": "HowTo", "name": "Integrating SuperAgent with a Bright Data Proxy", "description": "Learn how to integrate SuperAgent, a lightweight HTTP client for JavaScript, with a Bright Data proxy for enhanced online anonymity and IP ban avoidance.", "step": [ { "@type": "HowToStep", "name": "Understanding SuperAgent and Proxy Need", "text": "SuperAgent is a flexible HTTP client for JavaScript applications. Using a SuperAgent proxy hides your IP address, enhancing anonymity and preventing IP bans." }, { "@type": "HowToStep", "name": "Installing SuperAgent and superagent-proxy", "text": "Add SuperAgent and superagent-proxy to your project's dependencies with npm install superagent superagent-proxy." }, { "@type": "HowToStep", "name": "Extending SuperAgent with Proxy Support", "text": "In your Node.js script file, import superagent and extend it with superagent-proxy to add a proxy(uri) method for HTTP request proxying." }, { "@type": "HowToStep", "name": "Setting up a Proxy", "text": "Use the proxy(uri) function to set an HTTP, HTTPS, or SOCKS proxy. Provide the proxy URL following the syntax [<PROXY_PROTOCOL>://]<PROXY_HOST>:<PROXY_PORT>." }, { "@type": "HowToStep", "name": "Complete Example with HTTPBin", "text": "Verify the proxy setup by targeting the /ip endpoint of the HTTPBin project. The API should return the IP of the proxy server, confirming the requests are routed correctly." }, { "@type": "HowToStep", "name": "Advanced Use Cases", "text": "Explore advanced SuperAgent proxy integration techniques, such as setting proxies globally via environment variables, proxy authentication, and rotating proxies." }, { "@type": "HowToStep", "name": "Integrating with Bright Data Proxy", "text": "For reliable proxies, integrate SuperAgent with Bright Data. Create an account, configure your proxy service, and use the provided credentials in SuperAgent." }, { "@type": "HowToStep", "name": "Making a Bright Data Proxy Request", "text": "Build the proxy URL with the provided credentials and make a request to https://lumtest.com/myip.json. Verify that the response contains the proxy's IP address." } ], "supply": [ { "@type": "HowToSupply", "name": "superagent and superagent-proxy npm packages" }, { "@type": "HowToSupply", "name": "Proxy server URL" }, { "@type": "HowToSupply", "name": "Bright Data account for proxy credentials" } ], "tool": [ { "@type": "HowToTool", "name": "Node.js" }, { "@type": "HowToTool", "name": "npm (Node Package Manager)" }, { "@type": "HowToTool", "name": "IDE or Text Editor" } ] }
SuperAgent is a lightweight and easy-to-use HTTP client for JavaScript applications. Its flexibility makes it a popular library for making HTTP requests on frontend and Node.js applications. It offers many features, such as custom headers, configurations, and cookies.
Why do you want a SuperAgent proxy? Because it allows you to protect your online identity and achieve your goals anonymously. By forwarding your requests through a proxy server , you can hide your IP address, making it more difficult for the target server to identify and block you. This additional layer of confidentiality helps avoid IP bans or restrictions.
Note that you can achieve the same result with Node Fetch, as explained in our node-fetch proxy guide , and Axios, as covered in our Axios proxy tutorial .
What Is superagent-proxy?
SuperAgent does not support proxies natively. Considering how important proxy support is, the community fixed that with
superagent-proxy
. That npm package extends the superagent Request class with a proxy(uri) function to set an HTTP, HTTPS, or SOCKS proxy. In other words, superagent-proxy enables you to proxy HTTP requests through a specified proxy.
Behind the scenes, the library is powered by the
Proxy Agents
project, which offers
http.Agent
implementations to set proxies in different protocols.
Setting a Proxy in SuperAgent Through superagent-proxy
In this step-by-step section, you will learn how to set an HTTP, HTTPS, or SOCKS proxy in SuperAgent.
Prerequisites
Suppose you have a Node.js project in place. First, add the superagent and superagent-proxy npm packages to your project’s dependencies with:
npm install superagent superagent-proxy
In your Node.js script file, import the
superagent
function and extend it with
superagent-proxy
:
const superagent = require("superagent");

// extend the Request class from SuperAgent

// with the proxy() method

require("superagent-proxy")(superagent);
Or if you are an ESM user:
import superagent from "superagent";

import superagentProxy from "superagent-proxy";

// extend the Request class from SuperAgent

// with the proxy() method

superagentProxy(superagent);
Perfect! You are ready to follow the SuperAgent proxy guide!
HTTP, HTTPS, SOCKS Proxies
This is the URL syntax of an HTTP/HTTPS/SOCKS proxy:
[<PROXY_PROTOCOL>://]<PROXY_HOST>:<PROXY_PORT>Specifically, the parameters are:
<PROXY_PROTOCOL>
: “http” for HTTP proxies, “https” for HTTPS proxies, and ”socks,” “socks4,” “socks5” for proxies in the different SOCKS protocols. When omitted, it usually defaults to “http.”
<PROXY_HOST>
: The IP of the proxy server or its domain.
<PROXY_PORT>
: The port the proxy server listens to.
For example, assume this is the URL of your HTTP proxy:
"http://207.2.120.19:88"You can use a proxy in SuperAgent as below:
try {

    const proxyURL = "http://207.2.120.19:88";

    const response = await superagent

        .get("https://example.com")

        .proxy(proxyURL);

    // retrieve the JSON response from the request

    // and print it

    const jsonResponse = JSON.stringify(response.body);

    console.log(jsonResponse);

} catch (e) {

    console.error(e);

}

Or if you prefer a Promise-based approach:

const proxyURL = "http://207.2.120.19:88";

superagent

    .get("https://example.com")

    .proxy(proxyURL)

    .end((err, res) => {

        if (err) {

            console.log(err);

        } else {

            const jsonResponse = JSON.stringify(res.body);

            console.log(jsonResponse);

        }

    });
As you can see, all you have to do is pass the proxy URL to the proxy() method provided by
superagent-proxy
. SuperAgent will now perform the request to the URL passed as a parameter to
get()
through the HTTP proxy server specified in proxyURL.
Let’s verify that the above SuperAgent proxy approach works in a complete example!
Complete Example
If you do not have the URL of a proxy server, you can get one online. Consider this one:
http://198.199.70.20:31028That is an HTTP proxy , but keep in mind that the example you are about to see also works with HTTPS or SOCKS proxies .
To verify SuperAgent routes the requests through the specified proxy, we will target the /ip endpoint from the HTTPBin project. That public API returns the IP of the incoming request. Thus, if everything works as expected, the HTTPBin API should respond with the IP of the proxy server.
Here is what the complete JavaScript snippet looks like:
const superagent = require("superagent");

require("superagent-proxy")(superagent);

async function makeProxyRequest() {

    try {

        const proxyURL = "http://198.199.70.20:31028";

        const response = await superagent

            .get("https://httpbin.io/ip")

            .proxy(proxyURL);

        const jsonResponse = JSON.stringify(response.body);

        console.log(jsonResponse);

    } catch (e) {

        console.error(e);

    }

}

makeProxyRequest();
Execute the script, and it should print:
{ "origin": "198.199.70.20" }Fantastic! That is the IP of the proxy server, which means that the approach works as intended!
Note that the wording was intentional. “Should print” and not “will print” because free proxies have such a short lifespan that by the time you read this article, the selected proxy will no longer work .
Using free proxies retrieved online is okay for learning purposes, but you cannot trust them in a real-world scenario. Why? Because free proxy services are slow, error-prone, unreliable, data-hungry and short-lived. Make your life easier and avoid them altogether!
How to address that issue? With the premium proxies provided by Bright Data, the best proxy provider in the market. Create an account and try our reliable proxies for free!
SuperAgent Proxy: Advanced Use Cases
You know the basics of SuperAgent proxy integration, but what about more complex techniques? Follow the chapters below and become a superagent-proxy expert.
Setting Proxies Globally Via Environment Variables?
SuperAgent does not support global configurations but do not forget that superagent-proxy uses proxy-agent under the hood. There are two ways the proxy-agent package determines which proxy to use:
It uses the URL passed as a parameter.
It reads the HTTP_PROXY and HTTPS_PROXY environment variables as defined in the
proxy-from-env
module.
You can therefore configure a proxy globally in SuperAgent by setting the envs below:
HTTP_PROXY
: The URL of the proxy server to use for HTTP requests.
HTTPS_PROXY
: The URL of the proxy server to use for HTTPS requests.
For example, set them on Linux or macOS with the following commands:
export HTTP_PROXY="[<PROTOCOL>://]<USERNAME>:<PASSWORD>@<HOST>[:<PORT>]"

export HTTPS_PROXY="[<PROTOCOL>://]<USERNAME>:<PASSWORD>@<HOST>[:<PORT>]"
Then, call the
proxy()
method with no parameters:
superagent

    .get("https://example.com")

    .proxy()

    // ...
Great! SuperAgent will use the proxies specified in the environment variables for each request.
Follow the link to learn more, as the same mechanism also works with proxies in cURL .
Proxy Authentication in superagent-proxy
Proxy providers protect their servers with authentication. That way, only users with a valid pair of credentials will be able to access their proxy servers. Trying to connect to an authenticated proxy without a username and password will fail with a 407 Proxy Authentication Required HTTP error .
This is the syntax of the URL of an authenticated proxy:
[<PROTOCOL>://]<USERNAME>:<PASSWORD>@<HOST>[:<PORT>]
It is just like the URL of a regular proxy, but it also involves a
<USERNAME>
and a
<PASSWORD
>.
To better understand how this mechanism works, consider an example. Suppose the string below is the URL to connect to an authenticated proxy:
http://admin:[email protected]:8080The fields of the URL would be:
<PROTOCOL>
: http
<USERNAME>
: admin
<PASSWORD>
: pK5io86NWp56l9sju7
<HOST>
: 20.210.113.32
<PORT>
: 8080
Given that, there are two ways to deal with proxy authentication in SuperAgent:
Specify the credentials directly in the proxy URL:
const proxyURL = "http://admin:[email protected]:8080"

superagent

    .get("https://example.com")

    .proxy(proxyURL)

    // ...
Set the username and password attributes in a url-parse-like object:
superagent

    .get("https://httpbin.io/ip")

    .proxy({

         protocol: "http",

         host: "20.210.113.322",

         port: "8080",

         username: "admin",

         password: "pK5io86NWp56l9sju7"

     })
Awesome! SuperAgent proxy authentication is no longer a secret.
Rotating Proxies in SuperAgent
If you rely on the same proxy server over and over again, there is a risk of the target site blocking its IP address. To avoid this issue, it is crucial to ensure that each request originates from a distinct proxy server. Here is how you can do it:
Populate a list of proxy URLs.
Randomly choose a proxy URL before each request.
Configure the picked proxy URL in SuperAgent.
However, managing this logic before each HTTP request is tedious. Plus, it requires access to a pool of reliable proxy servers, which comes with a cost. Luckily, Bright Data offers a solution! Its rotating proxies automatically change the exit IP addresses at each request! These proxies ensure fresh IP addresses with each connection, are available in 195 countries, boast exceptional network uptime, and guarantee a success rate of 99.9%.
Follow the next chapter to learn how to get started with Bright Data’s rotating proxies in SuperAgent.
Integrating SuperAgent with a Bright Data Proxy
Bright Data controls the best proxy servers in the world, serving Fortune 500 companies and over 20,000 customers. Its worldwide proxy network involves:
Datacenter proxies – Over 770,000 datacenter IPs.
Residential proxies – Over 72M residential IPs in more than 195 countries.
ISP proxies – Over 700,000 ISP IPs.
Mobile proxies – Over 7M mobile IPs.
Overall, this is one of the largest and most reliable proxy networks available. Let’s now see how to integrate Bright Data’s proxies in SuperAgent.
If you already have an account, log in to Bright Data. Otherwise, create an account for free. You will gain access to the following user dashboard:
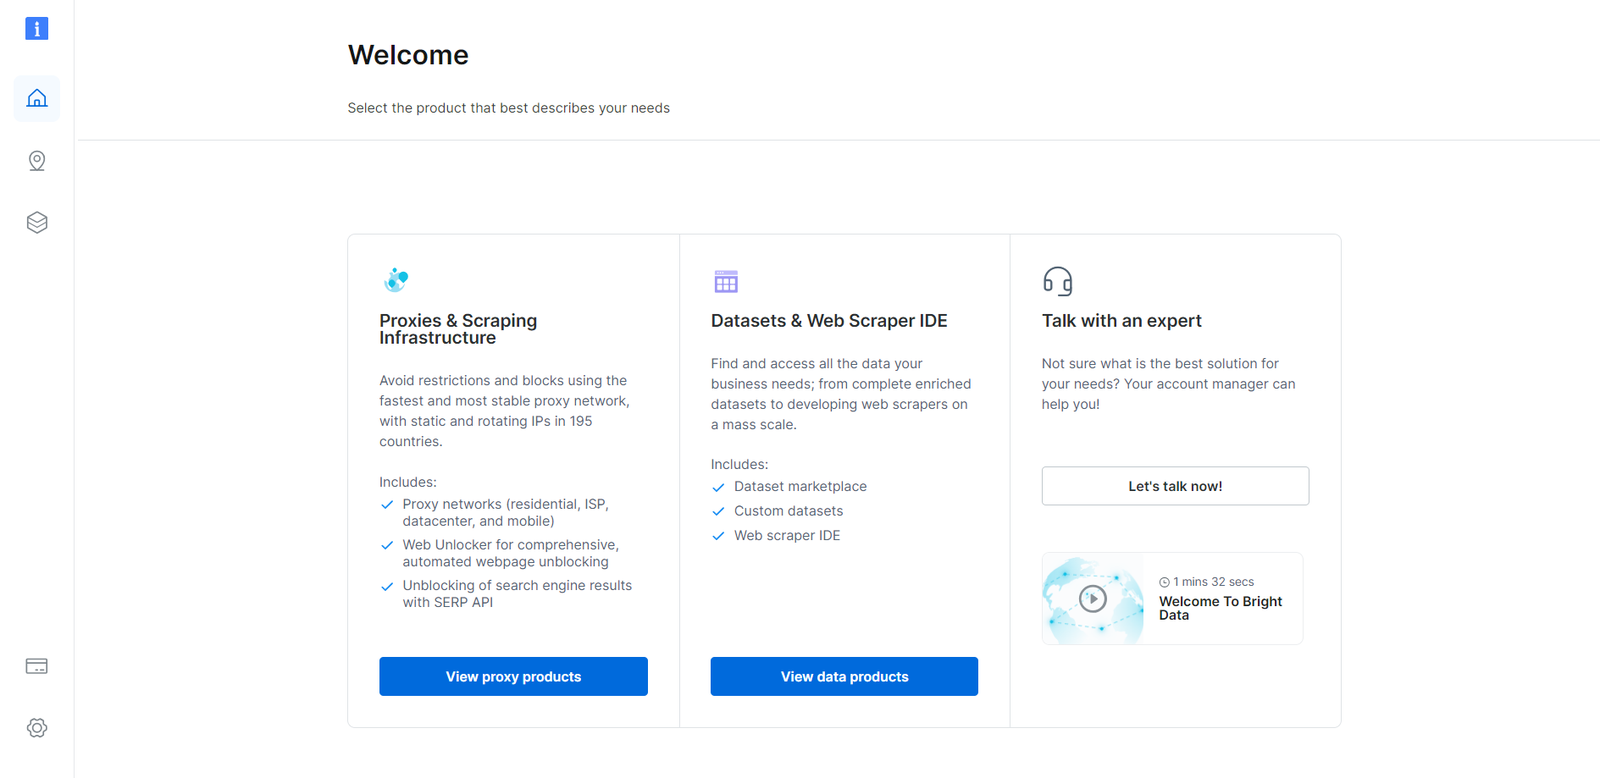
Click the “View proxy products” button:
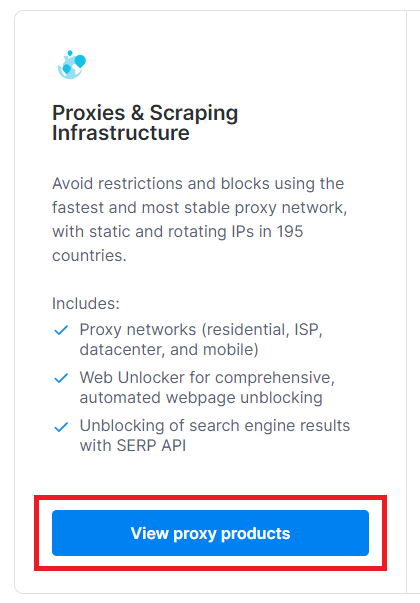
You will access the “Proxies & Scraping Infrastructure” page below:
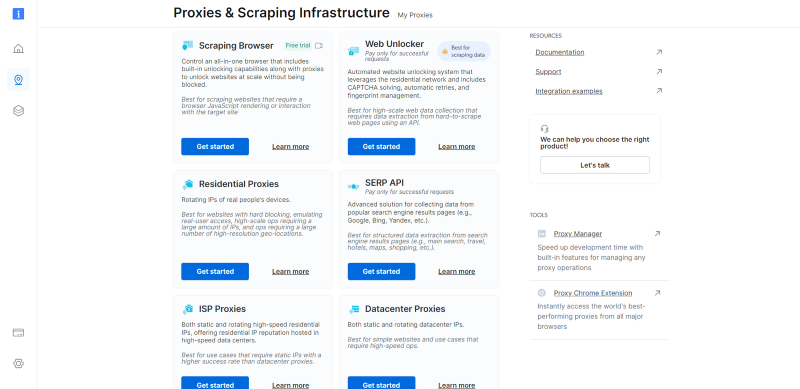
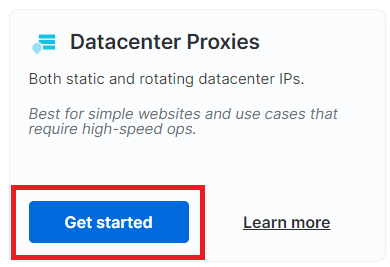
Scroll down, find the the “Datacenter proxies” card, and click on the “Get started” button:
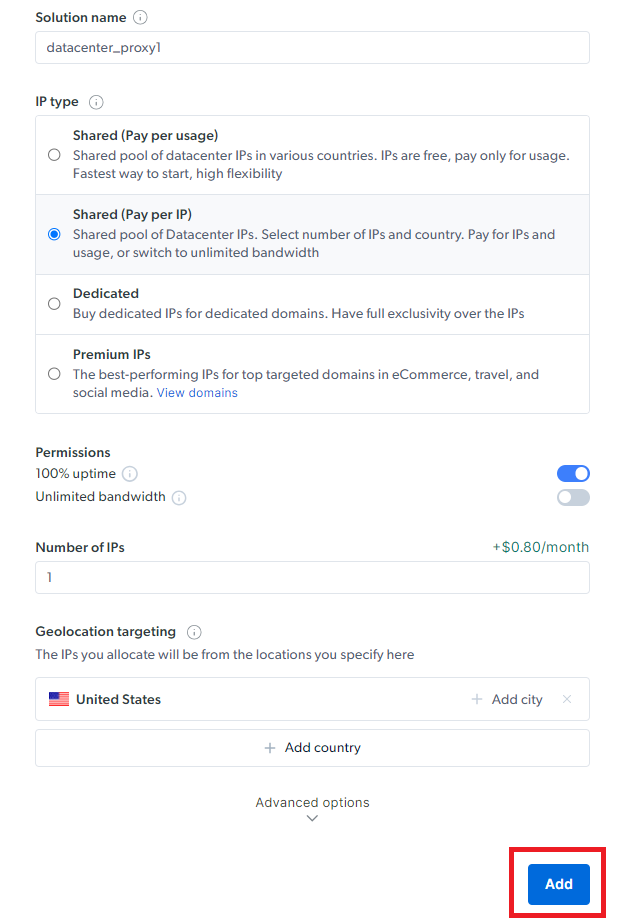
You will reach the datacenter proxy configuration dashboard. Give your solution a unique name and set up the proxy service based on your needs. If you have any doubts about how to configure the proxy, please feel free to contact the 24/7 support. Then, press “Add.”
Finally, you will get access to your proxy’s hostname, port, username, and password as below:
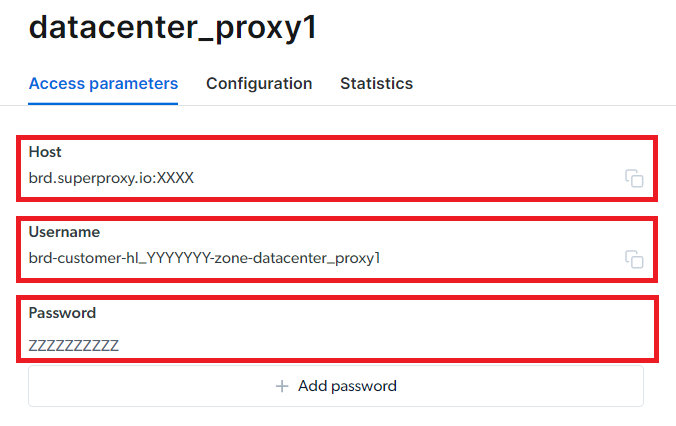
Note that the “Host” field already includes the port.
That is all you need to build the proxy URL and use it in SuperAgent. Put all the information together, and build a URL with the following syntax:
<Username>:<Password>@<Host>For example, in this case it would be:
brd-customer-hl_YYYYYYY-zone-datacenter_proxy1:@ZZZZZZZZZZbrd.superproxy.io:XXXXYour SuperAgent proxy snippet for Bright Data integration will look like as follows:
const superagent = require("superagent");
require("superagent-proxy")(superagent);

async function makeBrightDataProxyRequest() {
    try {
        const proxyURL = "brd-customer-hl_YYYYYYY-zone-datacenter_proxy1:@ZZZZZZZZZZbrd.superproxy.io:XXXX";
        const response = await superagent
            .get("https://lumtest.com/myip.json")
            .proxy(proxyURL);

        const jsonResponse = JSON.stringify(response.body);
        console.log(jsonResponse);
    } catch (e) {
        console.error(e);
    }
}

makeBrightDataProxyRequest();
Conclusion
In this SuperAgent proxy tutorial, you saw why you should use proxies and how to do it with superagent-proxy. You now know how to set up an HTTP, HTTPS, or SOCKS proxy in SuperAgent, the powerful JavaScript HTTP client library. As proved here, that takes only a couple of lines of code!
Thanks to this guide, you also understood why you should never use free proxy services and instead prefer reliable proxy servers from the best provider on the market, Bright Data. The integration procedure in SuperAgent is the same, but the benefits of premium proxies are endless!
Start free trial
Start free trial