Gemini CLI & Bright Data's Web MCP: Step-by-Step Guide
In this tutorial, you will learn:
What Gemini CLI is and why it is so popular in the coding community.
How adding web interaction and data extraction capabilities can take it to the next level.
How to connect the Gemini CLI with the Bright Data Web MCP server to build an enhanced AI coding agent.
Let’s dive in!
What Is the Gemini CLI?
The Gemini CLI is an AI agent developed by Google that brings the power of the Gemini large language model directly into your terminal. It is designed to improve developer productivity and simplify various tasks, particularly those related to coding.
The library is open-source and available via a Node.js package. As of this writing, it has already garnered over 67k stars on GitHub. Despite being released only a few months ago, the community’s enthusiasm and its rapid adoption have been remarkable.
In particular, the main aspects that make Gemini CLI special are:
Direct terminal interaction : Interact with Gemini models directly from the command line.
Coding focus : Assists you with debugging, generating new features, improving test coverage, and even creating new applications from prompts or sketches.
Tool integration and extensibility
: Leverages a
ReAct (“reason and act”) loop
and can integrate with built-in tools (like
grep
,
terminal
,
file read/write
) and external MCP servers.
Free to use : Google also provides a generous free usage tier, making the tool widely accessible.
Multimodal capabilities : Supports tasks like generating code from images or sketches.
Why Extend Gemini CLI with Web Interaction and Data Extraction Capabilities?
No matter how powerful the Gemini models integrated into the Gemini CLI are, they still face common limitations shared by all LLMs.
Gemini models can only respond based on the static dataset it was trained on . But that is a snapshot of the past! Plus, LLMs cannot render or interact with live web pages like a human user can. As a result, their accuracy and range of action are inherently limited.
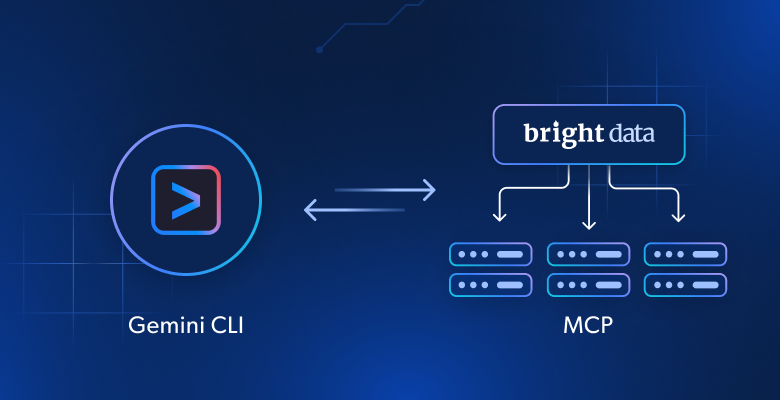
Now, imagine giving your Gemini CLI coding assistant the ability to fetch real-time tutorials, documentation pages, and guides—and learn from them. Picture it interacting with any live website, just like it already navigates your file system. This marks a significant leap in its functionality, and that is possible through integration with the Bright Data Web MCP server .
The Bright Data Web MCP server provides access to over 60 AI-ready tools for real-time web data collection and web interaction. These are all powered by Bright Data’s rich AI data infrastructure .
For the complete list of tools exposed by the Bright Data Web MCP server, refer to the documentation .
Here are just a few things you can achieve by combining Gemini CLI with the Web MCP:
Retrieve SERPs to automatically insert contextual links into reports or articles.
Ask Gemini to fetch up-to-date tutorials or documentation, learn from them, and then generate code or project templates accordingly.
Scrape data from real websites and save it locally for mocking, testing, or analysis.
Let’s explore a practical example of this integration in action!
How to Integrate the Web MCP Server in the Gemini CLI
Learn how to install and configure the Gemini CLI locally and integrate it with the Bright Data Web MCP server. The resulting setup will be used to:
Scrape an Amazon product page.
Store the data locally.
Create a Node.js script to load and process the data.
Follow the steps below!
Prerequisites
To replicate the steps in this tutorial section, make sure you have the following:
Node.js 20+ installed locally (we recommend using the latest LTS version).
A Gemini API key or Vertex AI API key (here, we are going to use a Gemini API key).
A Bright Data account.
You do not need to set up the API keys just yet. The steps below will guide you through configuring both the Gemini and Bright Data API keys when the time comes.
While not strictly required, the following background knowledge will help you:
A general understanding of how MCP works.
Some familiarity with the Bright Data Web MCP server and its available tools.
Step #1: Install the Gemini CLI
To start using the Gemini CLI, you first need to generate an API key from Google AI Studio . Follow the official instructions to retrieve your Gemini API key.
Note : If you already have, or prefer to use, a Vertex AI API key, take a look at the official documentation instead .
Once you have your Gemini API key, open your terminal and set it as an environment variable with this Bash command:
export GEMINI_API_KEY="<YOUR_GEMINI_API_KEY>"Or, alternatively, with this PowerShell command on Windows:
$env:GEMINI_API_KEY="<YOUR_GEMINI_API_KEY>"
Replace the
<YOUR_GEMINI_API_KEY>
API key with your actual generated key.
Next, install the Gemini CLI globally via the official
@google/gemini-cli
package:
npm install -g @google/gemini-cli
In the same terminal session where you set the
GEMINI_API_KEY
(or
VERTEX_API_KEY
), launch the Gemini CLI with:
geminiThis is what you should see:
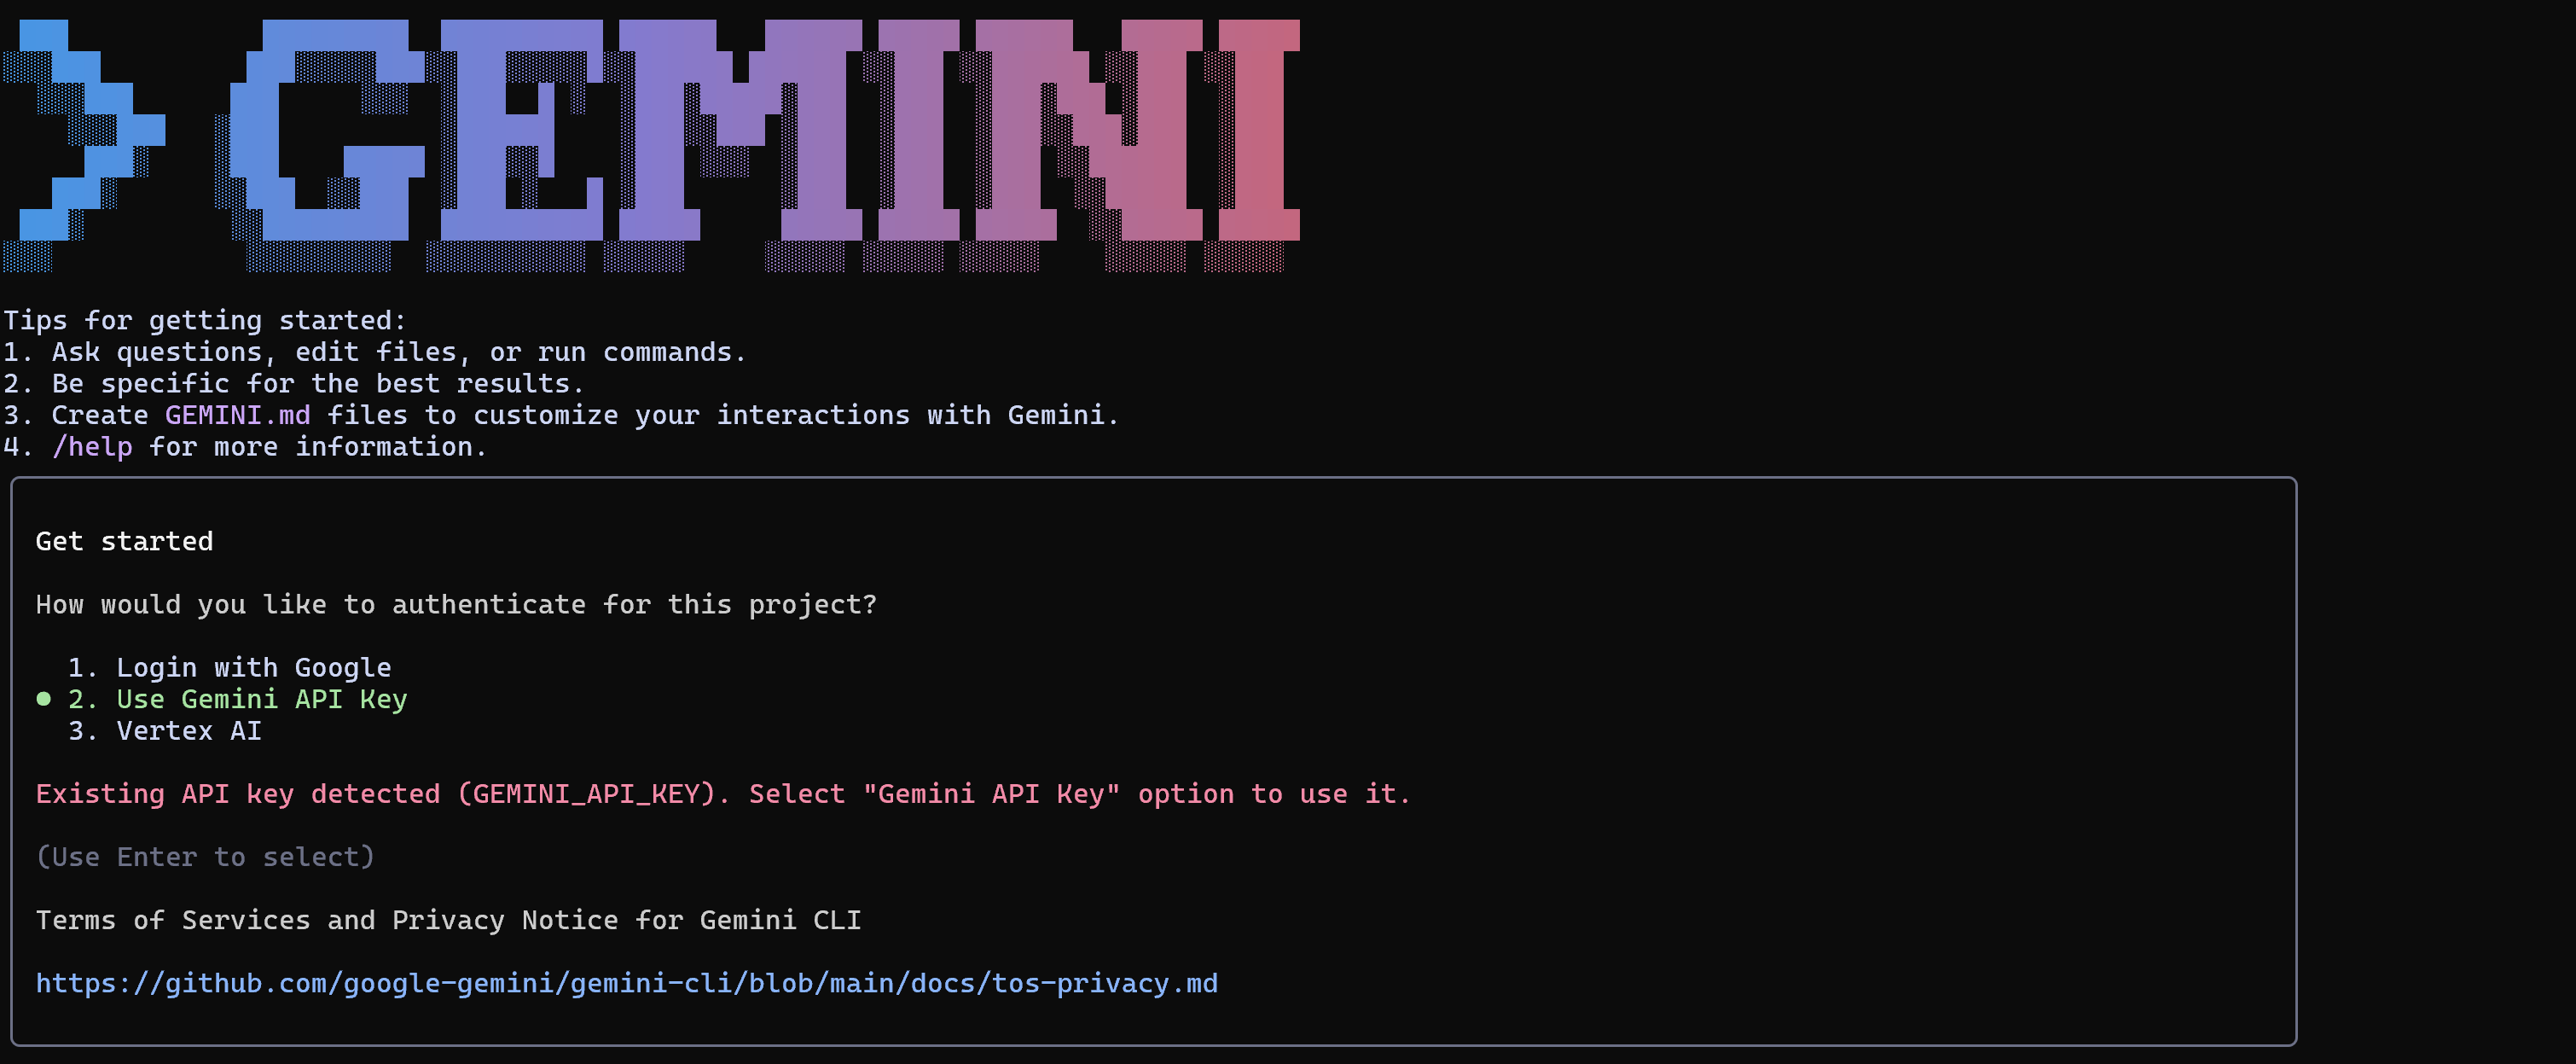
The Gemini CLI authentication view
Press
Enter
to select option 2 (“Use Gemini API key”). The CLI should automatically detect your API key and proceed to the prompting view:
The Gemini CLI prompting view
In the “Type your message or @path/to/file” section, you can write your prompt directly or reference a file to send to the Gemini CLI for execution.
In the bottom-right corner, you will notice the Gemini CLI is using the
gemini-2.5-pro
model. That is the model configured out of the box. Fortunately, the Gemini API offers a free tier with up to 100 requests per day using the
gemini-2.5-pro
model, so you can test it even without a paid plan.
If you prefer a model with higher rate limits,
such as
gemini-2.5-flash
, you can set it before launching the CLI by defining the
GEMINI_MODEL
environment variable. In Linux or macOS, execute:
export GEMINI_MODEL="gemini-2.5-flash"Or, equivalently, on Windows:
$env:GEMINI_MODEL="gemini-2.5-flash"
Then start the Gemini CLI as usual with the
gemini
command.
Great! The Gemini CLI is now set up and ready to use.
Step #2: Get Started with the Bright Data Web MCP Server
If you have not already, sign up for Bright Data . If you already have an account, simply log in.
Next, follow the official instructions to generate your Bright Data API key. For simplicity, this step assumes you are using a token with Admin permissions.
Install the Bright Data Web MCP server globally through this command:
npm install -g @brightdata/mcpThen, test that everything works with the Bash command below:
API_TOKEN="<YOUR_BRIGHT_DATA_API>" npx -y @brightdata/mcpOr, on Windows, the equivalent PowerShell command is:
$env:API_TOKEN="<YOUR_BRIGHT_DATA_API>"; npx -y @brightdata/mcp
Make sure to replace the
<YOUR_BRIGHT_DATA_API>
placeholder with the actual API token you retrieved earlier. Both commands set the required
API_TOKEN
environment variable and launch the MCP server via the
@brightdata/mcp
npm package.
If everything is working properly, you should see logs as below:

The Bright Data MCP server startup logs
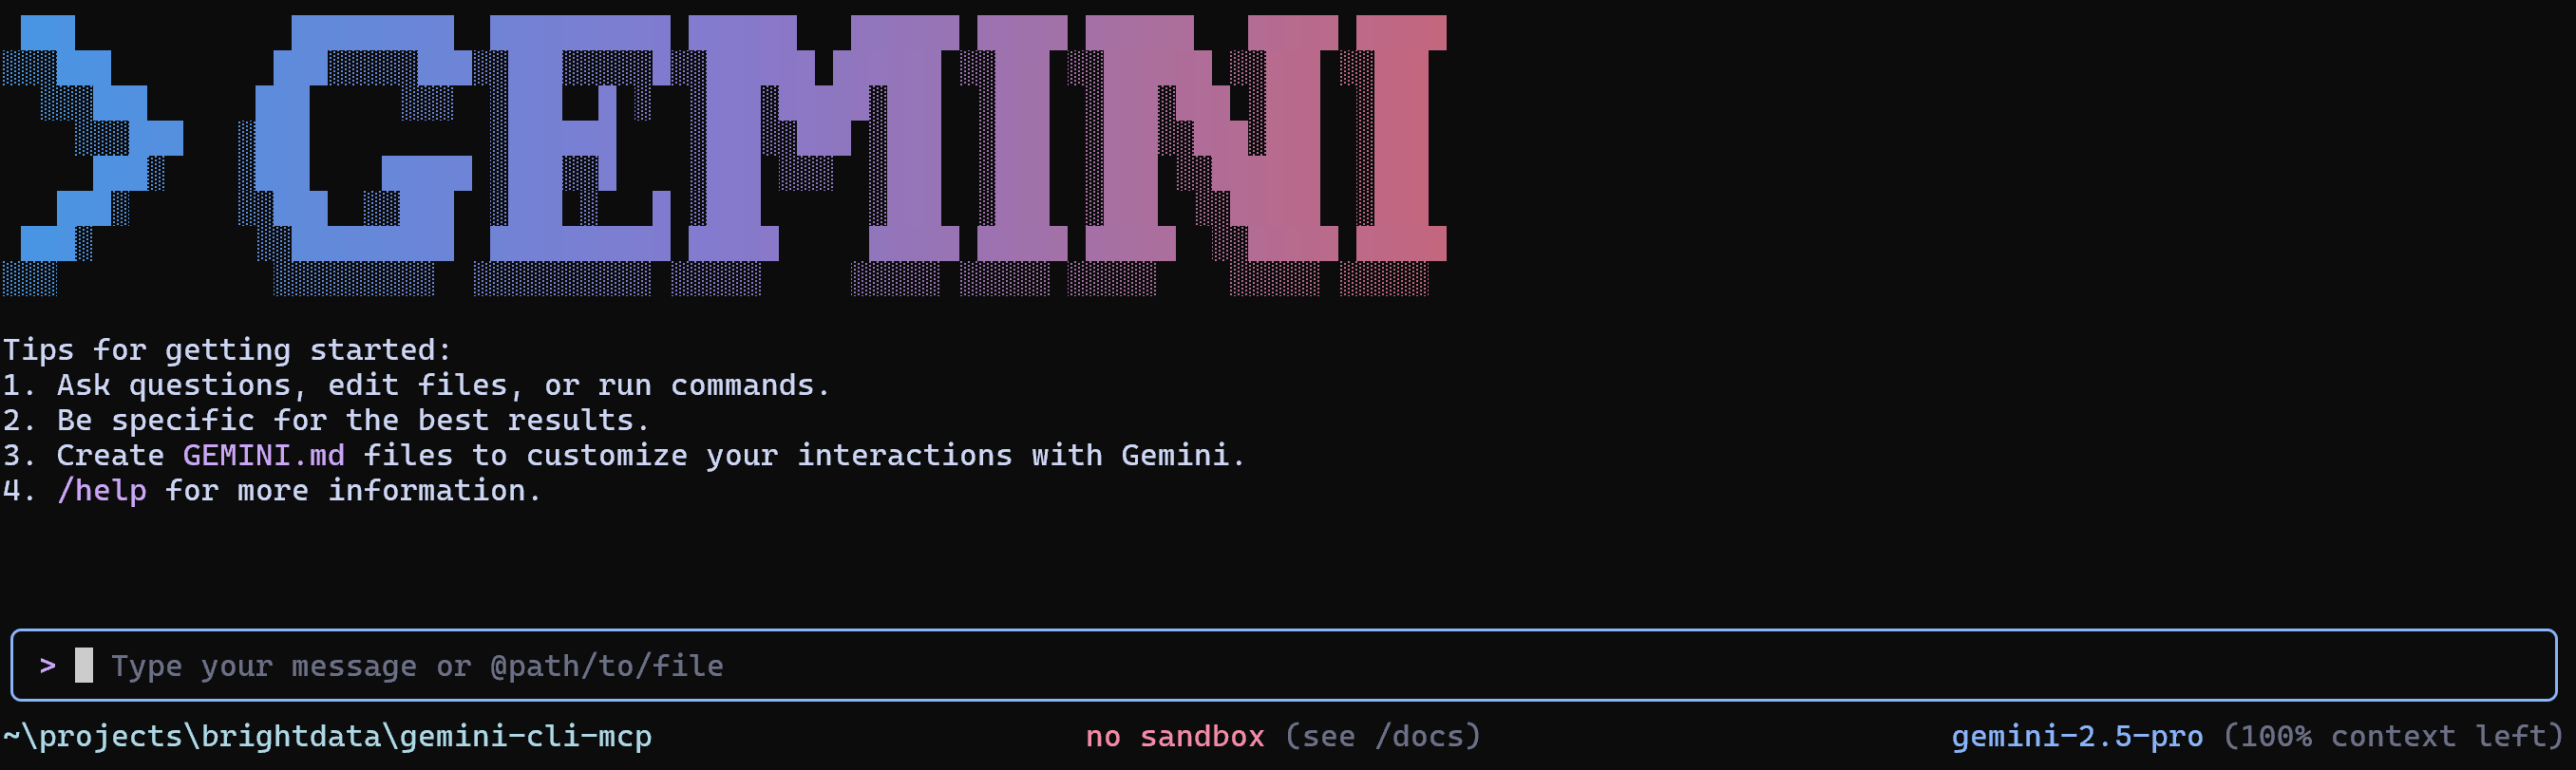
On the first launch, the MCP server automatically creates two default proxy zones in your Bright Data account:
mcp_unlocker
: A zone for
Web Unlocker
.
mcp_browser
: A zone for
Browser API
.
These two zones are required for enabling the full range of MCP server tools.
To confirm that the zones were created, log in to your Bright Data dashboard and go to the “ Proxies & Scraping Infrastructure ” page. You should see both zones listed:
The mcp_unlocker and mcp_browser zones created by the MCP server at startup
Note : If you are not using an API token with Admin permissions, these zones will not be created automatically. In that case, you have to create them manually and specify their names using environment variables, as explained in the official documentation .
By default, the MCP server exposes only the
search_engine
and
scrape_as_markdown
tools. To unlock advanced features like browser automation and structured data extraction, enable Pro Mode by setting the
PRO_MODE=true
environment variable before launching the MCP server:
API_TOKEN="<YOUR_BRIGHT_DATA_API>" PRO_MODE="true" npx -y @brightdata/mcpAnd, on Windows:
$env:API_TOKEN="<YOUR_BRIGHT_DATA_API>"; $env:PRO_MODE="true"; npx -y @brightdata/mcpFantastic! You just verified that the Bright Data Web MCP server runs correctly on your machine. You can now kill the server process, as you are about to configure the Gemini CLI to start it for you.
Step #3: Configure the Web MCP Server in the Gemini CLI
The
Gemini CLI supports MCP integration
via a configuration file located at
~/.gemini/settings.json
, where
~
represents your home directory. Or, on Windows,
$HOME/.gemini/settings.json
.
You can open the file in Visual Studio Code with:
code "~/.gemini/settings.json"Or, on Windows:
code "$HOME/.gemini/settings.json"
Note
: If the
settings.json
file does not exist yet, you may need to create it manually.
In
settings.json
, configure the Gemini CLI to automatically start the Bright Data Web MCP server as a subprocess and connect to it. Make sure
settings.json
contains:
{
  "mcpServers": {
    "brightData": {
      "command": "npx",
      "args": [
        "-y",
        "@brightdata/mcp"
      ],
      "env": {
        "API_TOKEN": "<YOUR_BRIGHT_DATA_API_KEY>",
        "PRO_MODE": "true"
      }
    }
  }
}
In the above config:
The
mcpServers
object tells Gemini CLI how to start external MCP servers.
The
brightData
entry defines the command and environment variables required to run the Bright Data Web MCP server (enabling
PRO_MODE
is optional but recommended). Notice that it runs the exact same command you tested earlier, but now Gemini CLI will execute it for you automatically behind the scenes.
Important
: Replace the
<YOUR_BRIGHT_DATA_API_KEY>
placeholder with your actual Bright Data API token to enable authentication.
Once you have added the MCP server configuration, save the file. You are now ready to test MCP integration within the Gemini CLI!
Step #4: Verify the MCP Connection
If the Gemini CLI is still running, exit it using the
/quit
command, then relaunch it. It should now automatically connect to the Bright Data Web MCP server.
To verify the connection, type the
/mcp
command inside the Gemini CLI:
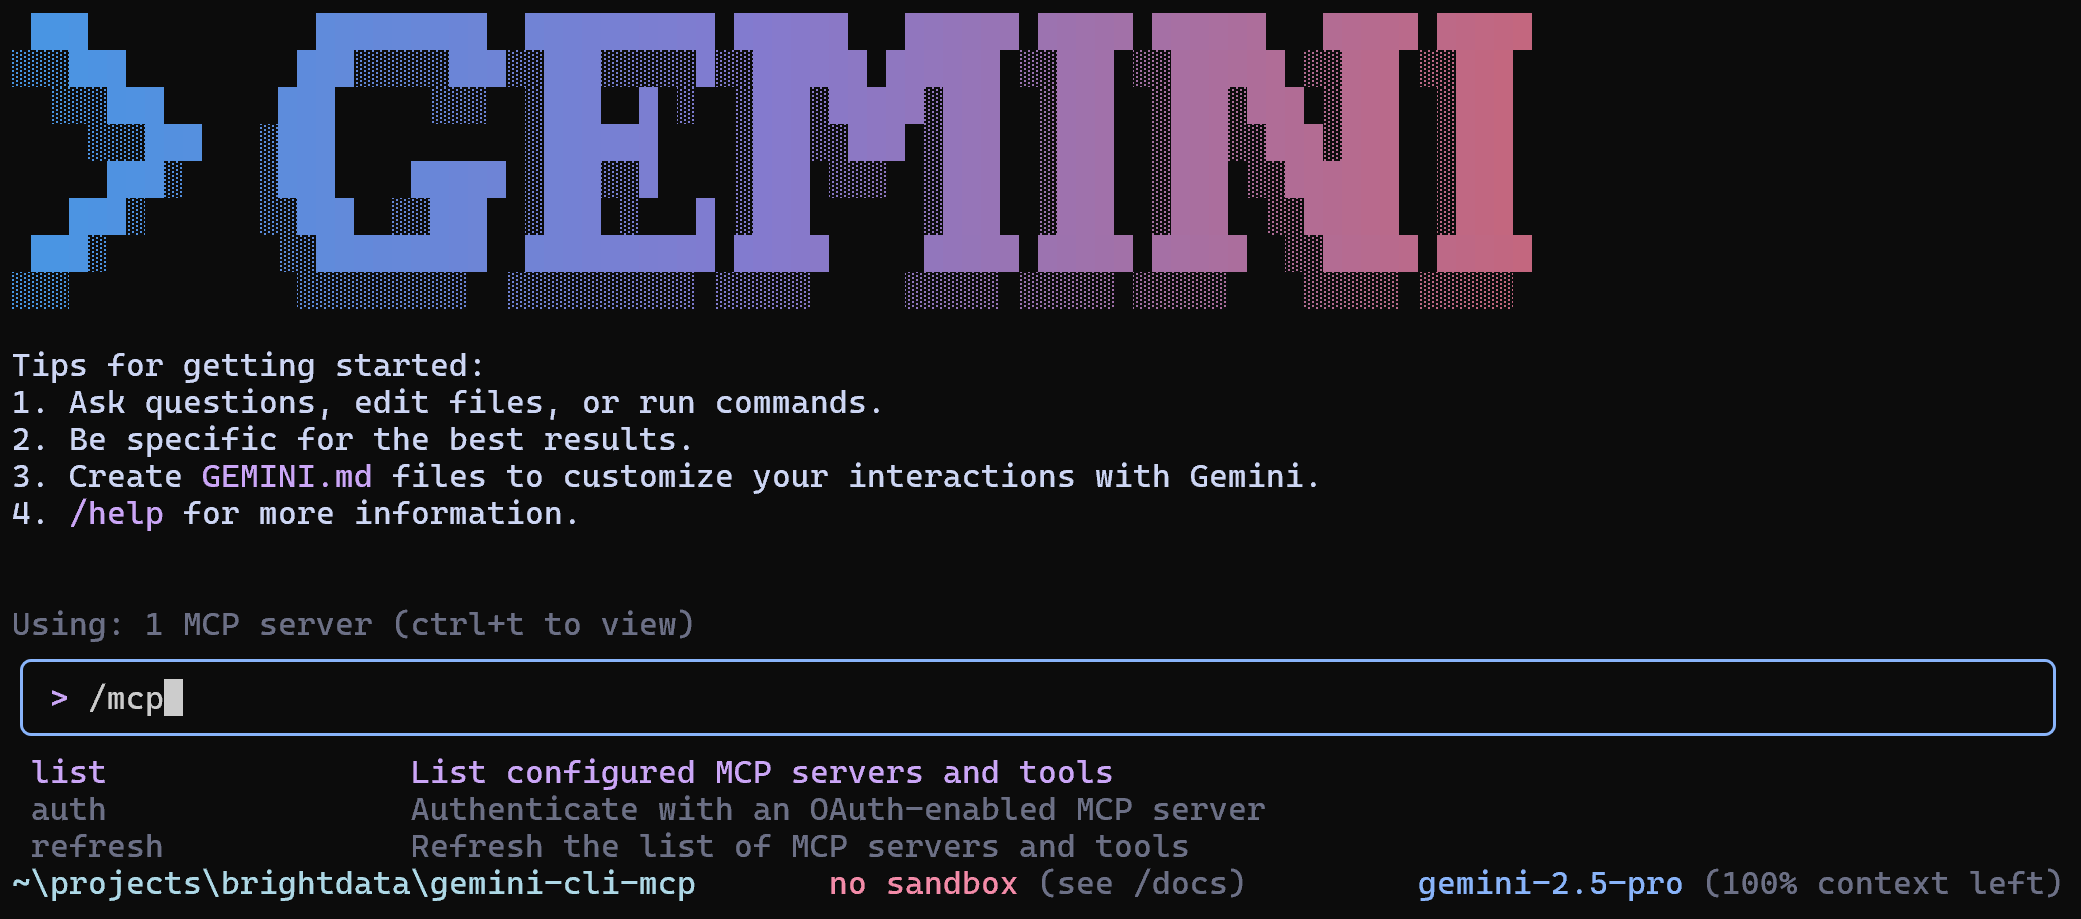
Typing the /mcp command
Then, select the
list
option to view the configured MCP servers and available tools. Press
Enter
, and you should see something like this:
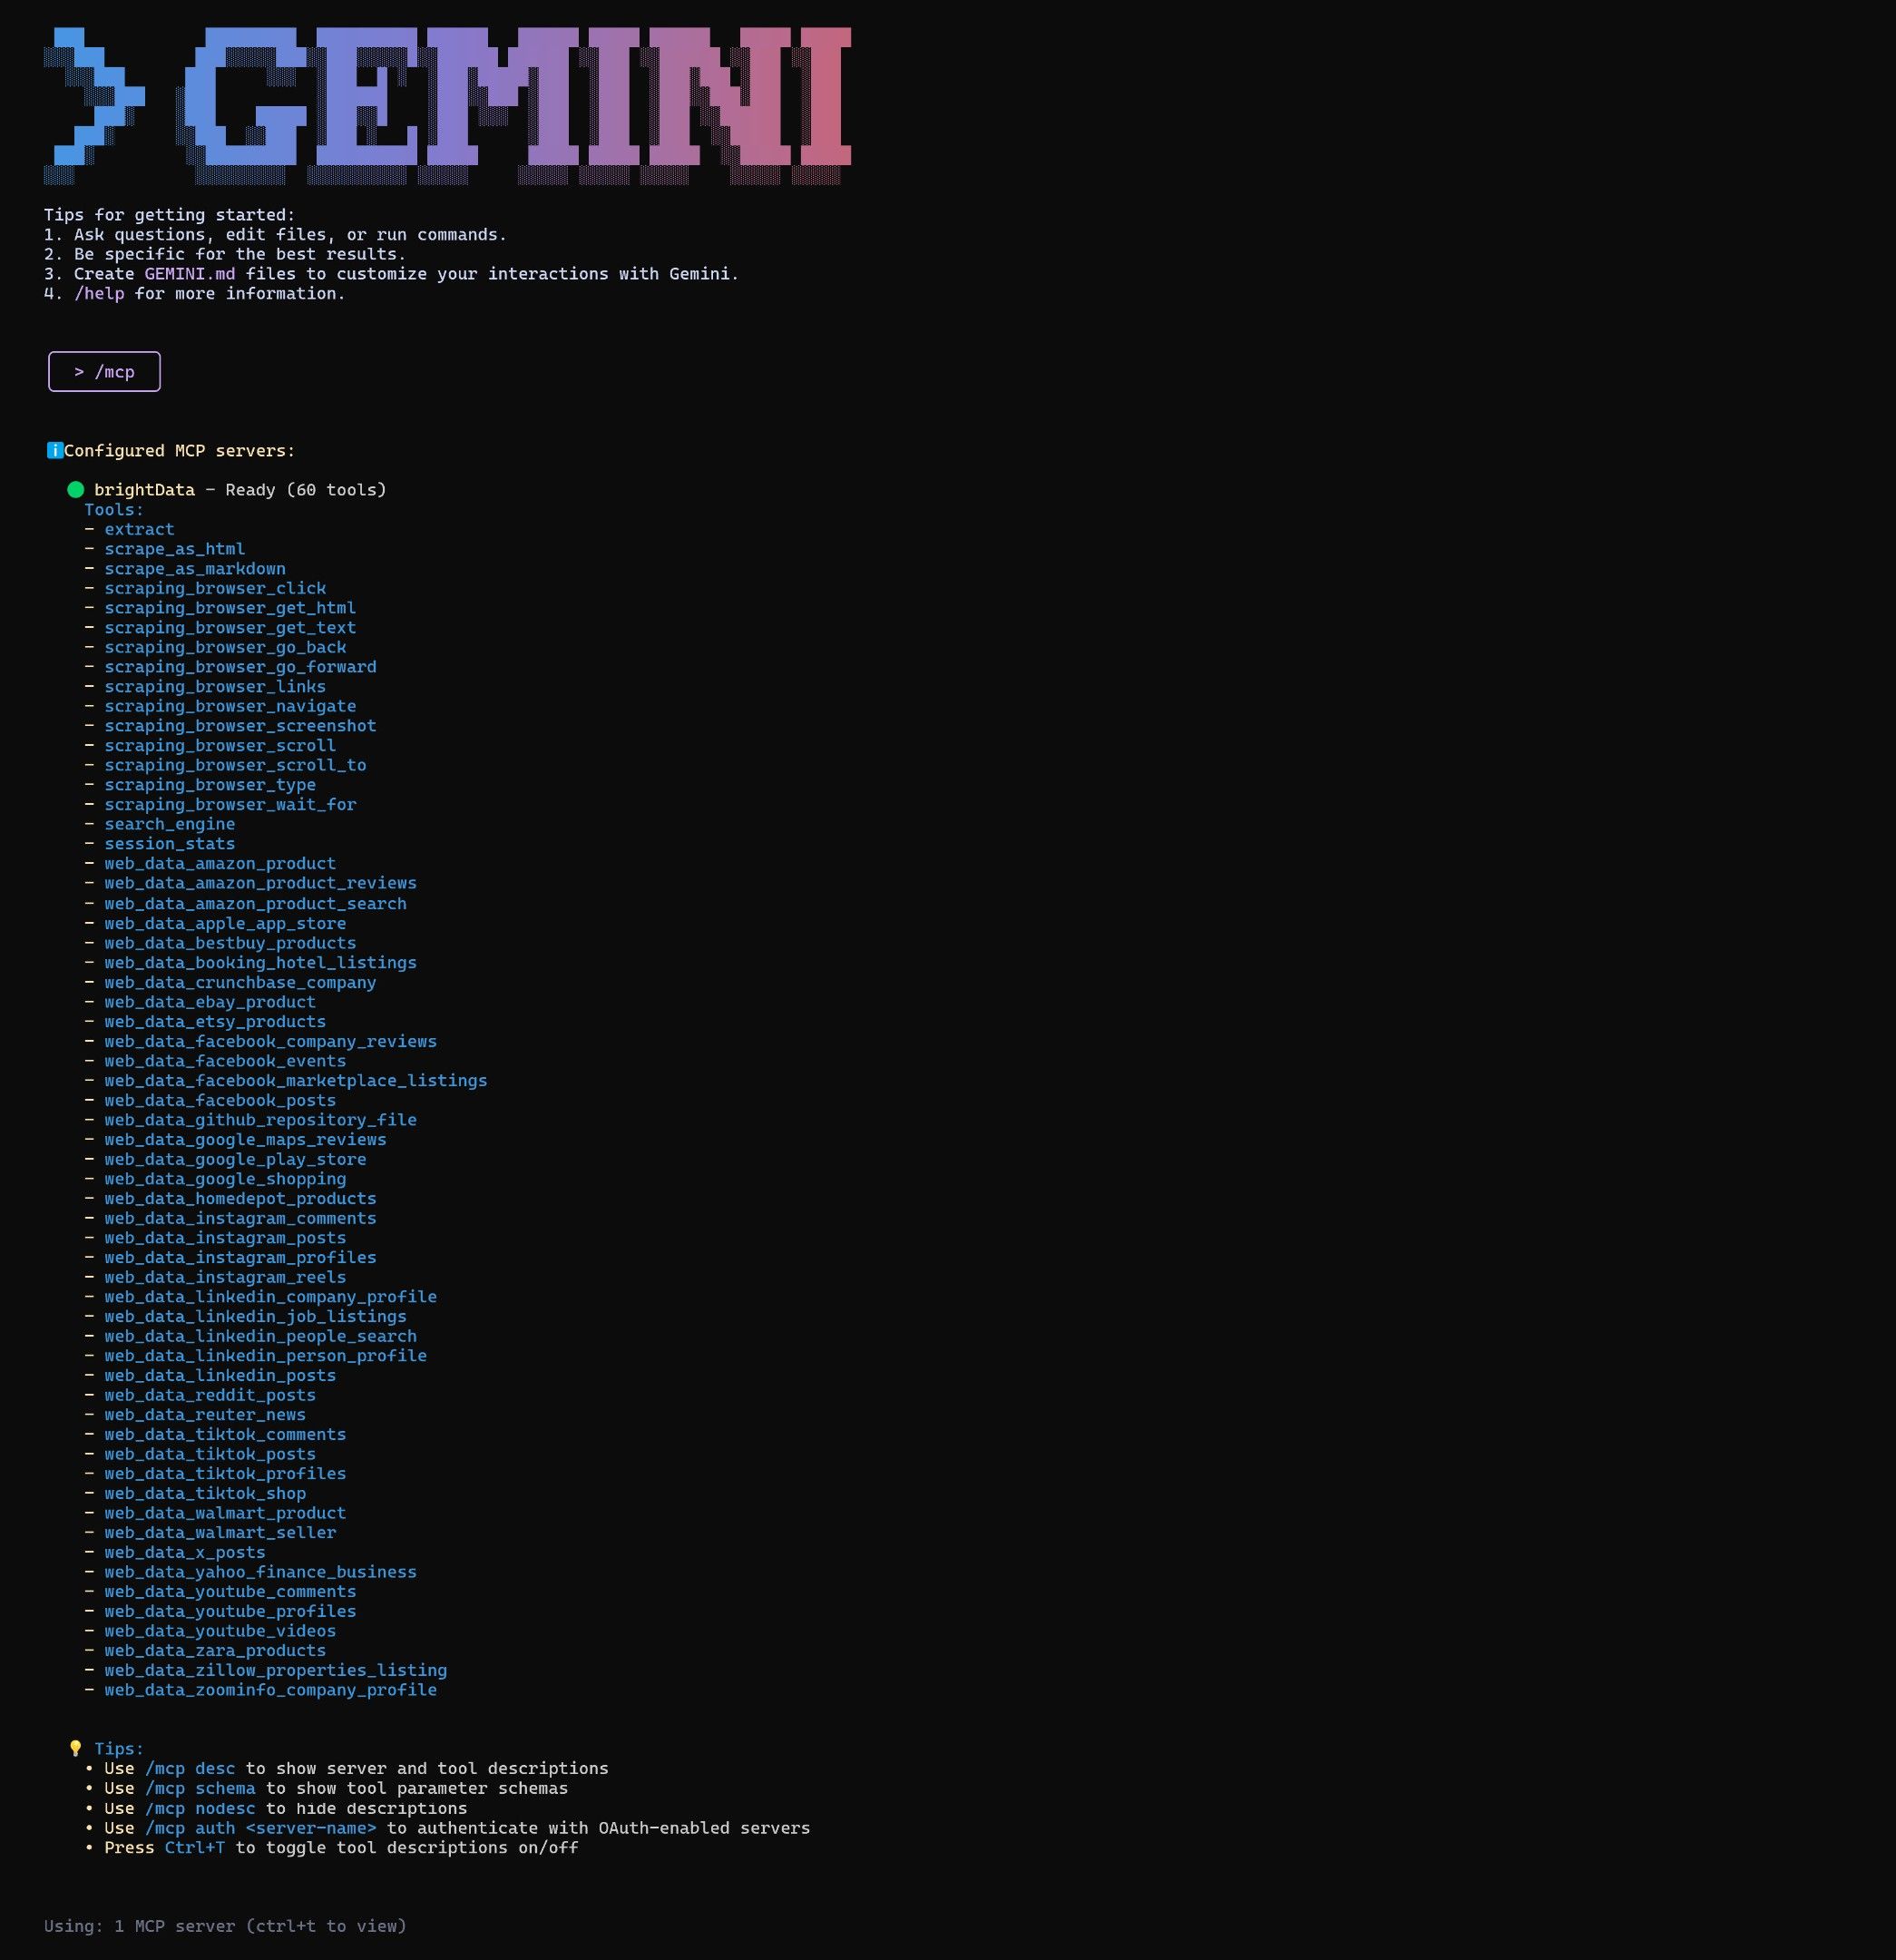
The Bright Data MCP server integration in the Gemini CLI
As you can see, the Gemini CLI has connected to the Bright Data Web MCP server and can now access all 60+ tools it provides. Well done!
Tip : Explore all other Gemini CLI commands in the docs .
Step #5: Run a Task in the Gemini CLI
To test the web capabilities of your Gemini CLI setup, you can use a prompt like the following:
Scrape data from "https://www.amazon.com/AmazonBasics-Pound-Neoprene-Dumbbells-Weights/dp/B01LR5S6HK/" and store the resulting JSON data in a local data.json file. Then, create a Node.js index.js script to load and print its contents.This represents a real-world use case, helpful for collecting live data for analysis, mocking APIs, or testing.
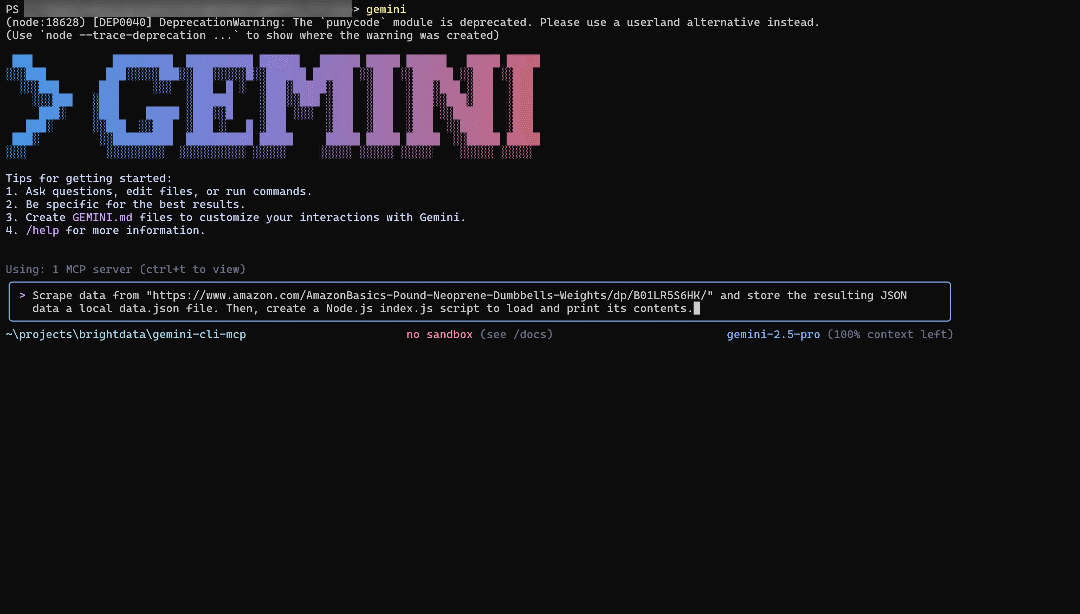
Paste the prompt into the Gemini CLI:
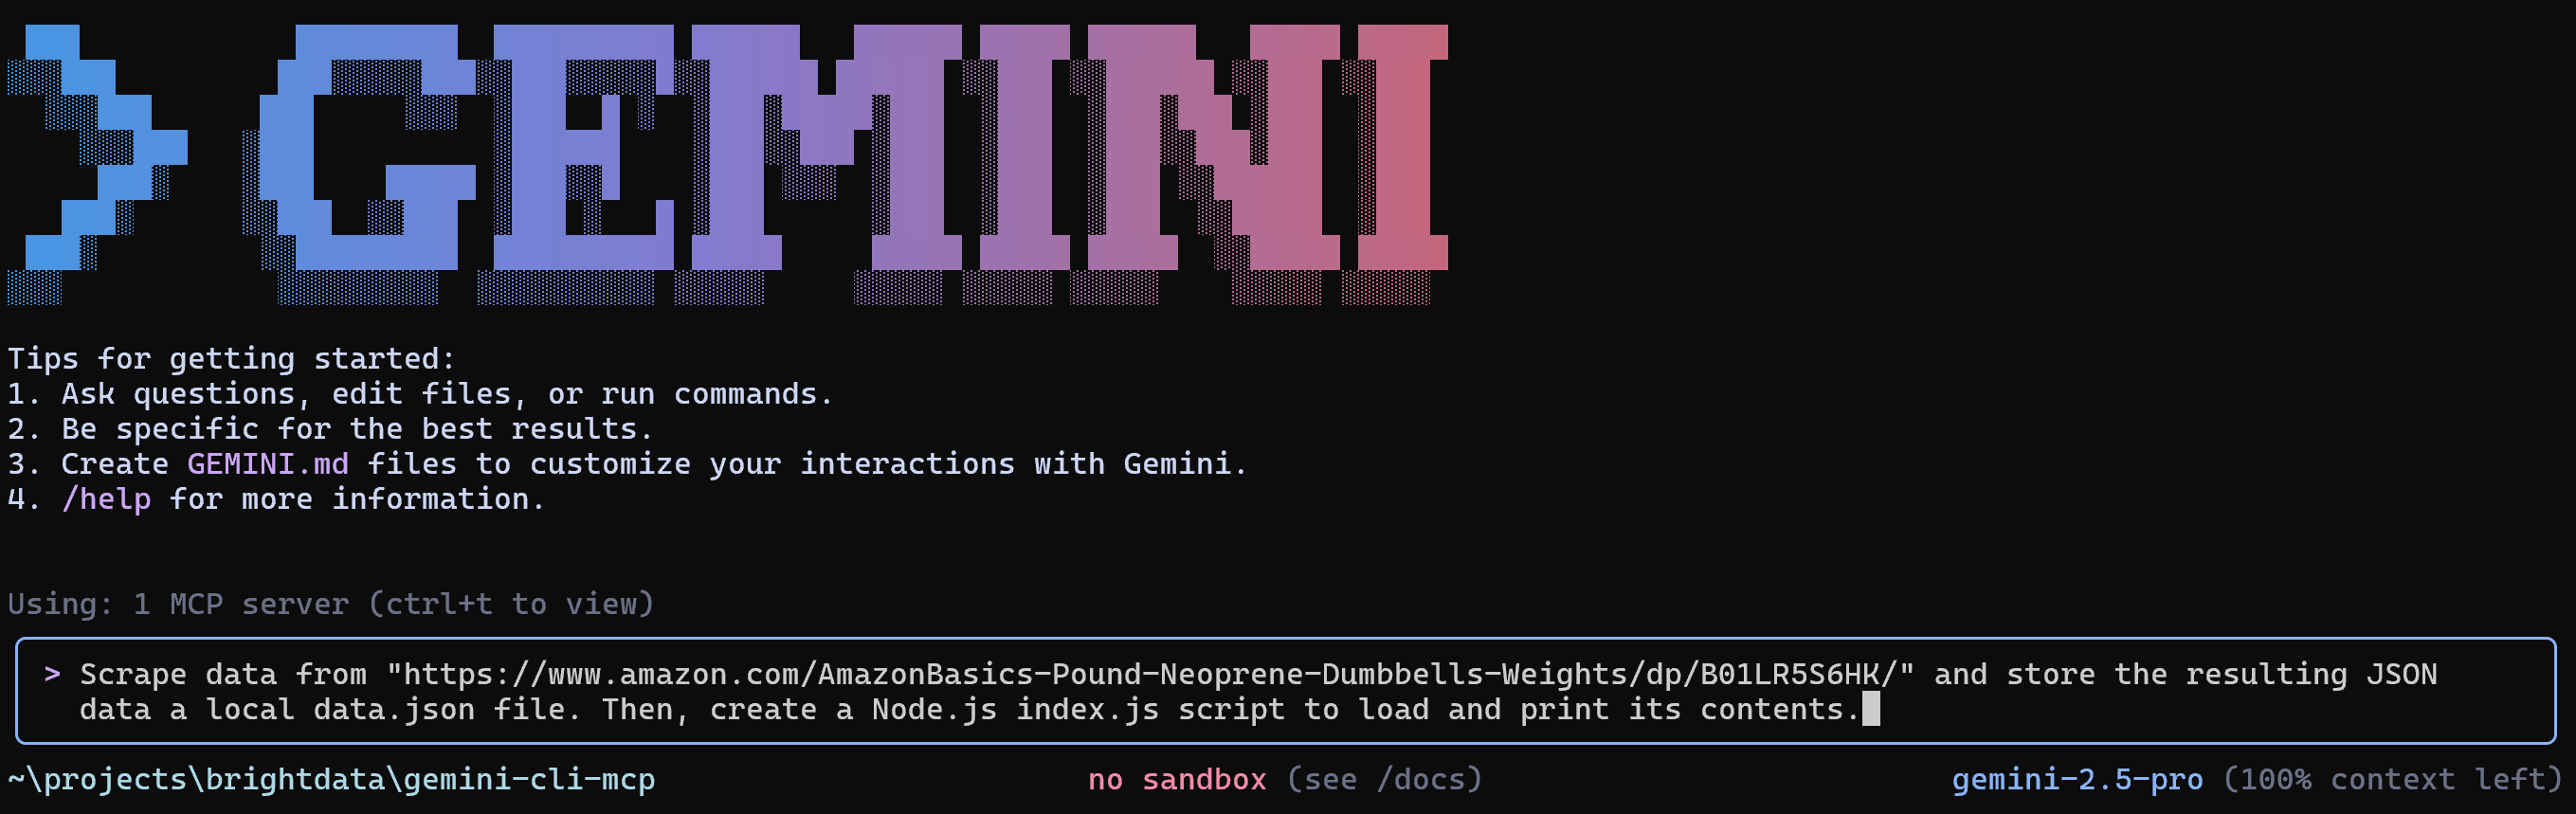
The prompt in the Gemini CLI
Then, press
Enter
to execute it. This is how the agent should address your task:
The prompt execution in the Gemini CLI
The above GIF has been sped up, but this is what should happen:
Gemini CLI sends your prompt to the configured LLM (i.e.,
gemini-2.5-pro
).
The LLM selects the appropriate MCP tool (
web_data_amazon_product
, in this case).
You are asked to confirm that the tool can run via Web MCP, using the provided Amazon product URL.
Once approved, the scraping task is launched through MCP integration.
The resulting product data is displayed in its raw format (i.e., JSON).
Gemini CLI asks if it can save this data to a local file named
data.json
.
After you approve, the file is created and populated.
Gemini CLI then shows you the JavaScript logic for
index.js
, which loads and prints the JSON data
Upon your approval, the
index.js
file is created.
You are asked for permission to execute the Node.js script.
Once granted,
index.js
is executed, and the data from
data.json
is printed to the terminal as described in the task.
Gemini CLI asks whether you want to delete the generated files.
Keep them to end the execution.
Note that the Gemini CLI asked for script execution even though you did not explicitly request it in the task. Still, that is useful for testing, so it made sense and was actually a good addition to your task.
At the end of the interaction, your working directory will store these two files:
├── data.json
└── index.js
Open
data.json
in VS Code, and you will see:
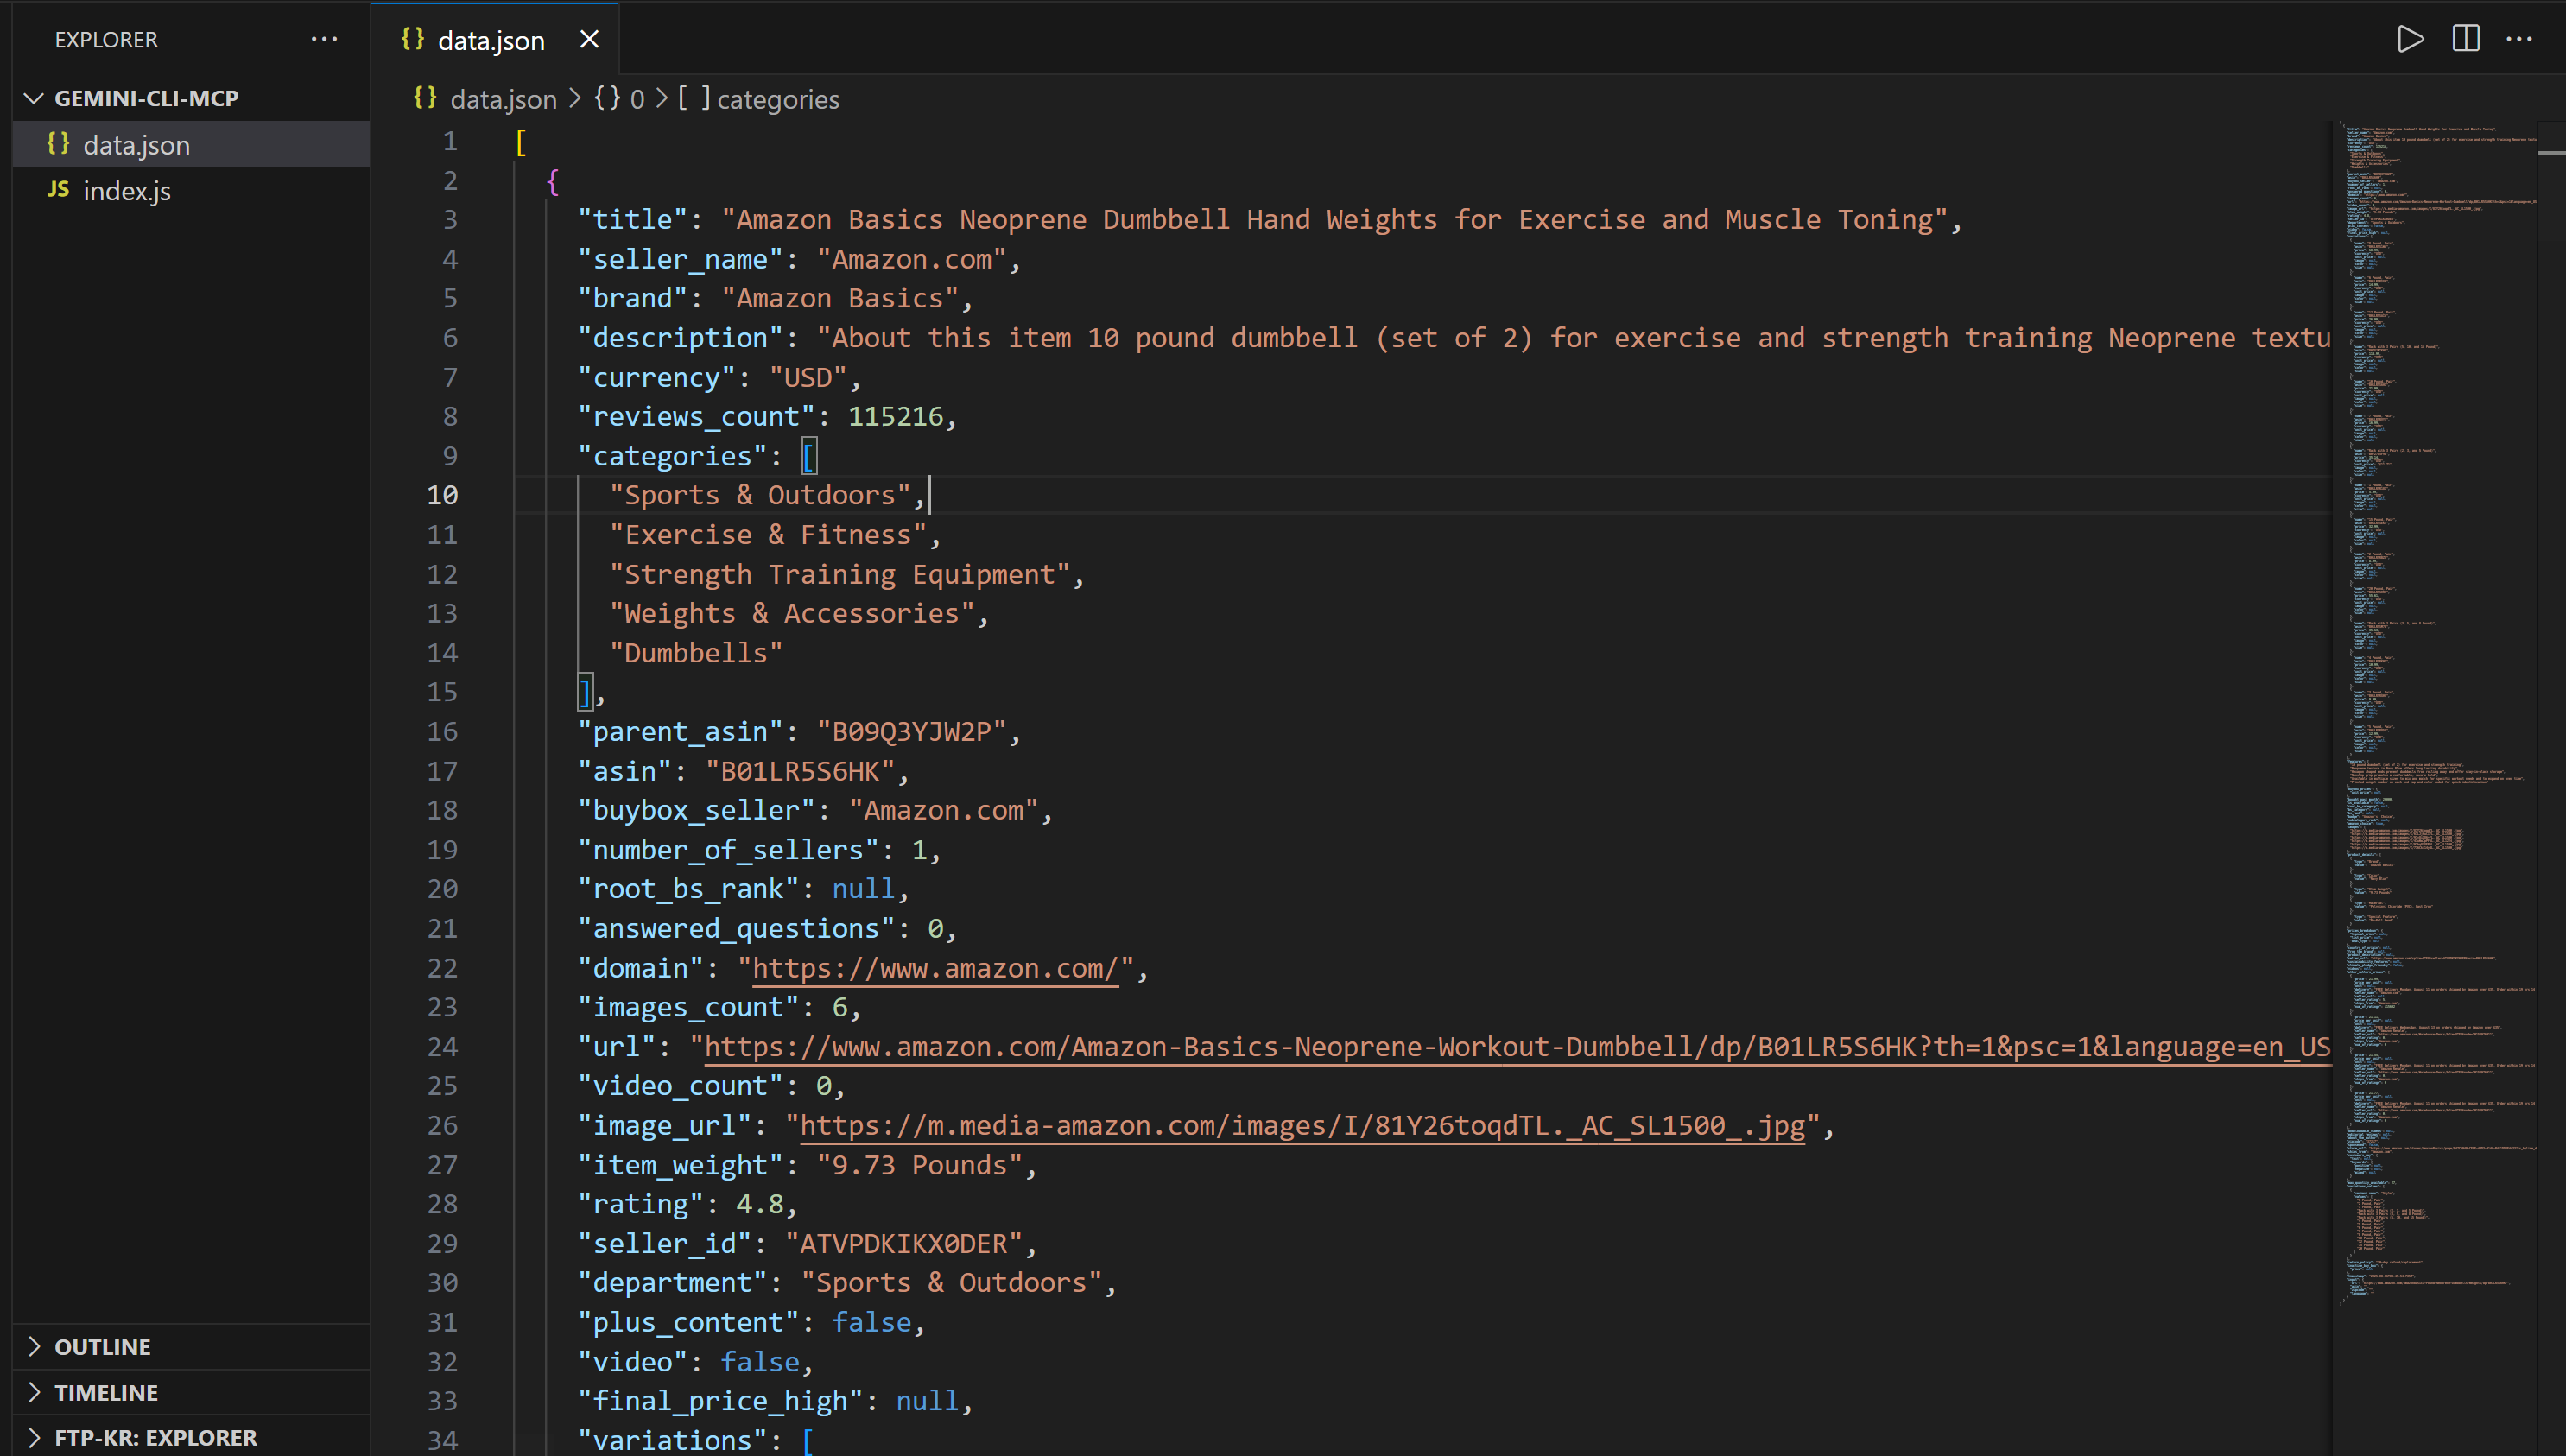
data.json in VSC
This file contains real product data scraped from Amazon using the Bright Data Web MCP integration.
Likewise, opening
index.js
reveals:
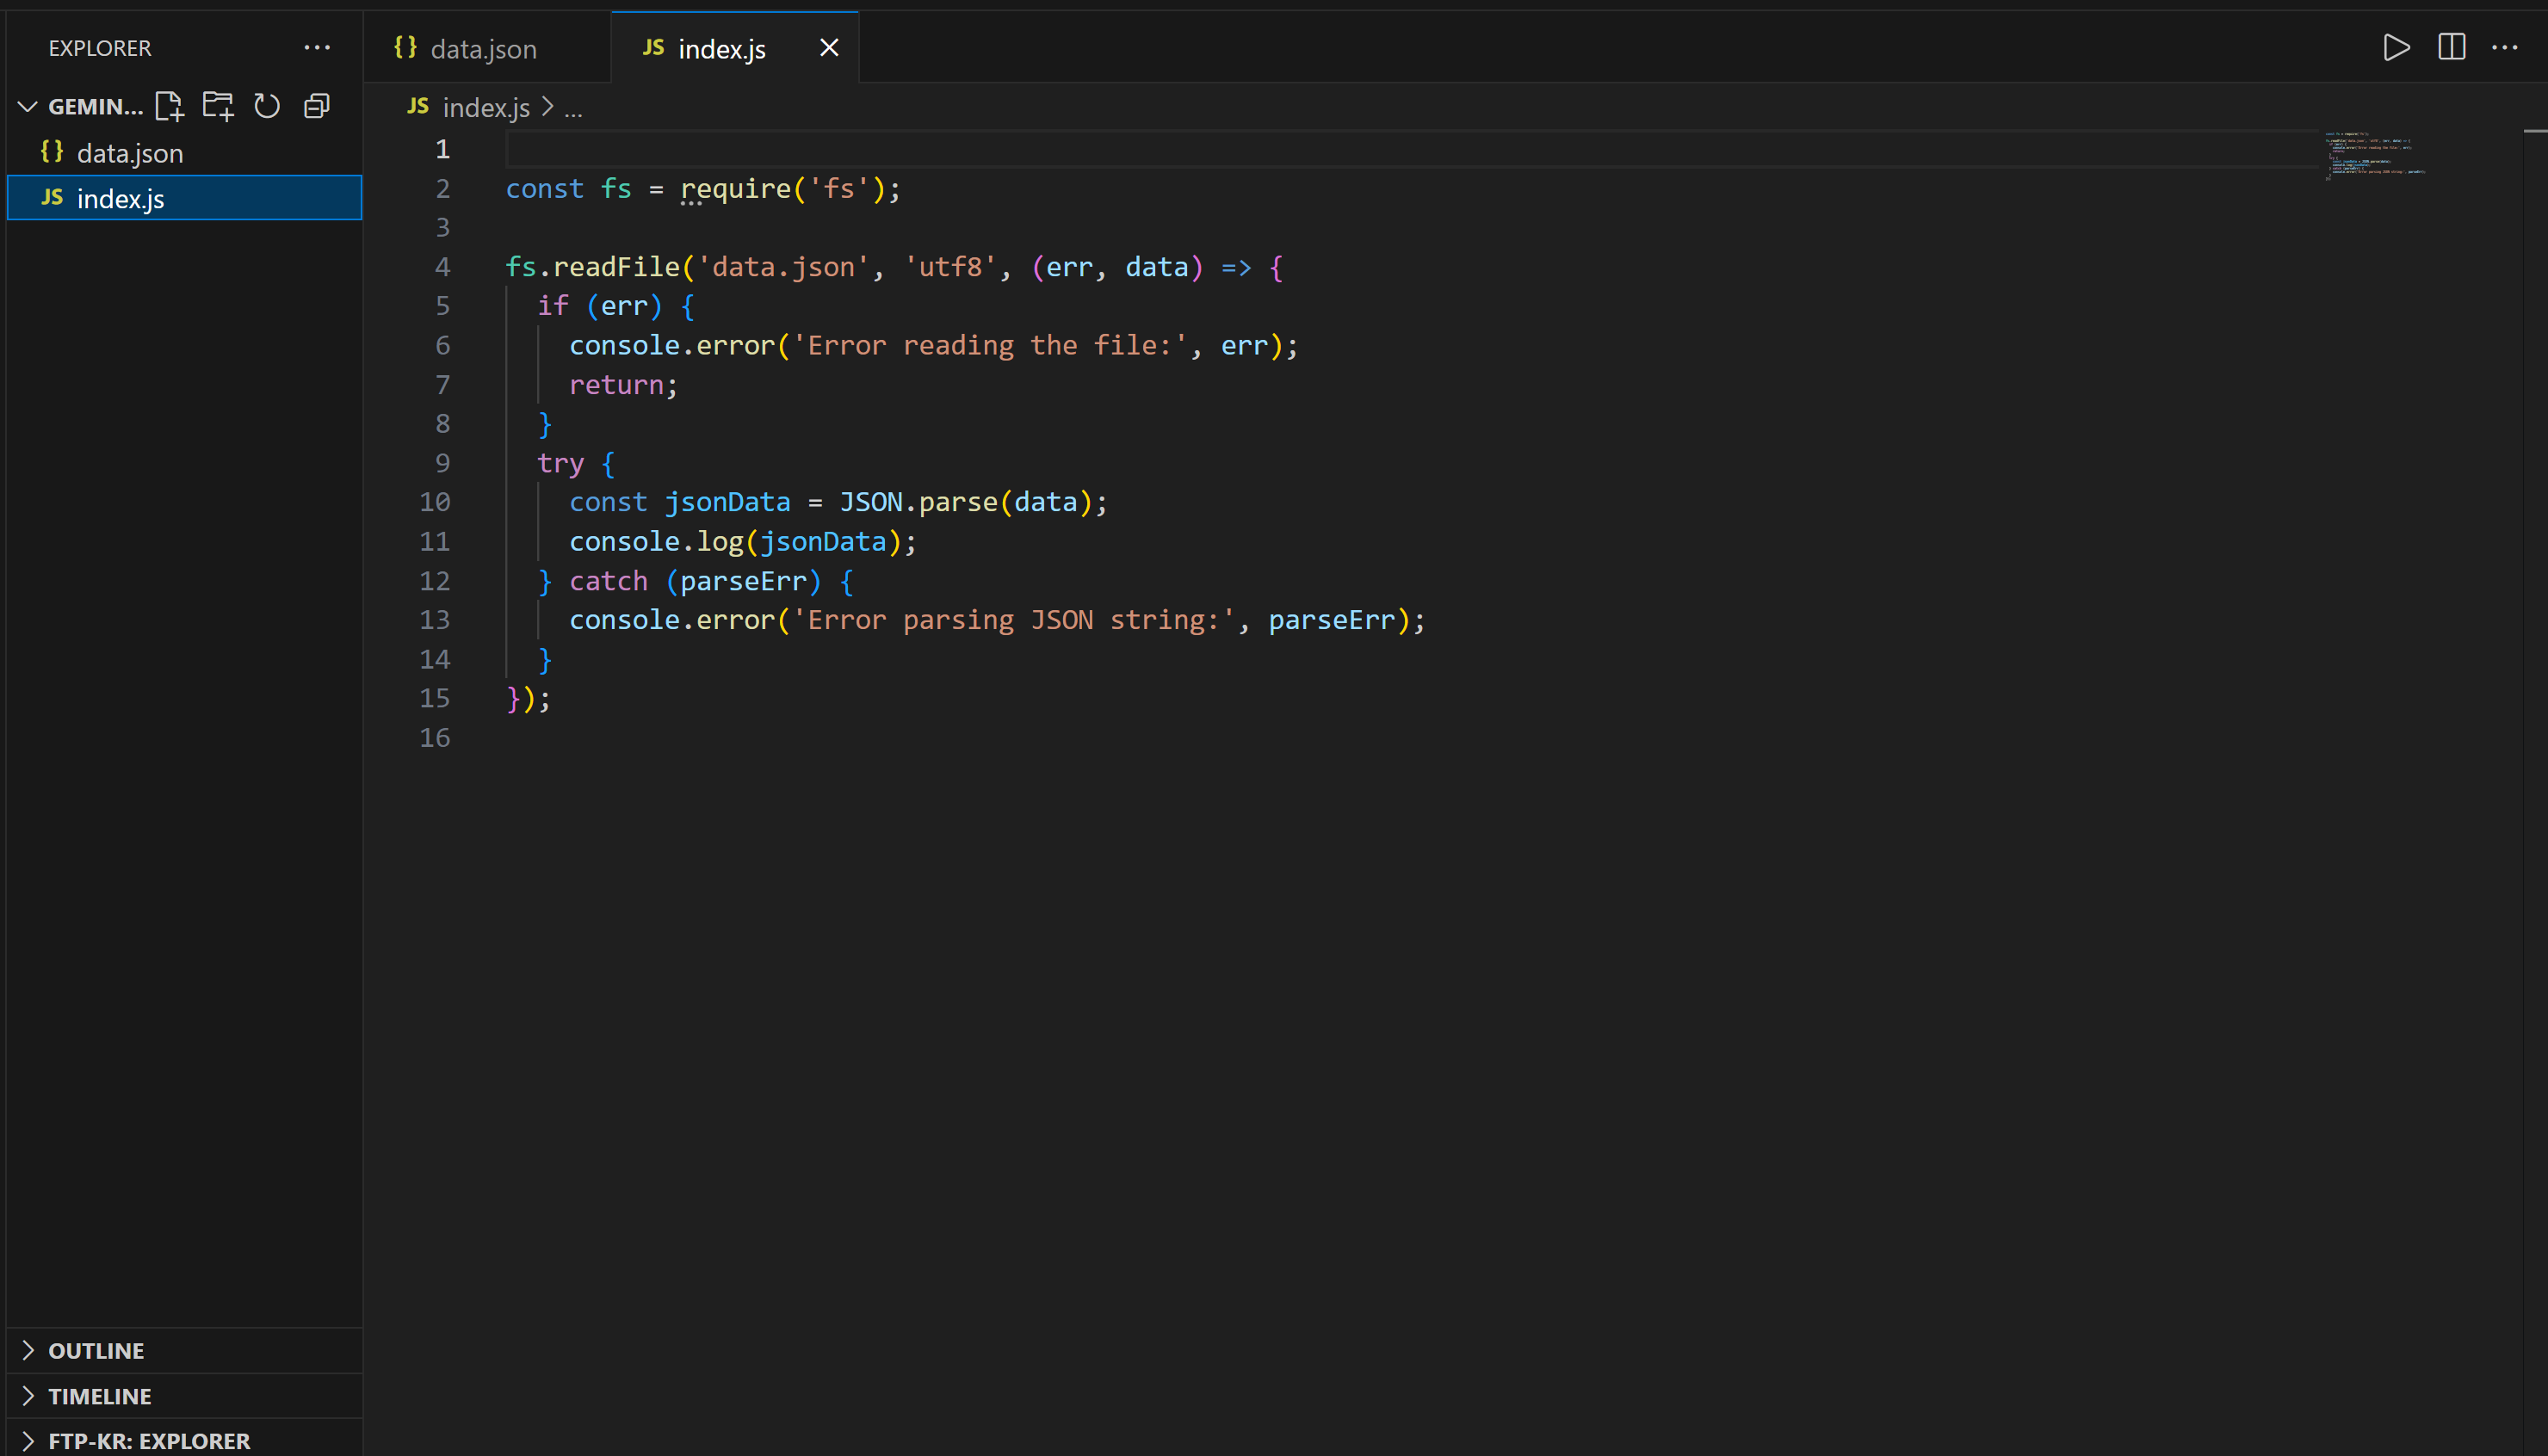
index.js in VSC
This script includes Node.js logic to load and display the contents of
data.json
.
Execute the Node.js
index.js
script with:
node index.jsThe result will be:
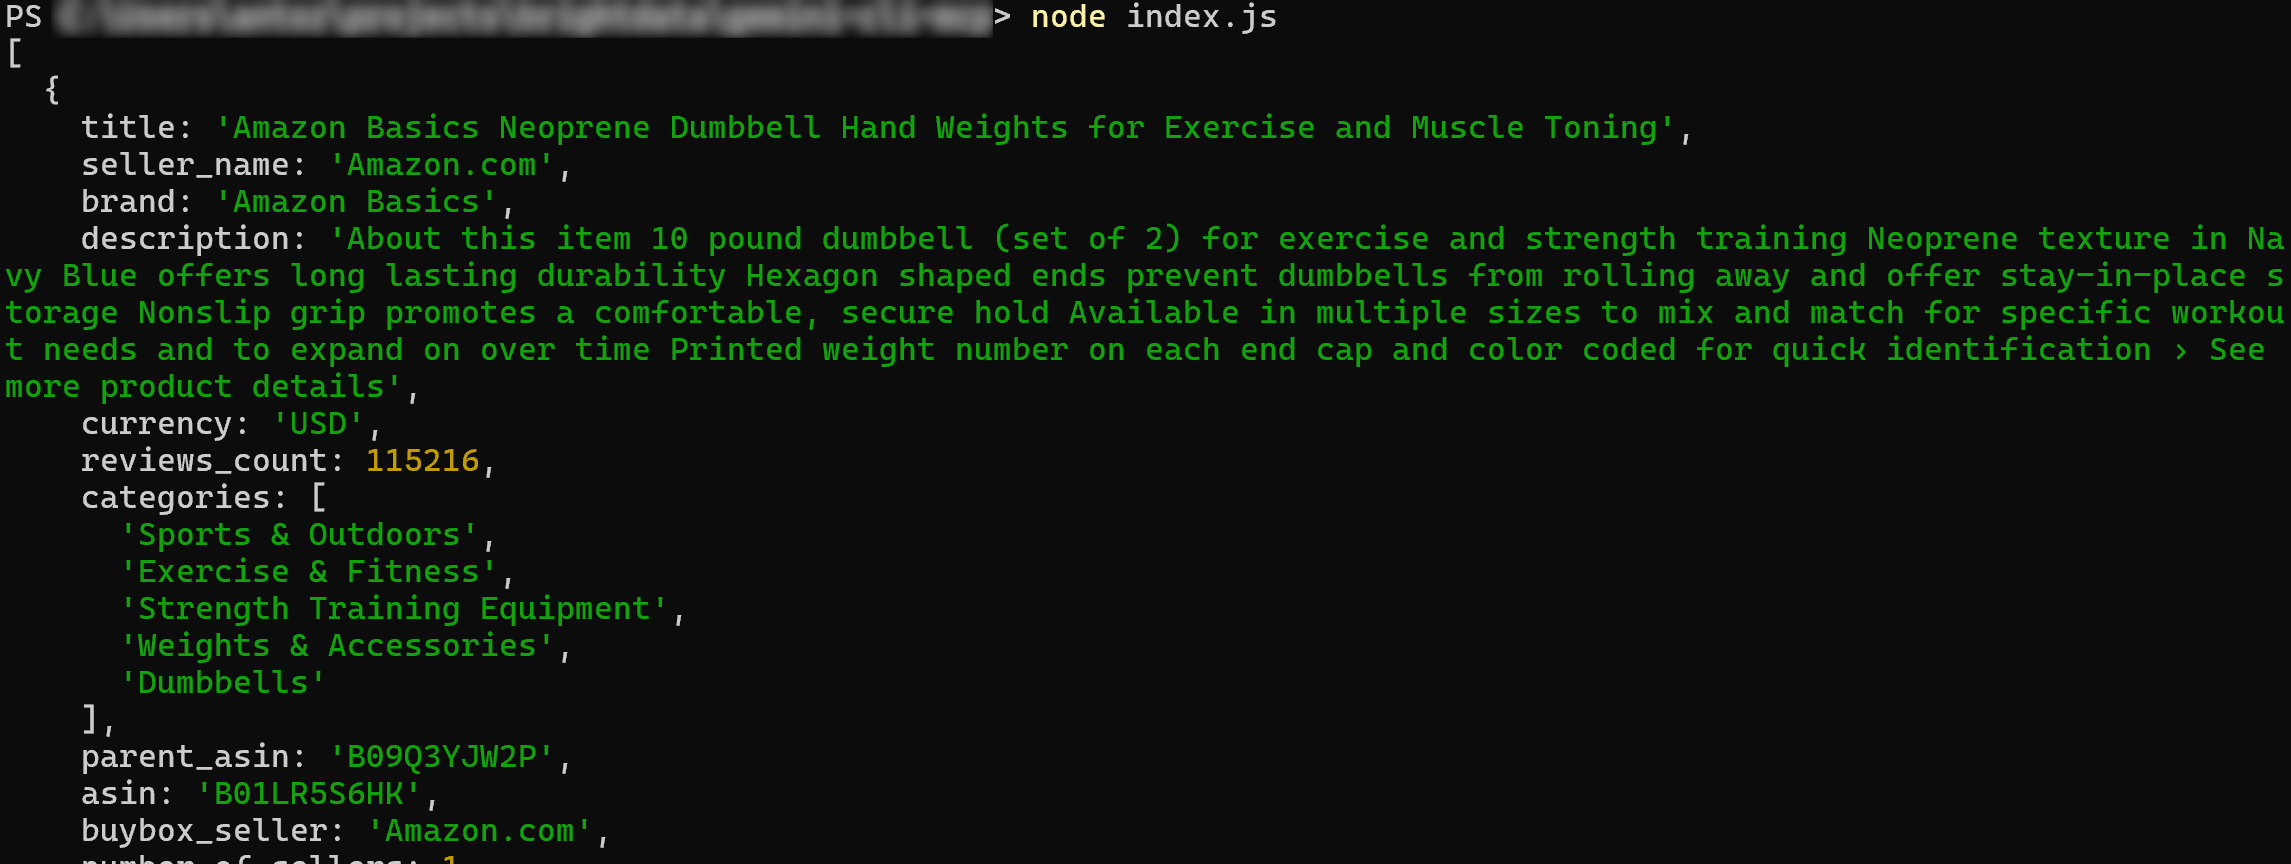
The final result
Et voilà! The workflow completed successfully.
Specifically, the content loaded from
data.json
and printed in the terminal matches the actual data from the
original Amazon product page
:

The Amazon product page used as a target to collect data
Keep in mind that
data.json
contains real, scraped data—not hallucinated hallucinated or made-up content generated by the AI. Also, remember that scraping Amazon is notoriously difficult due to its robust anti-bot protections (such as the
Amazon CAPTCHA
). A regular LLM could not do that!
So, this example demonstrates the power of combining the Gemini CLI with Bright Data’s Web MCP server. Now, try more prompts and explore advanced LLM-driven data workflows directly in the CLI!
Conclusion
In this article, you learned how to connect the Gemini CLI with the Bright Data Web MCP server to build an AI coding agent capable of accessing the web. This integration is made possible by Gemini CLI’s built-in support for MCP.
To build more complex agents, explore the full range of services available in the Bright Data AI infrastructure . These solutions can back a wide variety of agentic scenarios .
Create a Bright Data account for free and start experimenting with our AI-ready web data tools!