Build AI Agents With SERP & Web Scraping in Agno
Summarize: ChatGPT Perplexity
Summarize:
ChatGPT Perplexity
{ "@context": "https://schema.org", "@type": "HowTo", "name": "Build AI Agents With Bright Data in Agno", "description": "Step-by-step guide to building Python AI agents using the Agno framework integrated with Bright Data for real-time web data retrieval.", "step": [ { "@type": "HowToStep", "name": "Set up your Python environment", "text": "Install Python 3.7+, pip, and a code editor. Create a project folder and set up a virtual environment." }, { "@type": "HowToStep", "name": "Install Agno and Bright Data dependencies", "text": "Run 'pip install agno python-dotenv openai requests' in your virtual environment to install all required libraries." }, { "@type": "HowToStep", "name": "Set up Bright Data and LLM API keys", "text": "Register for Bright Data and OpenAI accounts. Generate API keys and add them to a .env file as environment variables." }, { "@type": "HowToStep", "name": "Configure Bright Data tools in Agno", "text": "Activate Bright Data's SERP API and Web Unlocker zones. Configure 'BrightDataTools' in your code with these zone names." }, { "@type": "HowToStep", "name": "Configure the language model", "text": "Set up your preferred LLM (e.g., OpenAI GPT-4o-mini) in code, using environment variables to store API keys securely." }, { "@type": "HowToStep", "name": "Define your Agno AI agent", "text": "Import 'Agent' from Agno and create an agent with Bright Data tools and your LLM model." }, { "@type": "HowToStep", "name": "Query your agent with Bright Data tools", "text": "Send prompts (e.g., 'Search for AAPL news') and display responses formatted in Markdown." }, { "@type": "HowToStep", "name": "Summarize live web content", "text": "Use your agent to scrape full web pages and generate real-time summaries using LLM capabilities." }, { "@type": "HowToStep", "name": "Expand with advanced features", "text": "Add features like long-term memory, multi-agent collaboration, or a custom UI for enhanced interaction." } ], "estimatedCost": { "@type": "MonetaryAmount", "currency": "USD", "value": "Free" }, "supply": [ { "@type": "HowToSupply", "name": "Python 3.7+ environment" }, { "@type": "HowToSupply", "name": "Bright Data API key" }, { "@type": "HowToSupply", "name": "OpenAI or other LLM API key" } ], "tool": [ { "@type": "HowToTool", "name": "Agno Python framework" }, { "@type": "HowToTool", "name": "Bright Data SERP API" }, { "@type": "HowToTool", "name": "Bright Data Web Unlocker" }, { "@type": "HowToTool", "name": "OpenAI API" }, { "@type": "HowToTool", "name": "python-dotenv" }, { "@type": "HowToTool", "name": "requests" }, { "@type": "HowToTool", "name": "Any code editor" } ], "totalTime": "PT1H" }
In this article, you will see the following:
What Agno is and what makes it special as an AI agent framework.
Why integrating it with data retrieval tools makes your AI agents significantly more powerful.
How to combine Agno with Bright Data tools to build agents capable of live data retrieval.
Let’s dive in!
What Is Agno?
Agno is an open-source Python framework for building lightweight AI agents and multi-agent systems. It comes with built-in support for memory, knowledge integration, advanced reasoning, and more.
What makes Agno unique are the following aspects:
Model-agnostic : Offers a unified interface to 23+ LLM providers.
High performance : Agents are instantiated in approximately 3 microseconds, using just ~6.5 KiB of memory on average.
Reasoning as a first-class citizen : Emphasizes reasoning to improve agent reliability and handle difficult tasks. It supports three reasoning approaches reasoning models , reasoning tools , and custom chain-of-thought pipelines.
Native multi-modality : Agents can process and generate text, images, audio, and video—out of the box.
Support for multi-agent scenarios : Build collaborative teams of agents with shared memory, context, and coordinated reasoning.
Built-in agentic search : Agents can search over 20+ vector databases at runtime for state-of-the-art agentic RAG workflows .
Integrated memory and session storage : Agents include built-in storage and memory drivers, providing long-term memory and persistent session tracking.
Structured outputs : Returns fully-typed responses.
On top of those, Agno comes with built-in support for over 50 third-party AI tool providers. This means that AI agents built with Agno can easily integrate with some of the best AI solutions on the market.
AI Agents Need Access to Web Data to Be Accurate and Effective
Every AI agent framework inherits key limitations from the LLMs it builds upon. Since most LLMs are pre-trained on static datasets , they lack real-time awareness and cannot reliably access live web content.
This often leads to outdated answers or even hallucinations. To overcome that limitations, agents (and, for extensions, the LLMs they rely on) need access to trusted web data. Why web data specifically? Because the web is the most comprehensive source of information available .
Therefore, an effective way to achieve that is by giving Agno agents the ability to perform live search queries and scrape content from any web page. That is possible via Agno’s Bright Data tools !
Those tools are natively integrated into Agno and provide agents with access to a large suite of AI-ready web data tools . Features include web scraping, SERP data retrieval, screenshot capabilities, and access to data feeds in JSON format from over 40 well-known sites.
How to Integrate Bright Data Scraping Tools into an Agno Agent
In this section, you will learn how to use Agno to build a Python AI agent that can connect to Bright Data tools. These will equip your agent with the ability to scrape data from any page and retrieve up-to-date search engine results.
Follow the steps below to build your Bright Data-powered AI agent in Agno!
Prerequisites
To follow along with this tutorial, make sure you have the following:
Python 3.7 or higher installed locally (the latest version is recommended).
A Bright Data API key.
An API key for a supported LLM provider (here, we will use OpenAI, but any supported provider will work).
Do not worry if you do not have a Bright Data API key yet, as we will guide you through creating one in the next steps.
Step #1: Project Setup
Open a terminal and create a new folder for your Agno AI agent with Bright Data-powered data retrieval:
mkdir agno-bright-data-agent
The
agno-bright-data-agent
folder will contain all the Python code for your AI agent.
Next, navigate to the project folder and create a virtual environment inside it:
cd agno-bright-data-agent
python -m venv venv
Now, open the project folder in your preferred Python IDE. We recommend Visual Studio Code (with the Python extension) or PyCharm Community Edition .
Create a new file named
agent.py
inside the project folder. Your project structure should now look like this:
agno-bright-data-agent/
├── venv/
└── agent.py
Activate the virtual environment in your terminal. In Linux or macOS, execute this command:
source venv/bin/activateEquivalently, on Windows, launch:
venv/Scripts/activateIn the next steps, you will be guided through installing the required dependencies. If you prefer to install everything now, run the following command in the activated virtual environment:
pip install agno python-dotenv openai requests
Note
: We are installing
openai
because this tutorial uses OpenAI as the LLM provider. If you plan to use a different LLM, install the appropriate library for that provider instead.
You are all set! You now have a Python development environment ready to build an AI agent using Agno and Bright Data tools.
Step #2: Set Up Environment Variables Reading
Your Agno agent will interact with third-party services like OpenAI and Bright Data via API integration. To do that securely, you should not hardcode API keys directly into your Python code. Instead, store them as environment variables.
To simplify loading environment variables, take advantage of the
python-dotenv
library. With your virtual environment activated, install it by running:
pip install python-dotenv
Then, in your
agent.py
file, import the library and load the environment variables using
load_dotenv()
:
from dotenv import load_dotenv

load_dotenv()
That function enables your script to read variables from a local
.env
file. Go ahead and create a
.env
file in the root of your project folder:
agno-bright-data-agent/
├── venv/
├── .env # <-------------
└── agent.py
Great! You are now set up to securely manage third-party integration secrets using environment variables.
Step #3: Get Started With Bright Data
As of this writing, the Bright Data tools integrated with Agno provide access to these solutions:
SERP API : An API that delivers real-time search results from all major search engines.
Web Unlocker API : An advanced scraping API that bypasses sophisticated bot protections, giving you access to any web page (in Markdown format, which is optimized for AI usage ).
Web Scraper APIs : Dedicated scraping endpoints for ethically extracting fresh, structured web data from several popular domains.
To integrate the above tools, you need to:
Configure the SERP API and Web Unlocker solutions in your Bright Data account.
Retrieve your Bright Data API token to access these services.
Follow the instructions below to do both!
First, if you do not have a Bright Data account yet, start by creating one . If you already do, log in and open your dashboard:
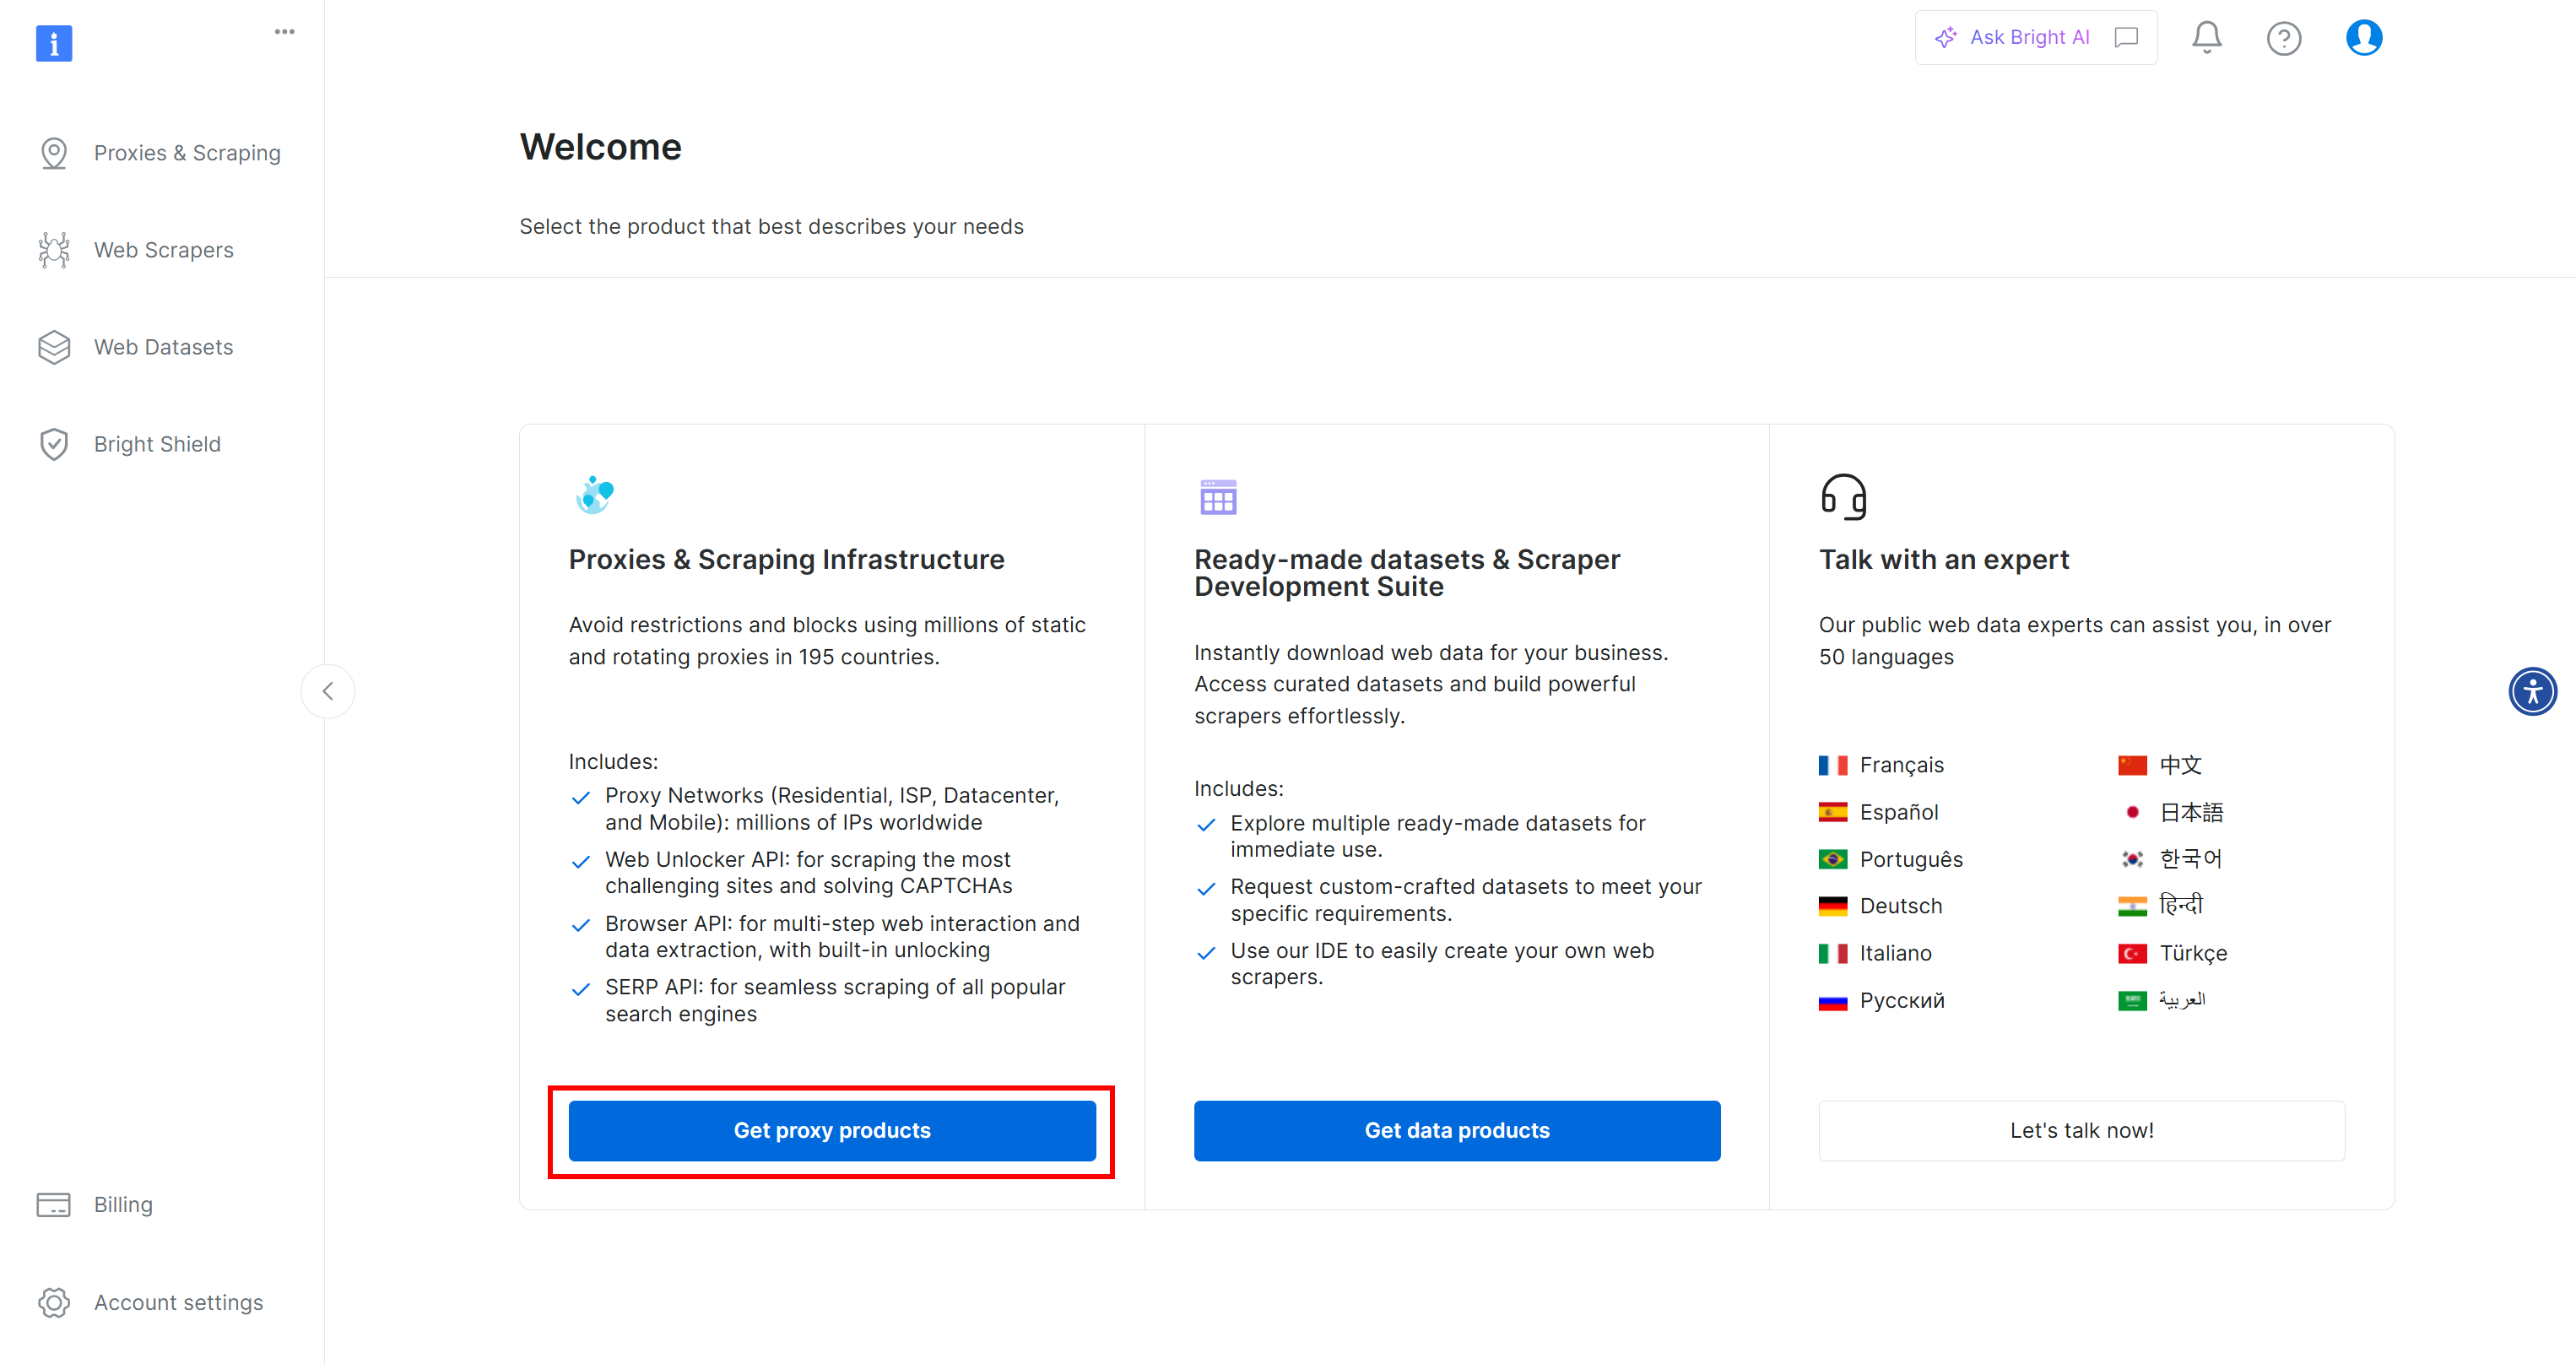
Clicking the “Get proxy products” button in your Bright Data account
Click the “Get proxy products” button, which will lead you to the “Proxies & Scraping Infrastructure” page:
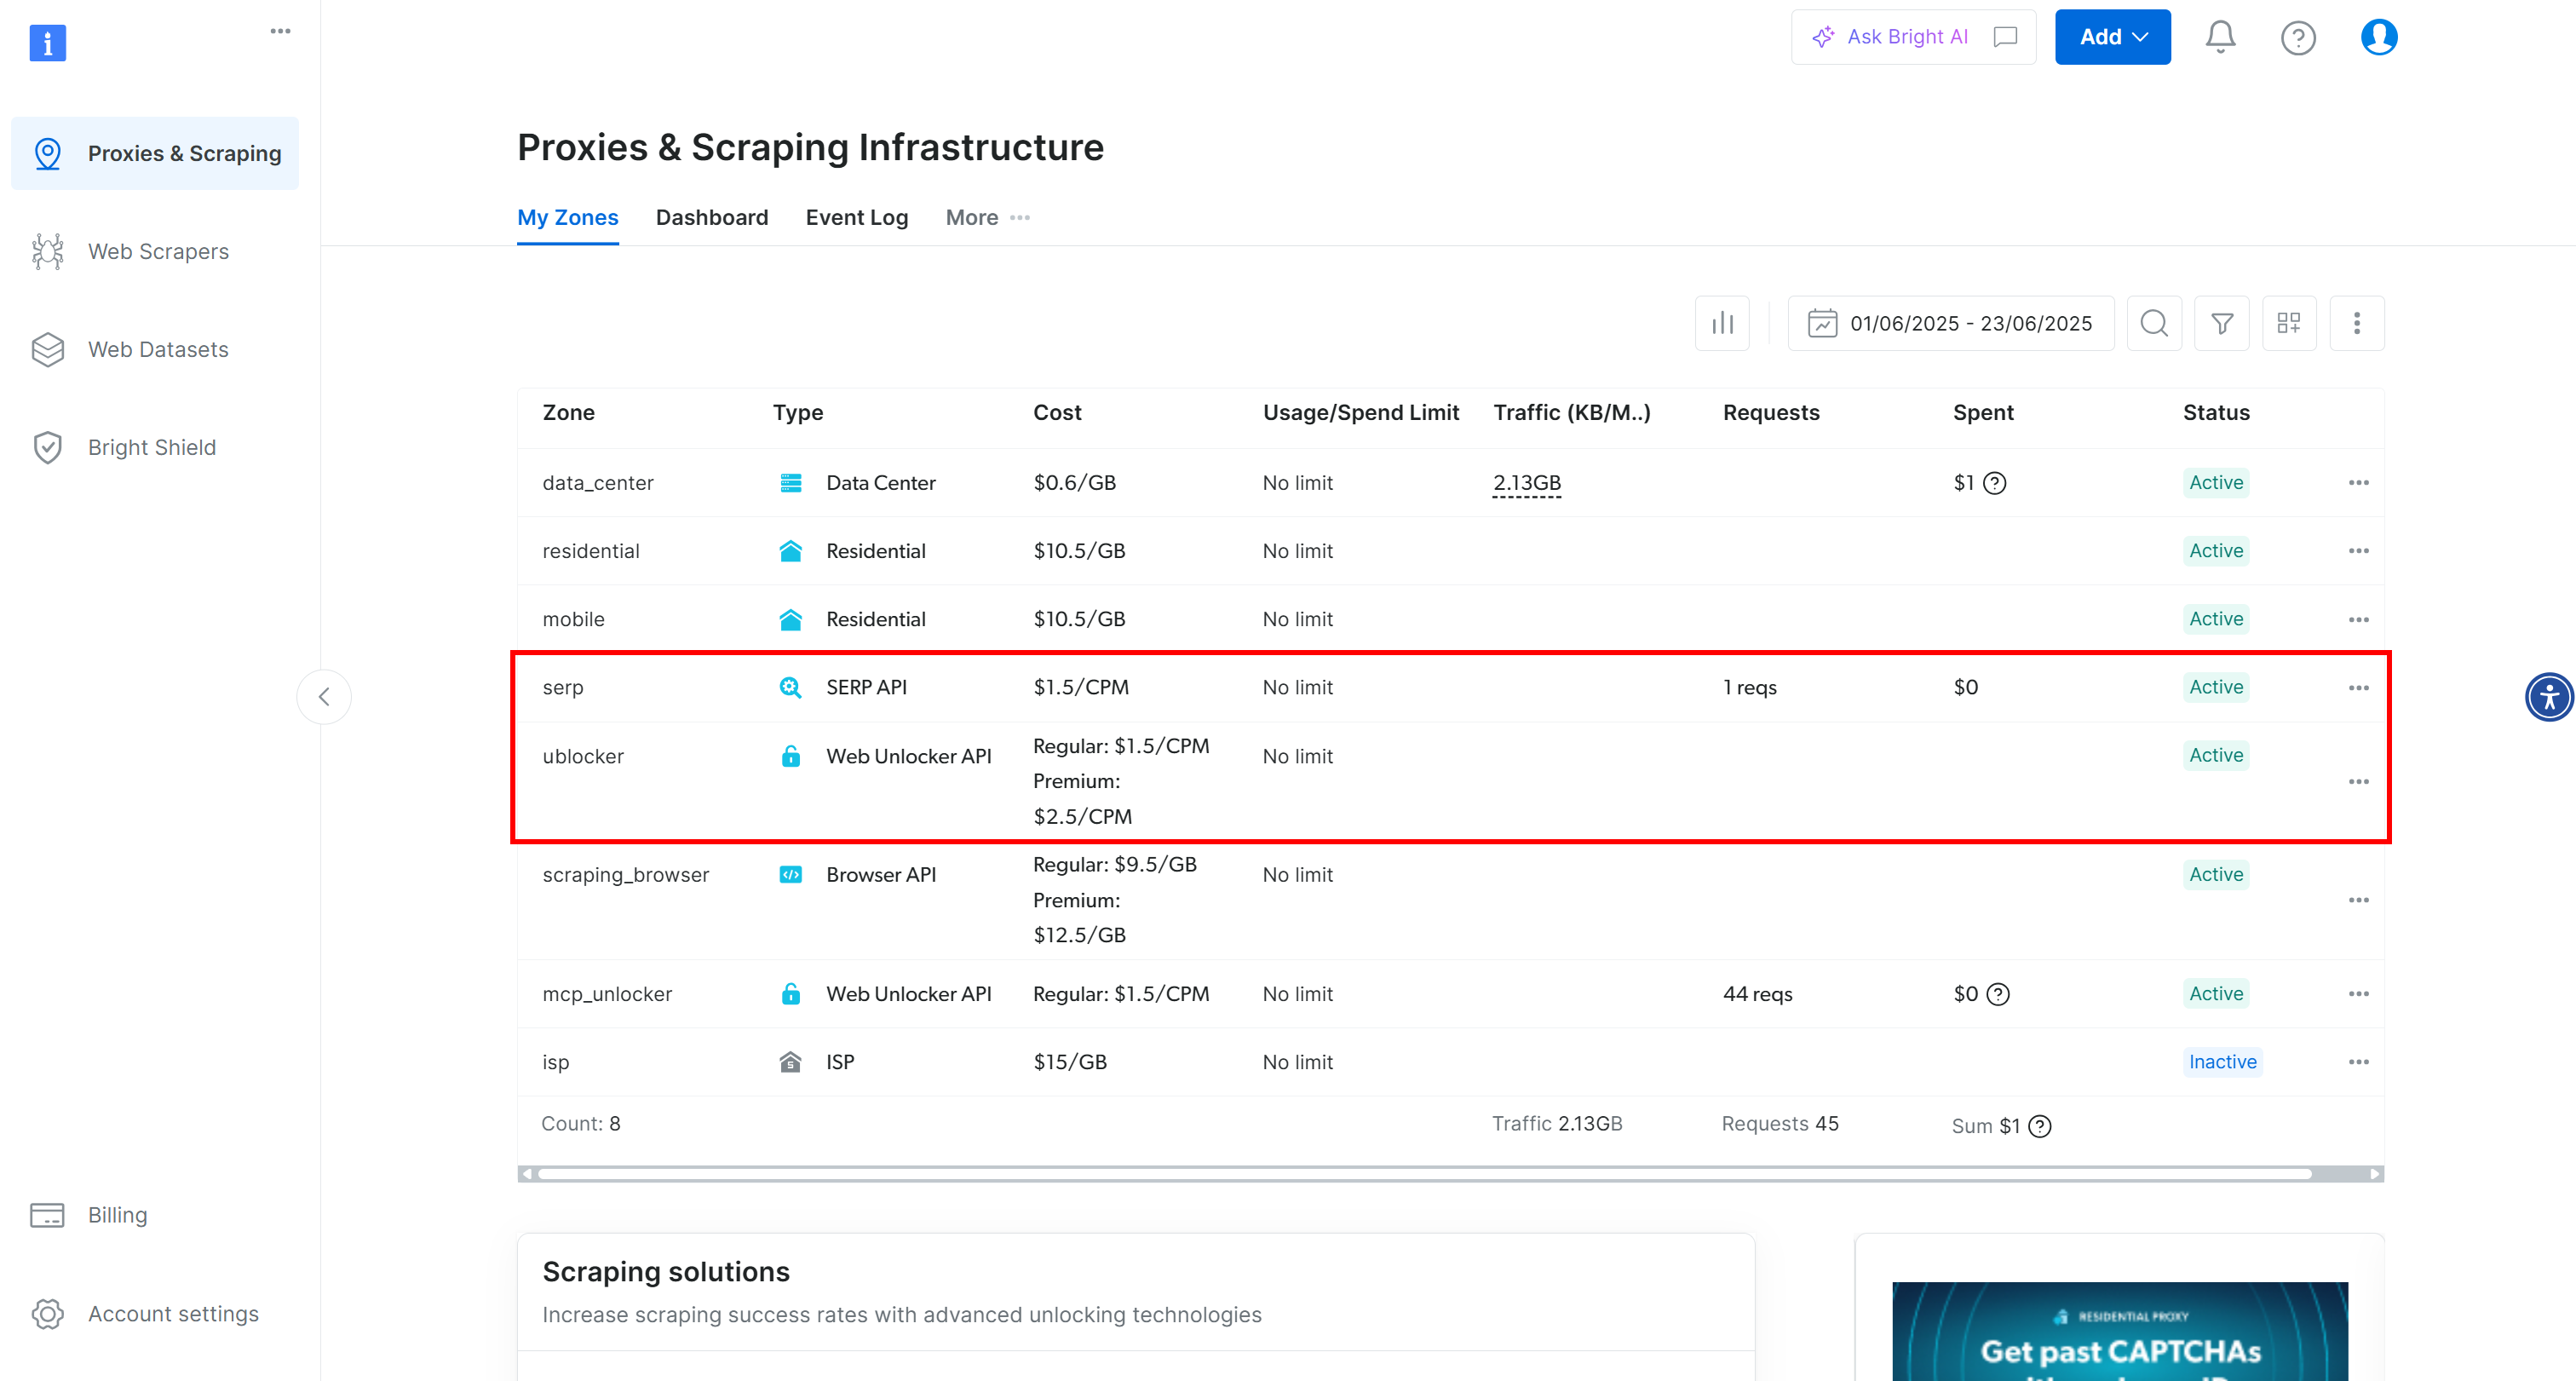
Note the SERP API and Web Unlocker API zones
In this case, you can see that both the SERP API and Web Unlocker API are already activated and ready to use. Their zone names are
serp
and
unblocker
, respectively.
If that is not your case, you need to set them up. We will demonstrate how to create a Web Unlocker API zone, but the process is similar for creating a SERP API zone.
Scroll down and click “Create zone” on the “Web Unlocker API” card:
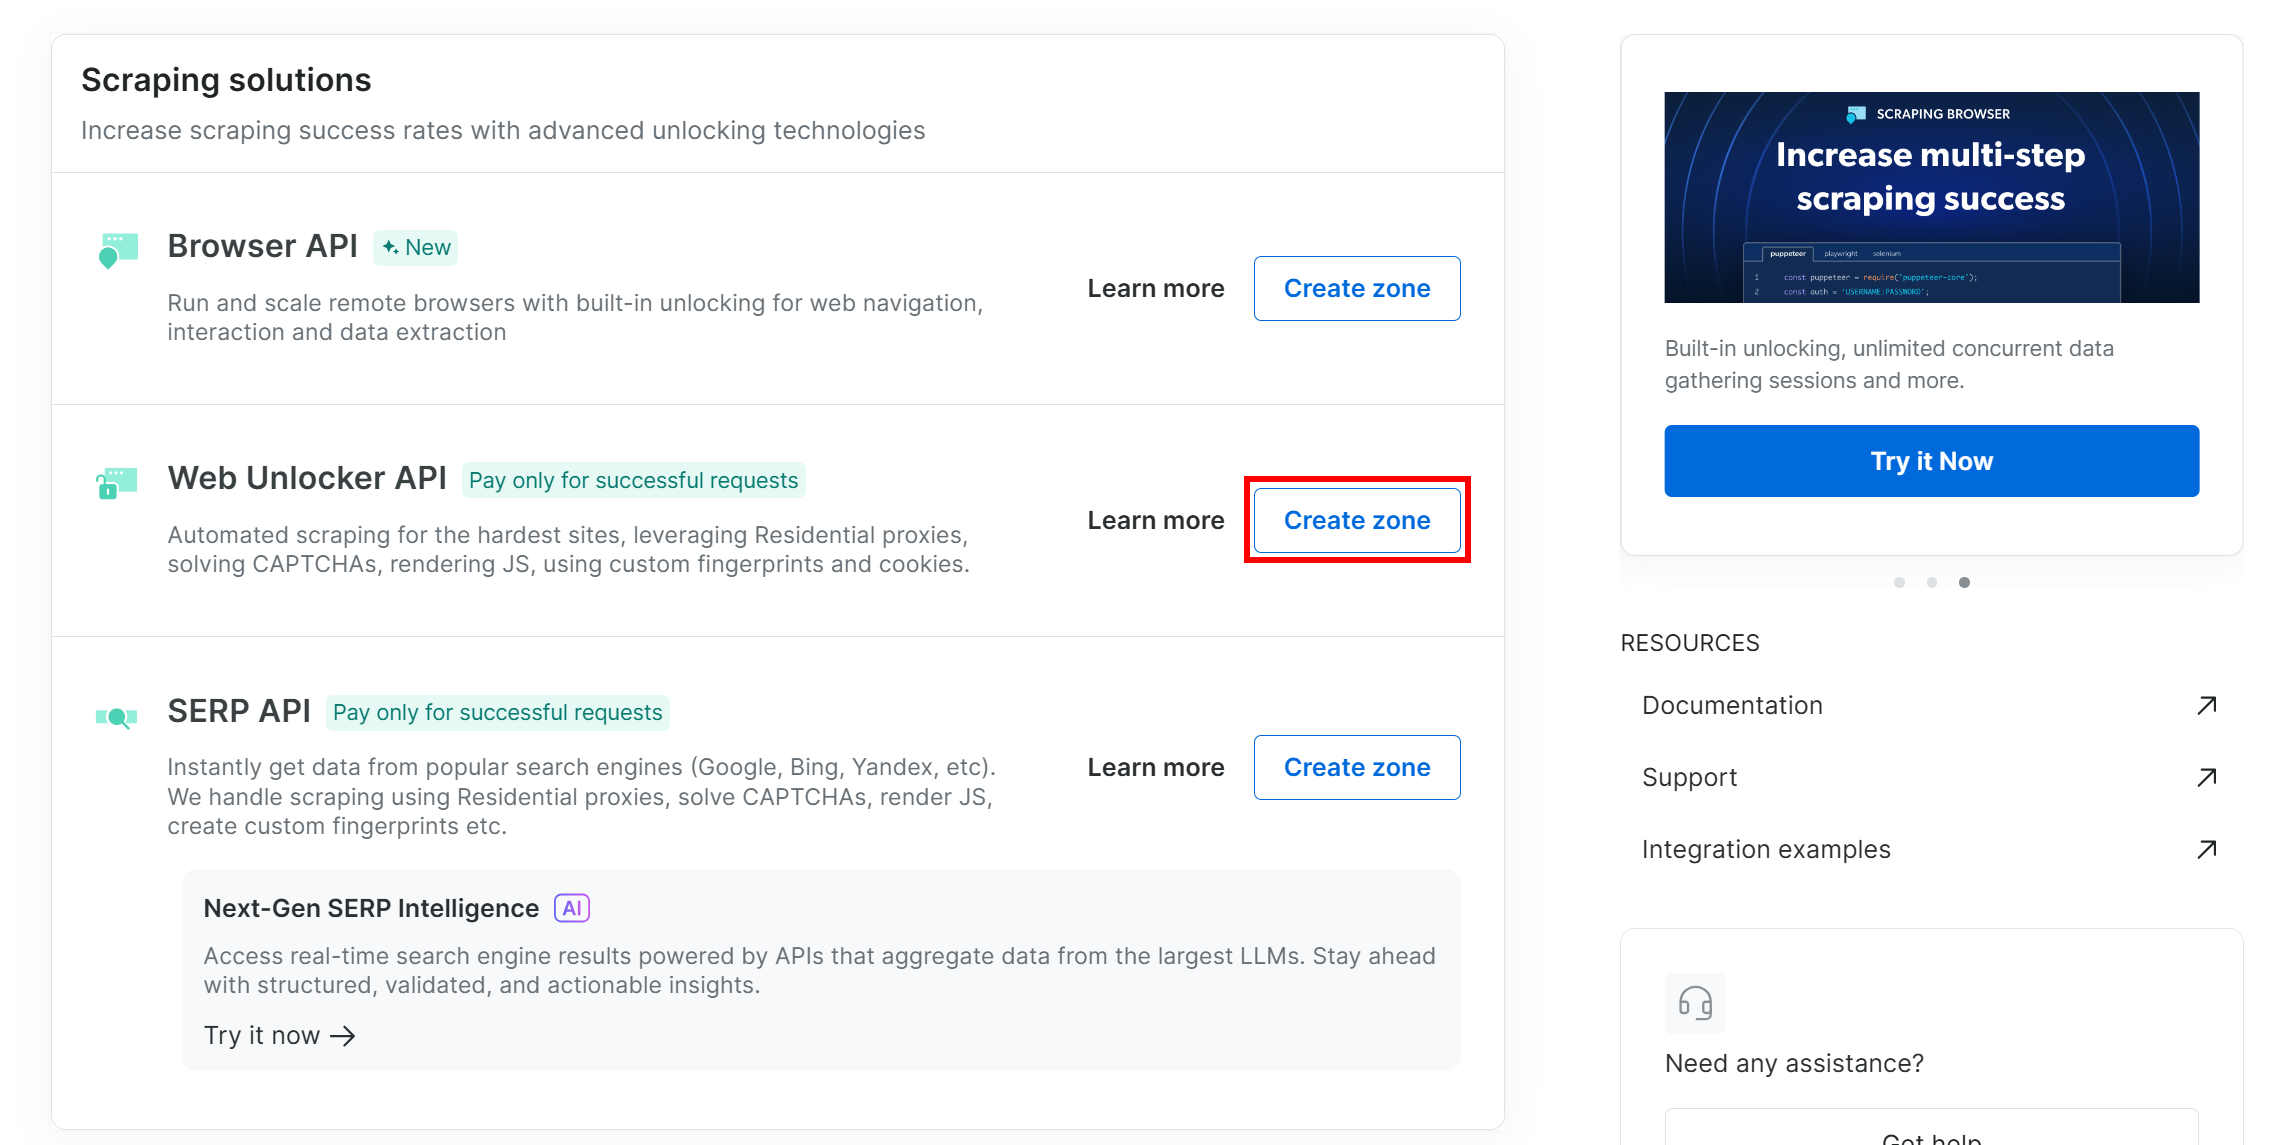
Clicking the “Create zone” on the “Web Unlocker API” card
Give your zone a name (like
unlocker
), enable the advanced features for maximum effectiveness, and press “Add”:
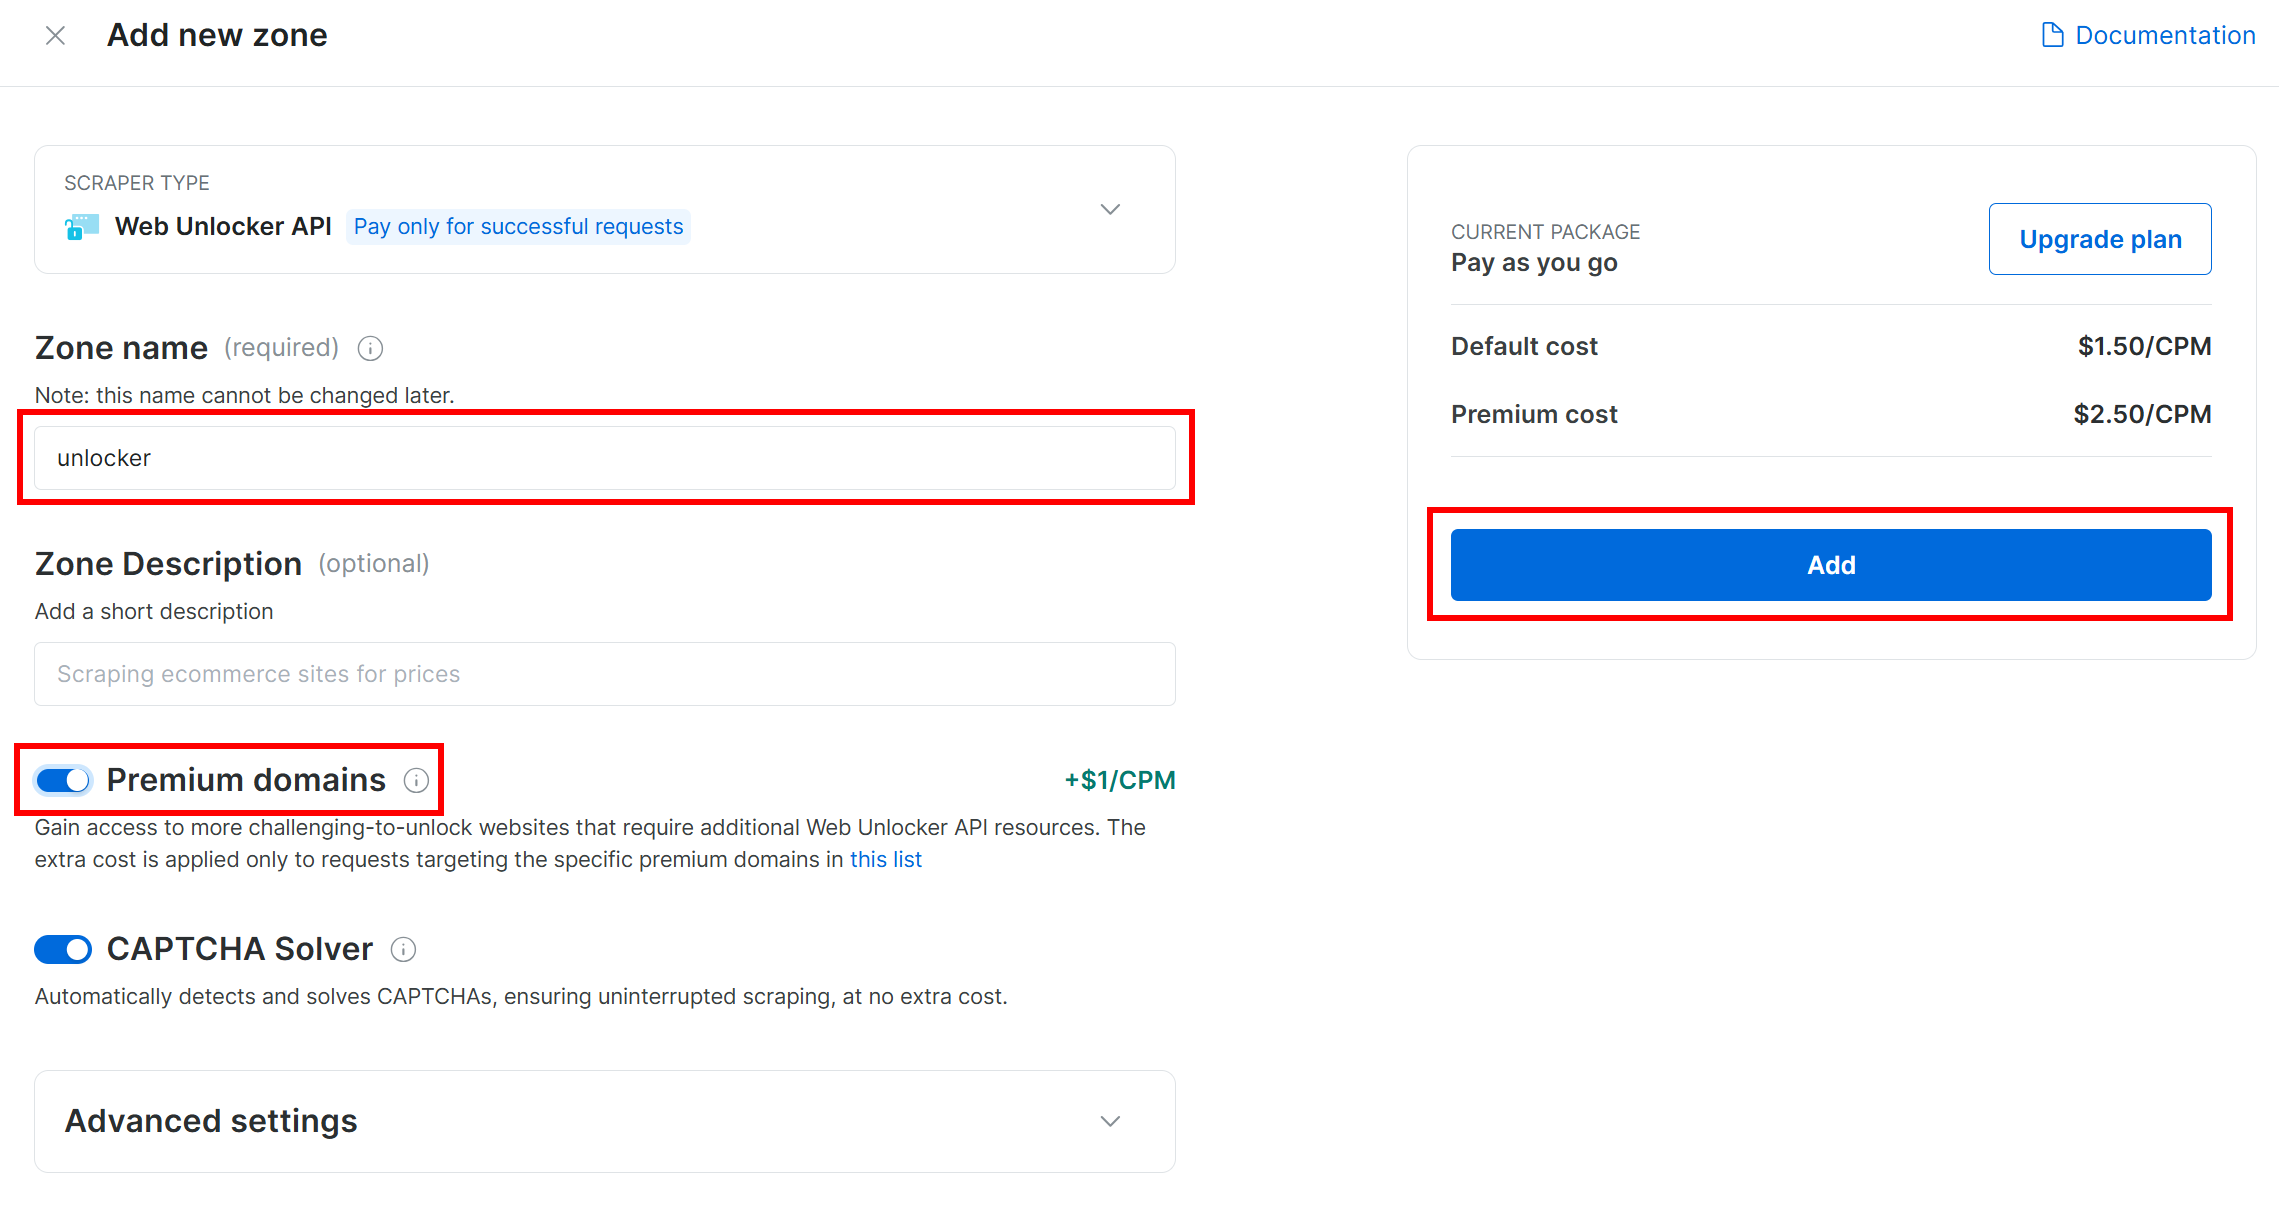
Configuring your new Web Unlocker API zone
You will then be redirected to the zone page, which will look like this:

The “unlocker” Web Unlocker API zone page
Make sure the activation toggle is set to “Active”, as this means your zone is correctly set up and ready to use.
Next, follow the
official Bright Data guide to generate your API key
. Once you have it, add it to your
.env
file like this:
BRIGHT_DATA_API_KEY="<YOUR_BRIGHT_DATA_API_KEY>"
Replace the
<YOUR_BRIGHT_DATA_API_KEY>
placeholder with your actual API key value.
Wonderful! Time to integrate Bright Data tools into your Agno agent script.
Step #4: Install and Configure the Agno Bright Data Tools
In your project folder, with the virtual environment activated, install Agno by running:
pip install agno
Note
: The
agno
package already includes built-in support for Bright Data tools, so no integration-specific packages are required for this setup.
Now, since Bright Data tools rely on the
Python
requests
library
, make sure to install it as well:
pip install requests
In your
agent.py
file, import the Bright Data tools from Agno:
from agno.tools.brightdata import BrightDataToolsThen, initialize the tools this way:
bright_data_tools = BrightDataTools(
    serp_zone="YOUR_SERP_ZONE_NAME",
    web_unlocker_zone="YOUR_UNLOCKER_ZONE_NAME"
)
Replace
"YOUR_SERP_ZONE_NAME"
and
"YOUR_UNLOCKER_ZONE_NAME"
with the names of the Bright Data zones you configured earlier. For example, if your zones are named
serp
and
unlocker
, the code would look like this:
bright_data_tools = BrightDataTools(
    serp_zone="serp",
    web_unlocker_zone="unlocker"
)
Note that you can also skip passing the zone names directly in code. Instead, use the following environment variables in your
.env
file:
BRIGHT_DATA_WEB_UNLOCKER_ZONE="<YOUR_BRIGHT_DATA_WEB_UNLOCKER_ZONE>"
BRIGHT_DATA_SERP_ZONE="<YOUR_BRIGHT_DATA_SERP_ZONE>"
Replace the placeholders with the actual names of your Bright Data zones. Then, remove the
serp_zone
and
web_unlocker_zone
arguments in
BrightDataTools
,
Note
: To connect to the Bright Data solutions,
BrightDataTools
relies on the
BRIGHT_DATA_API_KEY
environment variable. Specifically, it expects the
BRIGHT_DATA_API_KEY
env to contain your Bright Data API key. That is why we added it to the
.env
file in the previous step.
Amazing! That next integration is that with the LLM.
Step #5: Set Up the LLM Model
To connect to OpenAI—the LLM provider used in this tutorial—start by installing the required
openai
dependency:
pip install openaiThen, import the OpenAI integration class from Agno:
from agno.models.openai import OpenAIChatNow, initialize your LLM model as below:
llm_model = OpenAIChat(id="gpt-4o-mini")
Above,
"gpt-4o-mini"
is the name of the OpenAI model used in this guide. You can change that to any other supported OpenAI model if needed.
Behind the scenes, OpenAIChat expects your OpenAI API key to be defined in an environment variable named
OPENAI_API_KEY
. To set it up, add the following line to your
.env
file:
OPENAI_API_KEY="<YOUR_OPENAI_API_KEY>"
Replace the
<YOUR_OPENAI_API_KEY>
placeholder with your actual
OpenAI API key
.
Note : If you prefer connect to a different LLM supported by Agno, refer to the official documentation for instructions .
Well done! You now have all the building blocks in place to build an Agno agent with web data retrieval capabilities.
Step #6: Create the Agent
In your
agent.py
file, define your agent:
agent = Agent(
    tools=[bright_data_tools],
    show_tool_calls=True,
    model=llm_model,
)
This creates an Agno agent that uses the configured LLM model to process user input and has access to the Bright Data tools for data retrieval. The
show_tool_calls=True
option is helpful for understanding what is going on, as it displays which tools the agent is using to handle the request.
Do not forget to import the
Agent
class from Agno:
from agno.agent import AgentFantastic! The Agno + Bright Data integration is complete. All that is left is to send a query to your agent and see it in action.
Step #7: Query the Agent Powered by Bright Data Tools
You can now interact with your Agno AI agent using the following two lines of code:
prompt = "Search for AAPL news"
agent.print_response(prompt, markdown=True)
The first line defines the prompt, which describes the task or question you want your agent to handle. The second one, execute it and print its output.
The
markdown=True
option ensures the response is formatted in Markdown, which is ideal for readable, AI-friendly output.
Note : You can try any prompt you like, but “Search for AAPL news” is a great starting point to test the SERP data retrieval functionality.
Step #8: Put It All Together
This should be the final code of your
agent.py
file:
from dotenv import load_dotenv
from agno.tools.brightdata import BrightDataTools
from agno.models.openai import OpenAIChat
from agno.agent import Agent

# Load the environment variables from the .env file
load_dotenv()

# Configure the Bright Data tools for Agno integration
bright_data_tools = BrightDataTools(
    serp_zone="serp", # Replace with your SERP API zone name
    web_unlocker_zone="unlocker" # Replace with your Web Unlocker API zone name
)

# The LLM that will be used by the AI agent
llm_model = OpenAIChat(id="gpt-4o-mini")

# The definition of your Agno agent, with Bright Data tools
agent = Agent(
    tools=[bright_data_tools],
    show_tool_calls=True, # Useful for understanding what happens behind the scenes
    model=llm_model,
)

# Run a task in the AI agent
prompt = "Search for AAPL news"
agent.print_response(prompt, markdown=True)
In under 30 lines of code, you just built an AI agent that can scrape data from any web page and perform real-time searches across major search engines. That is the power of Agno as a full-stack framework for building AI agents!
Step #9: Run Your Agno Agent
It is time to run your Agno AI agent in action. In your terminal, launch it with:
python agent.pyYou will see an animated output in the terminal, showing that the agent is processing the “Search for AAPL news” prompt. Once completed, the agent will produce a result like this:
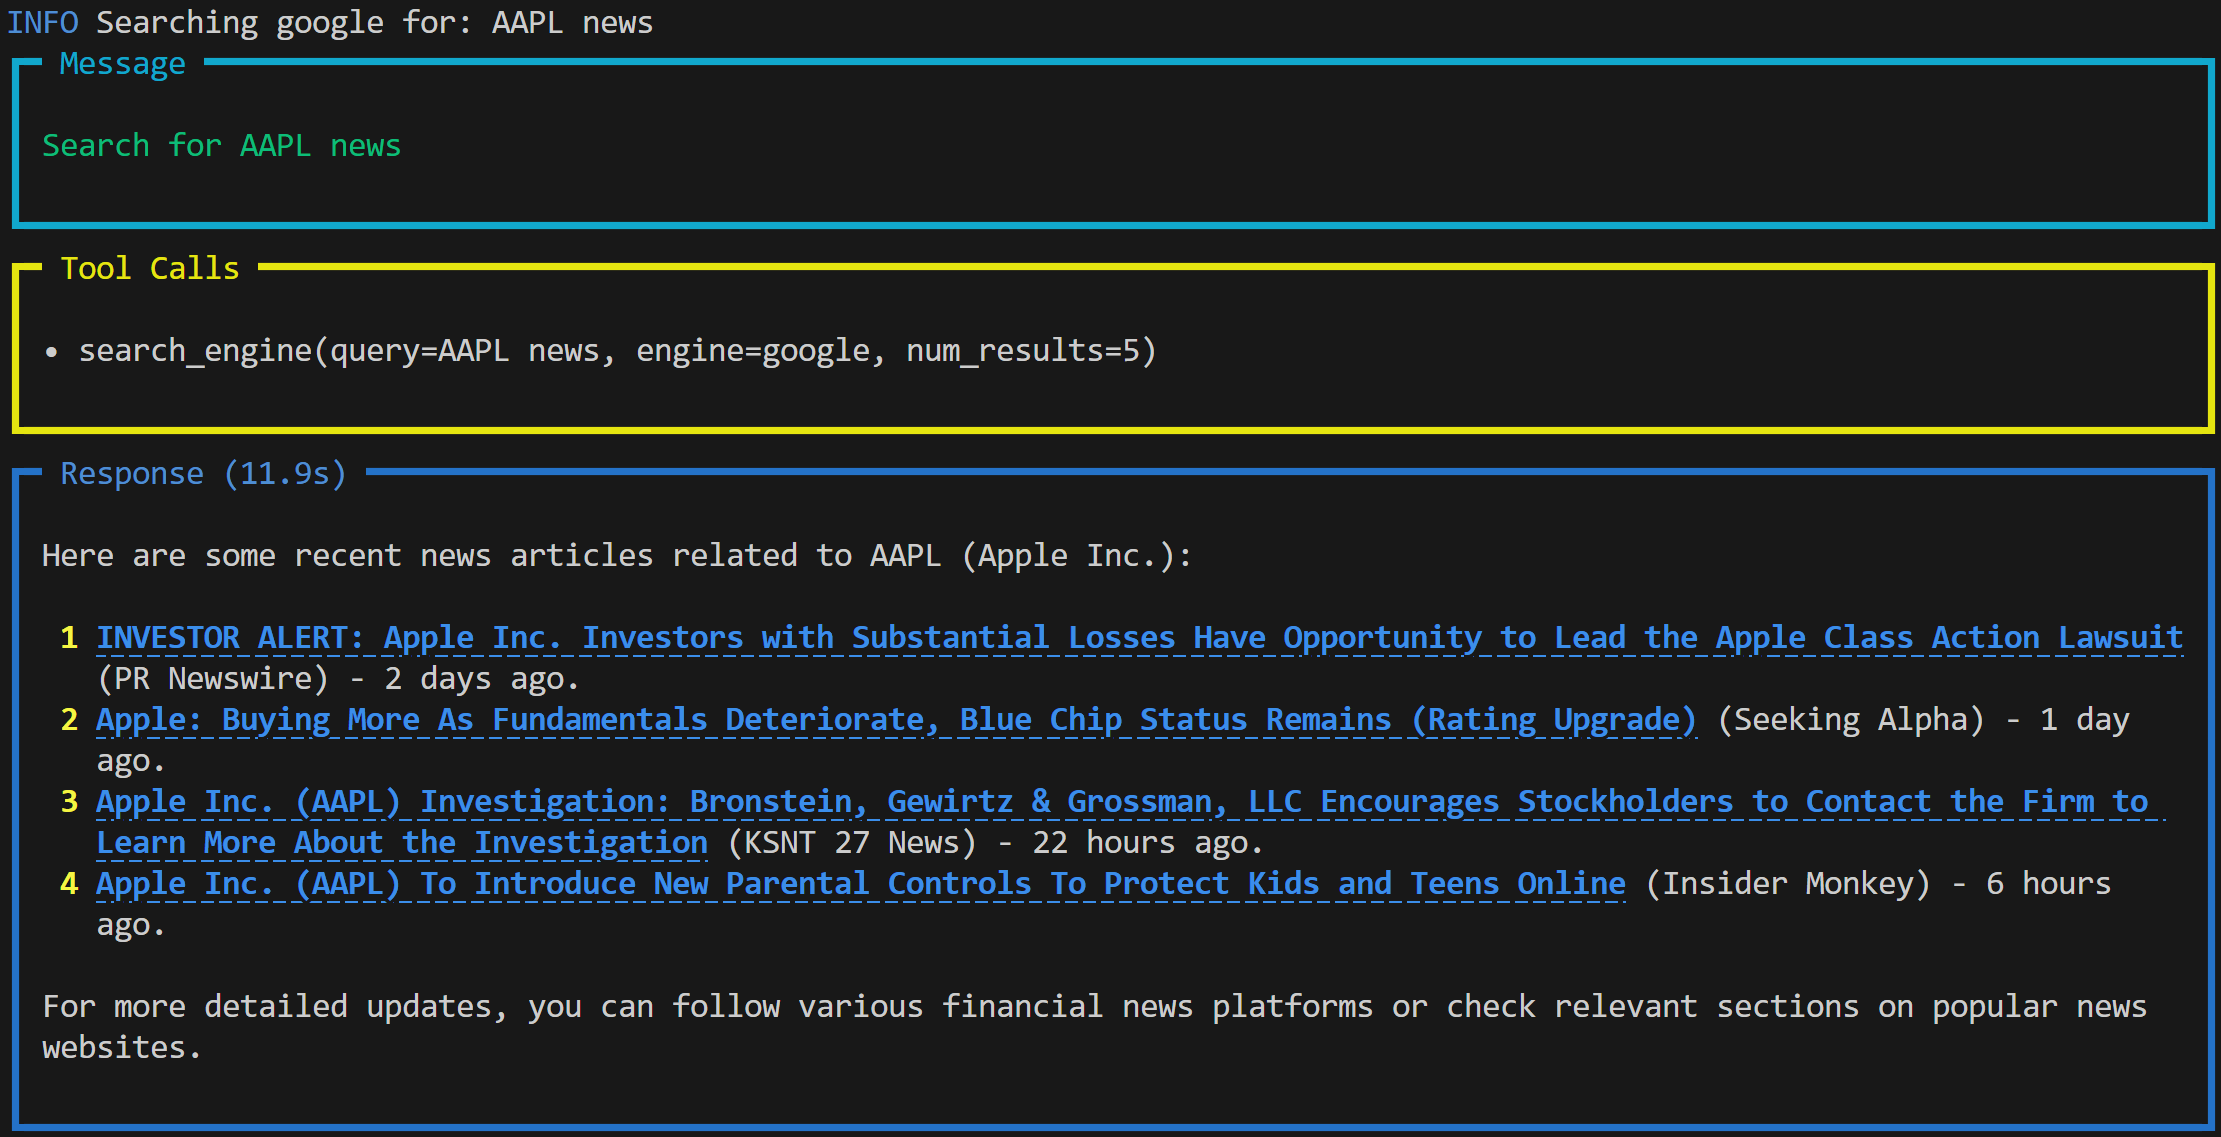
The Agno agent output on the "Search for AAPL news” prompt
The output includes:
The prompt you submitted.
The tool the agent used to complete the task. In this case, it used the
search_engine()
function from the Bright Data tools to access Google via the SERP API and retrieve real-time news about the AAPL stock.
A Markdown-formatted response generated by the OpenAI model based on the data retrieved.
Note : The result contains live news content with clickable links, thanks to Markdown formatting. Also, some of the news pieces are very fresh and were published only a few hours before running the prompt.
Now, let’s take it a step further. Suppose you want a summary of one of the retrieved news articles. You can simply update the prompt:
prompt = """
Give me a summary of the following news in around 150 words.

NEWS URL:
https://www.msn.com/en-us/money/other/apple-inc-aapl-to-introduce-new-parental-controls-to-protect-kids-and-teens-online/ar-AA1HdVd6
"""
agent.print_response(prompt, markdown=True)
This time, the output will look something like this:

The output for the news summarization task
In this case, the agent used a different tool:
scrape_as_markdown()
, which connects to the Web Unlocker API. This tool fetches the content of the web page in Markdown format and passes it to the LLM for summarization.
Et voilà! You just experienced seamless data retrieval and processing in your AI agent, powered by Bright Data tools and Agno.
Next Steps
The AI agent you built with Agno in this tutorial is just a starting point. In detail, we only scratched the surface of what is possible. To take your project further, consider the following next steps:
Add a knowledge store : Improve your agent by retrieving web data using Bright Data tools and storing it in Agno’s built-in vector database. This enables long-term memory and supports agentic RAG .
Enable Agent memory and reasoning : Equip your agent with memory and multi-step reasoning so it can learn, reflect, and make informed decisions. This allows to implement advanced patterns, such as the popular ReAct (Reasoning + Acting) agent architecture .
Build a UI for simplified interaction : Add a user interface to offer a ChatGPT-like experience, opening the door to more natural conversations with your AI agent.
For more ideas and advanced integrations, take a look at the official Agno documentation .
Conclusion
In this article, you learned how to use Agno to build an AI agent with real-time data retrieval capabilities using Bright Data tools. This integration allows your agent to access public web content from both websites and search engines.
Do not forget that what you saw here is just a simple example. If you are looking to build more advanced agents, you will need solutions for retrieving, validating, and transforming live web data. That is precisely what you can find in Bright Data’s AI infrastructure .
Create a free Bright Data account and start experimenting with our AI-ready data tools!